

 Reply With Quote
do not know why you need stainless
all i use is lamp rod ,cheap at any hardware store
just cut to lenght
drybean

I am looking for any kits, tips, or tricks for pillar bedding a Boyds thumbhole stock with a 4.4 stainless action. I would like the pillars to be stainless to match my action and want to know the best method for drilling and installing them. I will also be bedding the action after it is pillar bedded, but could only find the pillars sold on stockys website (they arent stainless) Any advice regarding the best pillars or pillar kits as well as the best installation instructions would be much appreciated. I know there used to be articles for this on the old site, but I cant find them anymore.
Last edited by Johndenverut; 07-17-2012 at 08:54 PM.


do not know why you need stainless
all i use is lamp rod ,cheap at any hardware store
just cut to lenght
drybean
I use the Savage Extra Pillar Sets for a Savage sold by pakratinator on Ebay. They are alumminum and the rear pillar is already nothched for the Savage. I put 1 to 2 wraps of painters tape around the stock screws to center in pillars and cover with kwiki netural shoe polish and then attach the pillars to the action. Drill slightly oversized holes for the pillars to depth in your stock. You can access the screws heads from below through the small stock holes for clean-up and removal after bedding the pillars in the stock. I use Devcon Plastic Steel Epoxy purchased at the local hardware store and kwiki shoe polish for release agent. Less mess and easier clean up when done. You want to put tape or a couple of business cards under the barrel and tang so they are free floated in the stock when you bed the pillars in place. Make sure everything fits just right before you do any bedding. First pass I just bed the pillars attached to the action for proper placement and depth. You need to set the pillars attached to the action into the bedding compound. Tape action to stock for stress free job after making sure the barrel, tang are free floated and the action is level and everything is centered in the stock. After bedding the pillars, I come back and bed the action and recoil lug.
Last edited by jpdown; 07-17-2012 at 09:56 PM.
Are there any good arguments in favor of steel pillars vs aluminum...or vice-versa? Assuming that the difference in material strength is irrelevant for this purpose, the only meaningful advantage of one over the other that I can think of is the fact that the aluminum won't rust.
Am I missing anything?
Here's a link to the "stress free bedding" article. The author suggests bedding the action and pillars as one unit to eliminate stress. He also is a proponent of flat top pillars with the bedding material providing the support on the sides of the pillars. The article show a Remington, but it works just as well on a Savage.Originally Posted by Johndenverut

http://www.6mmbr.com/pillarbedding.html
Good question. If it is just an asthetics thing I will ignore the stainless look for a better bedding job.
Thanks. Every once in a great while I slip up and ask something that isn't completely stupid. I do try to keep that to a minimum though.
Actually, I don't even know of any stainless pillars specifically for Savage models, and was thinking of the steel ones from Stocky's:
Those are the same ones I am debating over.
So.....nothing on this?
Actually, the pillars are just spacers to set the barreled action at the right level. The bedding of the recoil lug is SUPPOSED to be the impact resistance and strength. So, AL or SS? Al is easiest to work with, and readily available fomr vendors. I use a 1/2" front, and a 3/8" rear.
Bed all at once after you have done all the prep work for best fit all around. Follow tutorial.
Larry
Understood. But I wasn't referring to recoil. I was talking about resistance to compression, which is why I was assuming that the difference in material strength wasn't an issue in this case.
Interesting. Why makes aluminum pillars easier to work with than steel ones? The possibility of having to trim or otherwise cut into them?So, AL or SS? Al is easiest to work with, and readily available fomr vendors. I use a 1/2" front, and a 3/8" rear.
Just a guess here, but my thought is that bedding (either with or without pillars) gets the action aligned and seated stress-free at the right level and angle.
The recoil lug is supposed to take the recoil stress.
The other (main) purpose of the pillars is to have a relatively non-compressible metal-to-metal contact from the action screw head to the action so that one can accurately torque the action and have that torque (which, indirectly, is a measure of the amount the bolt is "stretching") remain constant. No fluctuations due to change in compressibility of flexible plastic or wood swelling or shrinking.
Considering the low torque values used on to fasten a Savage action to a stock, I believe the difference in compressibility of the aluminum or steel pillar is so small as to be insignificant.
...But now I have peaked my interest so let me stop guessing and find some facts:
Doing a little research, I find that for any material, "Bulk Modulus of Elasticity is the ratio of stress to change in volume of a material subjected to axial loading."
In other words, "the bulk modulus of a substance measures the substance's resistance to uniform compression. It is defined as the ratio of the infinitesimal pressure increase to the resulting relative decrease of the volume."
For various alloys of Aluminum, this measurement is in the range of 9.9 - 10.2 x10⁶ pounds per square inch. ( 9,900,000 PSI to 10,200,000 PSI)
For various steels, the Bulk Modulus of Elasticity is as follows:
Stainless Steels 18-8 23.6 x10⁶ pounds per square inch Steel, cast 20.2 x10⁶ pounds per square inch Steel, cold rolled 23.1 x10⁶ pounds per square inch Steel, various 22.6 - 24.0 x10⁶ pounds per square inch
Conclusion: So, even though Aluminum is roughly twice as compressible as steel, if you are compressing the aluminum pillars in your rifle stock by applying Ten Million pounds per square inch of force, (give or take a few pounds) I would gently suggest that you are likely tightening your action screws just a tad bit too much or your torque wrench is slightly out of calibration.
(If I have made any egregious mistakes I would hope that someone with more/better knowledge of metallurgy will step up and correct me.)
ref: http://www.engineeringtoolbox.com/bulk-modulus-metals-d_1351.html
http://en.wikipedia.org/wiki/Bulk_modulus
Last edited by thomae; 07-20-2012 at 10:03 AM.
Excellent post thomae. Thanks!
And, try as I might...I just can't seem to torque my action screws to anything even remotely approaching 10 million ft/lbs. I guess I'm just not the manly-man I thought I was.

This thread seems to be along the lines of what I'm trying to do. So when drilling the holes for the pillars just go about halfway down through the stock and then cut the pillars to the correct height? Or is there a more proper technique to do this?
Also any tips for drilling out the rear hole? It seems since its on an angle the drill bit will want to walk around slightly.
If I was going to fret i would be more concerned with dissimilar metal contact especially if humid or in rainy weather. Look at a galvanic chart, look at the metallurgy of the action vs. the pillar material. The further apart the 2metals are on the chart the more corrosive/ reactive they are together.
In reality neither metal should be an big problem. To me i would stay away from the contoured pillars and go with flat ended at all cost.
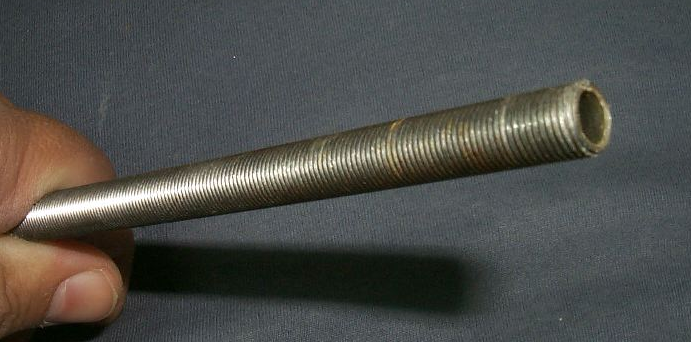
Lamprod and some Devcon 2-ton epoxy (or the epoxy of your choice) are all the raw materials needed to do a great pillar job.
It's got nice threads on the outside to give the epoxy plenty of grip.
You can cut it to length and notch it to clear the sear with either a Dremel or a hacksaw.
Has anyone here used a pilot drill bit of any kind to enlarge their stock's action screw holes for pillars? If so, how well did it work? Since I'm not likely to do my own bedding job on more than one or two rifles I just can't justify the cost of a jig just for that task.
Exactly what I'd like to know. I want to drill mine but no idea how to do it correctly
Also for the lamprod, there seems to be a large space between the inner diameter of the rod and the outer diameter of the action screws. Do you just torque it down and leave it or do you use something to keep the screws centered even after the? bedding is complete?
if i'm correct the recoil lug will help everything get centered providing the pillars aren't off too much! hopefully someone more experienced than myself will let you know. do know you don't want the action screws touching the inside of the pillars!! that is what i have read!
Before the latest forum software change I had an article about installing pillars in a Boyds stock on the main page. It's gone now so I will hit the high points.
I just realized that nobody has mentioned a very important step for some pillar jobs.
Buy a metal trigger guard (if your rifle has a plastic one) before you put pillars in the stock.
Torquing an action down to a pillar with a plastic trigger guard between the screw head and the pillar is a waste of effort.
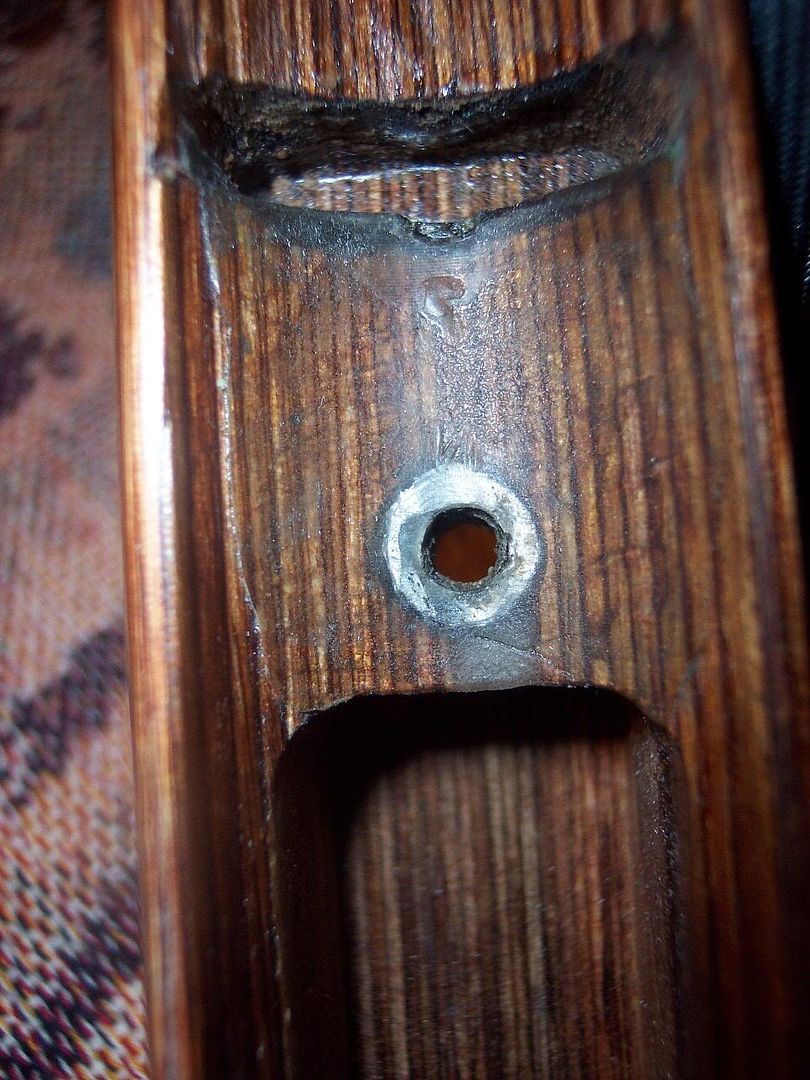
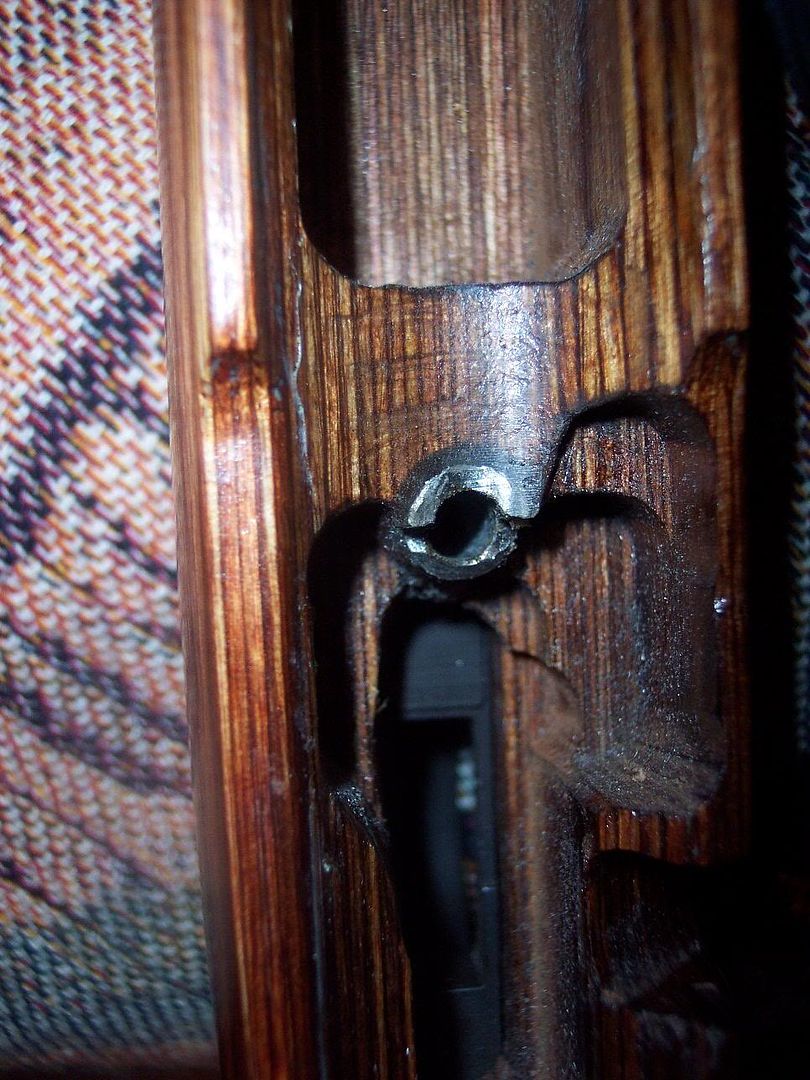
For installing the pillars I just used the next size up drill bit from the diameter of the lamp-rod to widen the holes in the stock and used a hand drill.
I wrap some tape around the action screws to center them in the pillars while the epoxy is setting once everything is cured I remove the tape and the screws are centered in the lamp-rod pillars.
Bedding the action can be done at the same time as installing the pillars and the proper seating of the recoil lug will keep the spacing correct for the action screws.
It's hard to see because the epoxy I used dries clear but the rear of the recoil lug is bedded with epoxy.
Remember the pillars are only supposed to keep the stock from compressing when installing the action. All rearward force should be transferred to the stock by the recoil lug.
So its the recoil lug that basically indexes the action in the stock and the points of contact should be the lug, the pillars to the action and the bedding around them?
Thanks for reproducing a very useful post, cgeorgemo...especially the bit about getting a metal trigger guard. I would have thought about that, but probably not until I started to torque the screws down. I do have a question about the following though:
For installing the pillars I just used the next size up drill bit from the diameter of the lamp-rod to widen the holes in the stock and used a hand drill
Without a jig, a pilot bit or a drill press, how in the world do you ensure that you're drilling straight and perfectly on-center with the existing holes?
Last edited by WuzYoungOnceToo; 08-12-2012 at 11:18 PM.
Truthfully I don't let it bother me at all if I'm not 100% centered with the holes.
The way I see it is this. I'm making the hole bigger than the pillar. I'm going to fill in the void with epoxy. If I'm off a little in any direction it will have slightly more epoxy on that side than the others.
To me these are the keys to a good pillar install/bedding job.
#1 Get the screws centered in the pillars with some tape around the screw so that it just fits inside the pillar. The tricky part here is remembering to get the body of the screw through the trigger guard before applying the tape.
#2 Apply release agent to both the action and the screws. Be sure to get the threads as well as the tape centering the screws. Don't forget to also get the trigger guard coated. I use Turtle Wax for my release agent...
#3 Mask off the stock all around the openings so the epoxy that oozes out doesn't screw up your finish. If you don't have a little epoxy oozing out you probably didn't use enough. I use painters tape for masking off the stock.
#4 Get the tang floated with a double layer of vinyl (electrical) tape and the barrel floated with the same. I put the tape on the barrel about 1" in front of the barrel nut and right at the end of the stock. For the tang I remove the trigger and safety and just wrap it around the tang.
#5 Apply your bebding epoxy from the bolt handle cutout forward to the back of the recoil lug. Fiddle with the positioning of the action until it's exactly where you want it in the stock and then tape it down to the stock until it cures. This is where you ensure that you don't can't the action one way or the other. I like to use my scope bases to place a level against while fiddling.
#6 Support the rifle in a horizontal position until it's completely cured. I use my rear bag and front rest for this.
Once it's good and cured unscrew the action remove it and clean up all the epoxy oozes, masking tape, electrical tape and release agent.
If you've got a center-feed blind mag stock now you get to install the magazine in the well of the stock. I only have stagger-feed stocks so I've not done this I just pop them off for bedding and then pop them back on for assembly.
Last edited by cgeorgemo; 08-14-2012 at 01:22 AM.
Yep if it touches anywhere else you've screwed up.
The number one screw up I remember from reading on here is bedding a Savage all the way back to the tang like you do on a rifle with a action screw that far to the rear.
I think I understand everything but this. I thought the tang height needed to be set by the original stock wood, and not changed. When you talk about floating the tang with layers of tape (or someone else said a business card) - how does this work when finally assembled? Don't you either have to stress the action by pulling the tang down with the action screw (if that's even possible when the screw is so far forward of the tang), or you have a big gap in the tang-stock fit?#4 Get the tang floated with a double layer of vinyl (electrical) tape and the barrel floated with the same. I put the tape on the barrel about 1" in front of the barrel nut and right at the end of the stock. For the tang I remove the trigger and safety and just wrap it around the tang.
KeS
 Members who have read this thread in the last 1 days: 0
Posting Permissions
Members who have read this thread in the last 1 days: 0
Posting Permissions

Bookmarks