

 Reply With Quote
I dont want to drill it out, its pretty wide and the hole will be even bigger then. I want to shave it down even with the bottom of the pocket. Right now, all the Lee tool is doing is highlighting the ridge.Originally Posted by charlie b


I'd probably just use a small dia drill bit, turned by hand. Would work like a countersink. Go just enough to remove the burr. Even better would be a small center drill.
I dont want to drill it out, its pretty wide and the hole will be even bigger then. I want to shave it down even with the bottom of the pocket. Right now, all the Lee tool is doing is highlighting the ridge.
Don't know about a reamer but the RCBS Primer Pocket Uniformer should do it.

How about clamping a 1/4" pin-punch or steel rod in a vice, setting the case over it, and and (lightly) tapping the ring flush with a 1/8" pin-punch. That will also bring you back closer to a small vent (you may need a small drill-bit in a pin vice to even them up to the proper diameter).
"They couldn't hit an elephant at this distance." Last words of Gen. Sedgwik
^^this might even be better as you can even up your flash holes.
Sorry, not enough info on the other. Use the center drill like a deburr tool. Just twist it until the flashing is gone.
Drill a couple out, load them up to shoot. Load an equal number of undamaged cases. Shoot them and see if You can see a difference on target.
This is a good option but I dont remember the drill diameter. I think it is .062. Works great on large primer brass. The included angle is 120 or 60 degrees per side. The tapered collar sets the amount of chamfer, or length from the mouth to the flashole.
The Dunning-Kruger effect is alive and well.
That's perfect. And that cool little bushing thing on it too!
Now you got me. Another tool I can buy :)
I have one of those and it is bigger than the flash hole in Lapua SRP 6.5 CM brass, its even bigger than the hole my Lee F/L sizing die made. I bought the Lyman pocket uniformer to see if that would shave off that ring around the flash hole.
Good choice. The Benchrite is another good one.
The Dunning-Kruger effect is alive and well.

K&M is good stuff too, have had them for over 30yrs.
I'll keep those in mind. I'm sure going to pay attention when I start using the next 200 cases. I learn something every time I reload.
Well, that didn't work.
Either the bottom of the cutter is not designed to cut or the shoulder keeps it from contacting the bottom of the primer pocket. Either way, it didn't do anything to the ring.
This might be the next attempt to fix the problem.
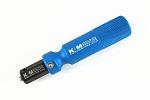
That tool is for reaming the primer crimp typically found on military brass. A uniformer like the K&M tool you posted will do what you want.
I guess I can use it anyway, I've thrown away .556 and 9 mm brass that was crimped. Now I can fix and use it. I ordered the K&M pocket correction tool.
yep. Good deal. I didn't realize the one you ordered didn't cut the bottom. I looked for one that was a carbide with a face cutting grind. I think this is the one you were after.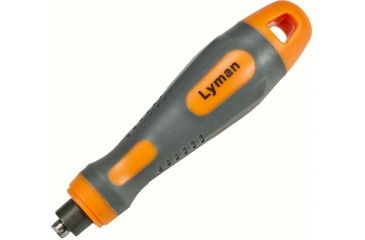
The Dunning-Kruger effect is alive and well.
I've been very pleased with my Sinclair carbide uniformers. Lots of excellent options today.
you figured it out. That is for reaming a crimp out.
That was fast! I received the K&N pocket uniforming tool today and it worked like a champ on the few cases I tried it on. I used it with the handle I ordered and it chattered and didn't smooth out the ring entirely so I chucked it into a 1/4" power screwdriver and gave it a few turns and it smoothed the ring right out. I did it until the bottom was just smooth. I want to shoot these to see how the pockets look after firing. I don't want to ruin a bunch of Lapua brass by buggering up the primer pockets.
K&M make good tools, check the depth of your virgin brass using the tail of your calipers , my small rifle Lapua brass measure .126 where the K&M tool was set at .122. I had to go with a 21st century adjustable
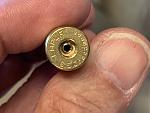
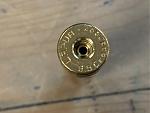
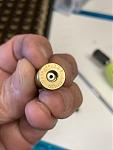
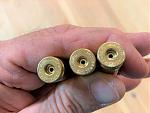
I didn't notice any difference shooting the brass that I uniformed so I guess I didn't take too much off. To tell the truth, I had visions of the back end of the case blowing out! Here's a couple of pics. Per the instructions, I adjusted the cutter to a depth of .121 and it looks like I didn't get all the way to the bottom of most pockets, but it did shave down that area around the flash hole that I boogered up using a decapper pin that was too large. The max depth is .123. I did try to see if there was a lip around those shaved areas, but I couldn't grab an edge with a pick, I think it just gradually swells up. I believe that ridge around the hole was causing inconsistent primer depth and CBTO measurements. I know the cases feel different when I seat the primers now.
The K&M tool I bought is adjustable. I went with the depth they said to use, but I know I didn't get to the bottom of the pocket on this first effort.
It didn't occur to me to measure the depth of the new brass and compare it to the fired brass I uniformed. I did and the depth of the new brass is centered on .124", some are .001 over or under, which is probably measurement error on my part. The uniformed brass was all slightly short of .121, which is probably due to my caution. I gave it another try and used more pressure and let the cutter work longer. The three measured .121, .123 and .124".
I decided to get the Lyman hand primer and give hand priming a try.
 Posting Permissions
Bookmarks