


Thats funny. My Axis II
XP 223 likes Sierra Varminter 60 gr HP over Hodgdon H4895.
The one-hole groups will make you weep.


Thats funny. My Axis II
XP 223 likes Sierra Varminter 60 gr HP over Hodgdon H4895.
The one-hole groups will make you weep.
While waiting for the EGW mount and Burris rings to arrive, I played around a bit more on the Axis:
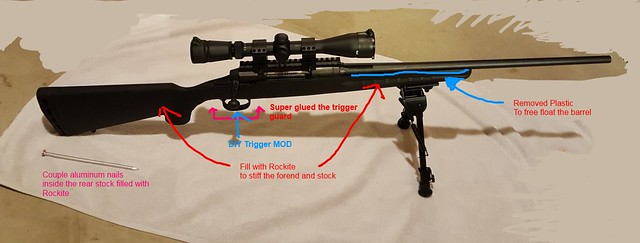
- I filled the rear stock with Rockite, but only half way. I also added couple of long aluminum nails into the Rockite - as a prevention against any future cracks in the concrete due to expansion. The rifle feels more balanced.. I think I added about one pound of Rockite combined for both the forend and the rear stock. The rest of the empty rear stock space, I filled it up with "peanut" packing material that I had.
- my conclusion for DIY trigger job is that you can go down only so far by reducing the trigger spring tension. My DIY spring is from a ball pen and it is barely providing enough tension to the trigger to catch the sear. The "weight" of the trigger pull is actually from the effort required to overcome the sear/trigger engagement surface when the bolt is cocked. (Check the trigger pull when uncocked... that is the "pull" due to your spring ) . I removed a bit of metal from the trigger surface that engages the sear. The pull weight is around 2.5 to 3 lbs now. I don't wish to go down further for safety reasons. I put some grease around the surface to reduce friction.
- Another interesting find. If you tighten the DIY over-travel screw too tight, that may lead to a light primer strike. The sear has to freely "travel" over the trigger surface. (See below for green arrow). I had my over-travel screw very tight just enough for the sear to break. I got 1 light primer strike out of 20 rounds. I also had difficulty pressing down on the bolt release, too... Giving more over-travel allowance eliminated the light primer strikes and it is easier now to press down on the bolt release.
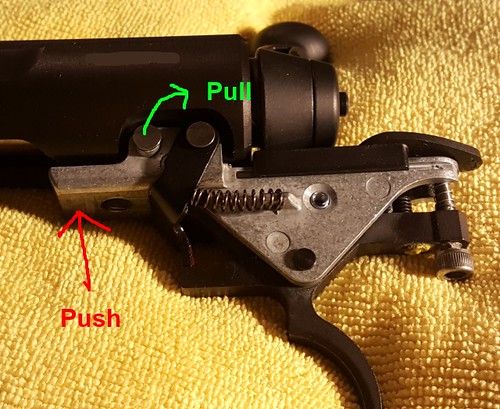
BTW, you can remove the trigger assembly from the action by pushing on the red arrow location (to reduce tension) and pulling out the pin indicated by the green arrow. I remove the assembly to clean out the existing grease/moly and applied my own lubes.
Definitely do not want judge it on the ammo you have tried so far. I basically had the same thing with the inexpensive stuff, although the American Eagle comes in several flavors and you might find something from this brand it likes. Try some Australian Outback or Black Hills and you might see it tighten up.
Update: no more "investment" on this plinker!
It's too cold to go to the outdoor range to verify the finished rifle, but it seems to provide consistent group at indoor range: 25 yard with only left elbow resting on a table. When the weather warms up, I'll check if my investment improved anything and compare the accuracy against my AR15.
What's been done: (larger picture here) Sorry for the quick "paint job" of the basement floor that was showing a lot of junk.
- DIY Trigger MOD: ball pen spring, over travel screw, modify sear/trigger engagement surface => about 2.5 lb to 3 lb pull
- Stock: fill with Rockite. For the rear, filled only 1/2 way + couple embedded long nails => 1 lb heavier !
- free floated barrel + added bipod
- replaced the detent BB under the extractor with larger 9/64 inch BB => good extraction !
- replaced mount (EGW), rings ( Burris XTR high ), and scope (Redfield Revolution 3-9x40)
Note: Using Burris Medium height rings with EGW mount should clear MOST scopes. I went for high rings just in case I wanted to use a Nikon scope.
Total Cost: $539
Axis XP 223 - $247
Rockite + over travel screw + 9/64" BB + misc supplies - $15
EGW mount - $33
==========
Axis specific subtotal: $295
Reusable on other rifle:
New Burris XTR rings - $44
Scope ( re-used what I had - about $170 )
Bipod( re-used what I had - about $30 )
Left over parts:
Axis XP specific scope , rings, and mount, 24 BBs
 Members who have read this thread in the last 1 days: 0
Posting Permissions
Members who have read this thread in the last 1 days: 0
Posting Permissions

 Reply With Quote
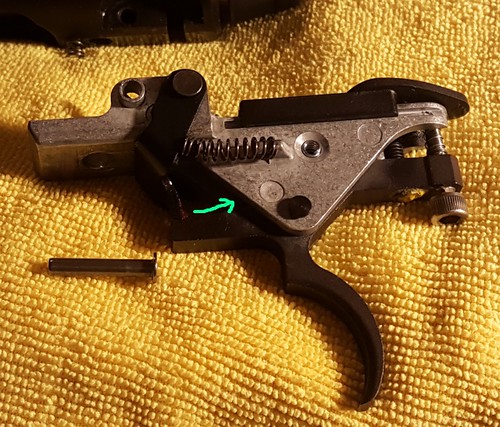
Bookmarks