


 Reply With Quote
LOL! Dave I was about to say, " That`s the ugliest bolt I`ve ever seen! " .


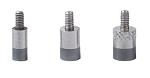
I figured it out! (Archimedes wasRight!) Just a matter of making a 3X Long Titanium Bolt Knob, along with all the other Bolt mods Ive done, and done!
Why, it has so much rotational torque now, it might sheer the lugs off, if Im not careful! And ya know its hardly even noticeable, LOL!
Heck! I might start marketing these suckers. Whoa, Whoa sss-low down gentlemen! Im but one man.
Ok, I hope everyone realizes this to be a joke. Im making another Ti Bolt Knob & was test fitting the threads. I didnt cut & machine the contour yet. (Obviously) Just thought it would be a nice Christmas chuckle for some; maybe a pick up for some with Holiday Blues.

LOL! Dave I was about to say, " That`s the ugliest bolt I`ve ever seen! " .
LOL
Looks like that darn mechanic forgot his 1/2" ratchet under the bolt assembly screw.
A good wife and a steady job has ruined many a great hunter.

Maybe a ratchet bolt handle would be a good idea
But, since you broached the topic of bolt lift (again) I have a question or two.
I know you like the old style pin, single point bolt lift modification, I notice a thin shim between the BAS and Handle.
It appears to be about 0.100" or so. It looks like it has a split like a lock washer (could be a reflection).
Was this to fit tight in the reduced diameter of the BAS near the flange?
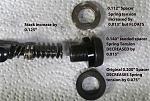
I find that the thrust bearing Bolt Lift Kit (I purchased from both vendors to avoid a Good Guy/Bad Guy discussion) changes the spring tension on the "New" style pins.
With the single spring variety the bearing stack is about 0.177" thick, the BAS washer is about 0.200", reducing the effective spring length by 0.023". Thinning the BAS washer could bring the tension back up. Maybe the wrong washer shipped?
_______________________________
With the Dual Spring Firing Pin the Key Ring Washer (about 0.055" thick) is tossed aside, the bearing stack is the same 0.177" and the BAS washer also 0.200".
This result in removal of 0.055", adding 0.177" inside, net thickness about 0.122", and adding 0.200" outside. To me, it seems this is reducing spring tension by a lot (0.078").
My home made thin 50 cent spacer has to be held centered as I tighten the BAS. It rides in the reduced diameter section.
Some have said that the spring tension with the new style pin is on the weak side to begin with, kicking it up maybe 0.010" would help. An internal shim (inside the BAS) about 0.070" - 0.080" would allow using the 0.200" BAS shim and ride centered on the BAS threads without reducing spring tension.

lol nice Modification
Rocket, yes, that is a Titanium washer I machined, and I understand what you mean about it moving in the undervlcut section of the BAS. Mine does the same & also needs held center while tightening. I used to have my stock BAS that I shortened & drilled for a Tungsten rod as the surface for the bearing ball. Illustrated in this thread: https://www.savageshooters.com/showt...Carbide-(Pics)Originally Posted by Rocketvapor

But last year I got the Titanium BAS (Lift Kit) from Lumley. The Lumley kit is like the one from PTG. It uses a pointed, adjustable set screw in the BAS and the SS Lift plate with the surface hole for the point. (Picture below). As you pointed out I prefer the bearing ball style, and more over, I prefer the ones I make: A Titanium Lift plate with a 5mm Si3N4 bearing ball pressed in the center. (Like the above thread) So I swapped the lift plate for the kind I make & used an end mill to machine the pointed set screw flat, then polished the surface. I made the spacer washer because I already had the Titanium plate for it & I can adjust the preload via the set screw. The only thing I’d rather is if I could get a Tungsten set screw with flat surface, but none doing. I may drill the set set screw & press in a piece of the Tungsten rod just as I was doing in the BAS’.
Lumley Kit:
EDIT: Hey Rocketvapor, if you give me the shim’s dimensions you believe will work, I’ll gladly machine a Titanium shim to fit the location you’re speaking of, and mail it your way.
Dave, Merry Christmas.
Just saw your edit.
It might be after the first to get her to the range.
I want to test the stack I presently have. Haven't measured spring tension yet but 177 -55 would give the same as stock spring tension with a 122 external shim.
BUT, 122 wouldn't catch a thread on the BAS.
My external 112 shim (two quarters) would be an increase in 10 thou in spring tension but floats on the reduced diameter of the BAS.
Probably not a bad thing for the reported weak new style pin/springs.
In order to catch the BAS thread diameter and be self centering the external shim needs to be at least 140.
That's why the thought of an internal shim. The external shim can easily be worked down in thickness staying over 140 (catches at least one thread of the BAS).
I think an internal shim about 0.040"- 0.070" and sanding down the external shim to less than the 0.200" would allow a good range for playing with spring tension.
I don't know the spring rate and if this would be enough, not enough or too much to do anything meaningful to spring tension.
Think I will see how the rifle performs with the current stack.
What do others do with the thrust bearing mod for the new type of dual spring one piece indicating pin?
I have one old style bolt and will consider the Hard Ball, 357, carbide mod.
Have you considered carbide tipped micrometer anvils counter bored into the BAS?
Anyway, thanks, and Merry Christmas.
RV
Last edited by Rocketvapor; 12-25-2023 at 11:43 AM. Reason: add pic
Honestly I don’t scrutinize it that much. I have a cut down and O.D. ground modified spring. Then the spacer is thick enough to only preload the spring a bit. Like barely. But I don’t measure. Again, this is the adjustable style firing pin. The non-adjustable style needs more preload.
If you made your BABK out of something heavier than Titanium it would almost be self closing.
Just push and let gravity take over.
Heck of a lift though. I hope the extra length helps :)
Well it’s not going to stay that long. Going to be a normal oversize bolt knob. Similar to the “Tactical” style knobs, but a bit different.
I know it was a joke, but you have to shoot it at least once :)

Rocket,
Could you show a picture of the bolt pieces and modification parts in a line like a I P B? It would seem that the finished product would be butter smooth.
The bolt parts, including the thrust bearing are on Desh's website/youtube videos.
I went though the "add internal length", "add external length" to come up with something that did not reduce spring pressure.
Lower spring pressure would give less resistance but the consensus seems to be the new style pin is undersprung from the factory.
Still haven't shot this thing, going to take the wife to the range after the first.
I'll probably modify this with internal shims and a thicker BAS shim after we test fire it.
Use your X-Ray vision on this :)
I'll post a pic after the various shims and parts are finalized.
One thing… you need to swap out Cocking Sleeves. Yours is the older, open style. You should grab one of these from Gunshack. https://www.gunshack.com/savage-parts?product_id=2897
I have an old style but the one in the picture was this one.
Even though not like yours, your posts (recent and old) have been a big help in learning about this action.
Where to smooth, where not to.
Thanks. Here soon we will get to see how your help bears out on paper :)
Yes, I’m sorry Rocket. My mistake. I should have studied the larger picture. I glanced & saw the open section, which is actually machined into the firing pin striker body itself, and immediately thought it was an adjustable assembly with the Cocking Piece & Sleeve being separate. Again, had I paid closer attention, I would have noticed the Cocking Pin is 90 degrees out from being center with that cutout section. So, yeah… DUH on me.
“How MY help bears out on paper”? What exactly? I don’t feel like I offered much here.
If it don't shoot, it's all your fault.
I’m sorry..LOL!
I do hope my posts can help others. It’s sincerely my top goal. So if any of what I’ve said has given you a better understanding of anything related to firearms, well, that brings me joy & puts a smile on my face, my friend. It’s my fondest desire to share what I’ve learned in my 30 years of firearms use. I do so enjoy this hobby & everything about it. And the comradery among members here…the back & forth with some incredibly knowledgeable persons & sharing something I know with those who do not. Just seeing someone else’s success, let alone after having asked a question I may have helped answer is so very rewarding.
Thanks to Dave and rocket for these informative postings!!
Doing some more digging on spring/pin/spacer mods on the new style 2 spring assembly.
Shims/spacer inside the BAS was found in an older post on this forum.
Then on another forum
https://www.in-depthoutdoors.com/com.../#post-2005838,
a brass spacer in place of the Key Ring washer to add spring tension and keep the two springs aligned.
He did not use the thrust bearing kit though.
I think this undercut internal shim/spacer is a good idea (see sketch above).
Removing the 0.055" ring, adding about 0.080" to 0.100" for a internal brass spacer plus 0.175" for the thrust bearing, but at the TOP of the stack inside the BAS, adds a total of 0.200" to 0.220" to the inside. Adding the 3 piece thrust bearing to the top of the internal stack is done with the single piece pin with indicator, single spring Lift Kit.
You could sand down the 'Kit' 0.200" spacer just a little or a different brass spacer thickness would (maybe) help keep the dual springs aligned, and increase spring tension a little.
Using an external spacer that guides on the BAS threads (greater than 0.140") would fix the 'Floating Spacer' issue.
Sounds like an easy to do mod, in brass, aluminum or even titanium :)
The NEW stack would be firing pin, spring #1, undercut internal spacer, spring #2, 3 piece thrust bearing, external BAS spacer, BAS.
One of the 3 piece thrust bearing kits being sold (for the old style pin) has a race that is undercut to fit inside the cocking piece (like the 357 mod, sort of), but a plain race at the top. Two undercut races could be made to fit in both springs to keep them aligned.
See any problems with a dual race aligning thrust kit for the two spring bolt?
Other than buying two kits and stealing the undercut races.
The undercut would have to be made to fit the springs instead of the cocking piece.
An additional internal shim inside the BAS and/or thinning the BAS spacer could be used to fix/adjust spring tension of the new style 2 spring bolt.
From the Desh website:
For now, we will try my current stack and see how it does.
But, it looks like more experimenting in the future :)
One thing for sure,
if you don't balance internal stack length and external BAS spacer thickness you will impact spring tension.
Rocket, I have one question. Why use an external BAS spacer but also an internal preload shim together? Don’t the two just cancel each other out? Honestly, if there is a problem of light primer strikes, as many are having with the new FP setup, I wonder if just using the Lift Kit with no BAS spacer, or a much thinner spacer is the answer. However, playing with both an internal preload shim & external BAS spacer together just seems redundant to me.
My discussion was for the one piece pin/dual spring with the 3 piece thrust washer.
Add up what you have with internal stack. Using the 3 piece thrust washer adds a bunch. A whole bunch.
Measure how much you changed the stack. Decide on how much you want to CHANGE spring tension (the stack) then pick a BAS spacer thickness that gives you a total change you want. Can't just install parts and expect desired results.
Even your mod for the old style adds to the stack and you needed a thin external spacer (until you shaved the BAS).
That's why the external BAS spacer in the first place. The BAS threads seems to WANT about 0.140+" to catch the threads. The 0.200" spacer is WAY TOO MUCH for the 2 piece spring set up. No wonder the lift is reduced.
0.140+" might be too much.
A thin shim inside AND/OR adjusting the BAS spacer gives you 2 options to adjust the stack and thus any change to spring tension you might want.
That's why I said:if you don't balance internal stack length and external BAS spacer thickness you will impact spring tension.
Maybe in picture form
Were do you buy the thrust bearing? What size is it? I have a single spring.
Single piece pin, single spring, with indicator?
I ordered from Desh, https://deshind.com/product/savage-b...ing-indicator/ ,
but ended up with 2 thick BAS washers.
Contact them, make sure of the bolt style.
Dave's single point lift kit is likely even better.
Si3N4 hard ball and a Carbide plate.
Probably the lowest friction mod you can find.
I ordered a kit from Lumley in black but they are on back order.I could always get silver and paint it! LOL. In the meantime, ordered a bolt handle.
 Posting Permissions


Bookmarks