Results 1 to 12 of 12

Thread: Getting ready to install the pillars

  1. #1
    Basic Member
    Join Date
    Nov 2013
    Posts
    51

    Getting ready to install the pillars


    I'm about ready to begin installing my pillars, but have a few questions first.

    -Drilling Pillar holes - It will be necessary to drill the existing action holes larger to accommodate the pillars and epoxy....

    What precautions/risks need to be considered against chipping the thin laminates - especially the rear hole where the sear cut is? I ordered a 7/16" forstner bit with serrated cutter- it recommends 1500 rpm for hardwood & 2500 for softwoods-my drill press can do 3100, 2340, 1720, 1100, 620 - would 1720 or 1100 be the appropriate setting? Any other drilling tips I need to know? If this bit is not a good choice, I would be willing to get another type bit.

    How do you align the bit so it is both centered and perpendicular to the existing hole ? My plan is to use a 1/4" rod chucked in the press and eyeball it into place, then clamp everything down... sound about right?

    Does it matter which side you drill from? Do you drill part way from each side or just plunge on thru?
    The rear hole is covered by the trigger guard and the front is countersunk with a (plastic) escutcheon, so it appears to me, I can bore all the way thru on both. Any reason to stop before going all the way thru?

    If drilling from the top (action side) the rear hole may have a lot of risk for bit chatter & tearout, being that half the hole is already cut out for the trigger/sear - so maybe coming in from the bottom would be safer and give the bit more side support when it reaches the thin areas - what do you think?

    Another question is should I form a putty dam to keep epoxy out of the trigger/bolt handle area (basically everything behind the sear bar) but also try to get a little bedding on that small area of receiver behind the pillar?

    Drilling the front hole out seems less risky, and if either end chips it can probably be repaired with epoxy.

    -Pillar Length
    After drilling hole, the next issue is just how long should the pillars be? That's simple - they should bridge the gap between the receiver bottom and the screw shoulder... I figure one way to get an approximate distance is to measure the action screws when seated in the receiver (also considering escutcheon or bottom metal). Of course (as I understand it) the "waterline" of the barreled action should be aligned and level with the top of the stock.

    A couple of other variables may come into play determining how long the pillar needs to be. They may only account for a few thousandths difference, but should be determined beforehand to make sure the final lengths are not too long or short

    Another consideration is how thick is the epoxy bed supposed to be minimum?
    This will raise the action off the wood, which affects how long the pillars need to be (and the screws), everything needs to be test fit beforehand and adjusted as necessary. The bed will go in after the pillars are set, so whatever it is, the epoxy will fill the space... My question is - what is a typical thickness -should it be closer to .05" or .125" thick?

    The other variable is the thickness of the stock at the screw holes. Commercial pillars are often pre-cut for specific actions. Sometimes they may need to be trimmed or even a spacer devised to maintain metal to metal contact.

    I have done a bit of measuring, and it appears the factory stock and my Boyde stock are slightly different. The rear pillar looks like it's a good length, but initially my front hole seems to be significantly longer than the designated pillar.

    I will have to see how the action levels up and how to deal with the plastic escutcheon, which is counter sunk further than it looks. I can't get it out without damaging the stock, so I plan on drilling thru it - It's big enough diameter that I think I can drill the bottom out and if the pillar fits flush, then I can use a washer under the screw head or if the pillar is too short, I can sink a metal spacer in to sit between the screw head and pillar. I was lucky to find a spacer of just the right size that will be below the stock - so I will have to make a some adjustment when doing the front hole.

    - I made action alignment screws by cutting the heads off 2" long smooth-shank grade 5 bolts and threading the cut end, and will wax them good so they don't get stuck.
    - I'm leaving my pillars flat, so at the receiver there will be spaces at the edges where epoxy will likely flow... do you fill that gap with putty or put release agent at the top contact points? How do you keep the epoxy from gluing the receiver to the pillar when installing the pillar? (it just occured to me you don't have to epoxy all the way to the top of the pillar) - just wax the tops and fill in the gaps at final bedding... yes?

    Sorry I get so wordy - thanks for all your advice.

  2. #2
    Team Savage Stumpkiller's Avatar
    Join Date
    Jan 2018
    Location
    Port Crane, NY
    Age
    64
    Posts
    980
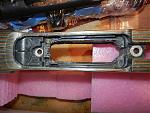
    Make sure you dry assemble everything before bedding. I had to remove metal from the rear pillar for trigger/sear clearance. I bedded the barrel, flipped it when dry and also bedded the floor-plate. As far as thickness of the bedding: 1/8" is good. I made a LOT of clay and cardboard dams (coated with paste-wax) to make cleaning up the excess much easier. I also coated EVERYTHING not being bedded with blue masking tape, also waxed.

    Dry assemble it out of the stock to judge the proper pillar height.

    Click image for larger version. 

Name:	fullsizeoutput_41f.jpg 
Views:	26 
Size:	142.2 KB 
ID:	9956

    Click image for larger version. 

Name:	fullsizeoutput_420.jpg 
Views:	27 
Size:	159.4 KB 
ID:	9954

    Click image for larger version. 

Name:	fullsizeoutput_419.jpg 
Views:	31 
Size:	155.3 KB 
ID:	9955

    Click image for larger version. 

Name:	fullsizeoutput_418.jpg 
Views:	32 
Size:	214.5 KB 
ID:	9953
    "They couldn't hit an elephant at this distance." Last words of Gen. Sedgwik

  3. #3
    Basic Member
    Join Date
    Nov 2013
    Posts
    51
    Great info - Thanks,
    I hadn't thought of dry fitting outside the stock. Informative pics too.

  4. #4
    Banned
    Join Date
    Jan 2016
    Location
    Suburb of Filthadelphia.
    Age
    45
    Posts
    5,704
    Ok, quite a bit there. Let me start with aligning. Before I used a mill & had only a drill press, I would align holes to drill out larger, by first setting up with existing size bit, then switching to larger size. Of course this requires locking part down in a mill vise. (I’d recommend doing this) Just get a cheap vice if you don’t already have one. Remember, the stock must be level. Not canted side to side or front to back.

    The Forstner bit will work, however, I’d recommend using a Brad Point for better drilling in wood. It can reduce tear out by first drilling the top until the Brad Point’s Pilot comes through. Then flip the stock over align with the Pilot holes & finish drilling. Also, for speed, 1100rpm will do fine.

    You can build up the epoxy to strengthen the back anywhere it won’t get in the way of other components. Just fit the parts together & use your judgment. Even if there is a little too much, remember the epoxy is easy to grind away. For the bedding, you certainly don’t want .125”! Way too thick! You want the minimal amount of epoxy that does the job completely. Some people do only a skim-bed, of bed only the front Action screw. And more still skip the rear Pillar, doing just the front. There’s no incorrectprocess, only doing said process incorrectly.Research (as you are doing now), patience & care in doing will promote success.

  5. #5
    Basic Member
    Join Date
    Jun 2018
    Location
    las cruces, nm
    Posts
    2,727
    Forstner and brad point bits are not good for enlarging holes, IMHO. They rely on the brad point to center. If you use a mill to do this it will be 'stiff' enough to hold the bit true. The drill presses I've used are not that precise. I'd use a simple twist drill (sharp and/or new) and spin at higher speed. The MUST have is a solid stock vise on the press and a solid table to make sure the bit runs true. Go slow. Yes, start where you have enough 'meat' to center the drill.

    Pillar to action can be either flat or you can grind the pillars to fit the action curvature. Doesn't seem to matter when bedding everything anyway. To keep epoxy from binding the pillar to the action you just use generous amounts of release agent on the action, stock screw and screw threads.

    As you can tell there are more than one way to do this and any of them will work.

  6. #6
    Basic Member
    Join Date
    Nov 2013
    Posts
    51
    Well, I guess I always wanted a 7/16" forstner bit for something.... I saw that center point and realized there isn't anything but air for it to grab onto...
    I thought for a second about plugging the hole to drill then went to the hardware store... All they had was a split point, so that's what I got - at least it looks like it will self center and is sharp - only gotta drill 2 holes.

  7. #7
    Basic Member Robinhood's Avatar
    Join Date
    Apr 2014
    Location
    South Texas
    Age
    66
    Posts
    7,804
    You can square of the cutting edge of the flute so the drill doesn't "feed itself" in softer materials just grind the cutting edge of the flute inline with the drill. Otherwise it may pull in and get away from you. Works for me anyway. Learned to do that when machining aluminum and brass/bronze.
    The Dunning-Kruger effect is alive and well.

  8. #8
    Team Savage centershot's Avatar
    Join Date
    Jul 2023
    Location
    Tucson, AZ
    Posts
    35
    I only did the front pillar. By the time you cut the "notch" for the rear one, there isn't much contact surface left. I put bedding material on the rear Action screw though.

  9. #9
    Team Savage
    Join Date
    Sep 2008
    Age
    73
    Posts
    597
    I grind the notch after I get the rear pillar bedded. Smaller chance of it tipping. You will probably have to do some reliving with a Dermal anyway.

  10. #10
    Basic Member
    Join Date
    Jun 2018
    Location
    las cruces, nm
    Posts
    2,727
    Quote Originally Posted by Robinhood View Post
    You can square of the cutting edge of the flute so the drill doesn't "feed itself" in softer materials just grind the cutting edge of the flute inline with the drill. Otherwise it may pull in and get away from you. Works for me anyway. Learned to do that when machining aluminum and brass/bronze.
    I used to do that with plexiglass too. Would even make it a reverse angle a little bit. High speed, slow feed.

  11. #11
    Basic Member
    Join Date
    Nov 2013
    Posts
    51
    At first, I figured I would just do this project like baby steps but since weather was gonna change and everything was prepped it, turned in to a 1-2-3 multi-stage effort.
    Warning... this post is pic heavy, and I tend to get verbose....so get a beverage and an easy chair and continue at your own peril...

    I took pics as I went and will use them to point out issues and processes I used.

    In summary, I first tacked the pillars into place, let them dry overnight then i in-filled around them, another day passed then i did the action bedding, the recoil lug area, after that I fixed the oops...

    Some things didn't quite go like all the how-to posts, and a number of WTF happened along the way that needed attention. I finally got to a point where it is now together as a unit. It's 35* out and I'm wondering if I should do some more before it warms enough to range test.

    The first thing I had to do was drill out the 2 existing action screw holes to accommodate the pillars. Since holes already existed, I needed a way to center the bit as I drilled. The forstner bit I bought has a pointed guide tip so I realized it wouldn't work like I wanted… I was able to locate a split point drill that appeared it would self center, so that’s what I used.

    After leveling (both ways) and clamping my stock in a padded stock vise, I used a 1/4" drill to center the holes with my drill press then switched to the 7/16" bit when I was satisfied it was aligned good enough. Drilling very slow at 1100 rpm, it worked well, slightly off but close enough.

    Click image for larger version. 

Name:	Pillars-1.jpg 
Views:	42 
Size:	185.5 KB 
ID:	10002

    Click image for larger version. 

Name:	Pillars-2.jpg 
Views:	41 
Size:	201.8 KB 
ID:	10003

    Click image for larger version. 

Name:	Pillars-4.jpg 
Views:	40 
Size:	304.1 KB 
ID:	10005

    Click image for larger version. 

Name:	Pillars-3.jpg 
Views:	43 
Size:	124.7 KB 
ID:	10004

    Even with precautions, there was still some minor chipping of the laminate at the hole exits. Fortunately the epoxy filled in the chips, but also I found small chipped out spots throughout the stock. This laminate is brittle and seems to chip on the edges easily.

    Click image for larger version. 

Name:	Pillars-7.jpg 
Views:	41 
Size:	207.3 KB 
ID:	10007

    Several places to watch fout for include sharp corners, holes -the rear trigger guard screw, the end of the barrel channel, any inlet area.
    I had the center piece of the laminate completely split at the rear of the rear pillar hole after enlarging it.- epoxy filled that in.

    The Front hole has a plastic escutcheon, which I wanted to replace. I ended up drilling right thru it, then found out it isn't glued in and pushed right out.

    Click image for larger version. 

Name:	Pillars-5.jpg 
Views:	39 
Size:	84.5 KB 
ID:	10006

    It leaves a pretty deep countersink so the pillar sticks well into the hole. T debated on cutting the pillar, cutting a spacer or filling around it with epoxy and using a washer… the last option was the easiest so I went that route. I plugged the pillar hole with playdoh.

    Getting the epoxy down between the pillar and stock was a bit difficult so I created a squeeze bag like cake decorators use…

    Cut the tip and fold over like a cake decorator, to squeeze epoxy into small spaces.

    It worked somewhat but I still have a little smoothing and cleanup to do yet.
    Click image for larger version. 

Name:	Pillars-9.jpg 
Views:	43 
Size:	200.7 KB 
ID:	10009

    Click image for larger version. 

Name:	Pillars-10.jpg 
Views:	40 
Size:	249.3 KB 
ID:	10010

    A lot of test fitting took place throughout the process… One issue that came up repeatedly after the pillars were in place was getting the barreled action out of the stock- it seemed it was binding somewhere. I think I finally determined it was that sliver of wood behind the recoil lug causing the action screws to move forward and since the holes in the pillars didn't allow enough movement, they were binding inside the pillars. If I tried to use the original screws after setting the action in place, the holes wouldn't allow the screws to start… so I removed that sliver of wood with a dremel and used epoxy to fill in the space behind the recoil lug. Now It all releases out of the stock without binding.

    Click image for larger version. 

Name:	Pillars-12.jpg 
Views:	42 
Size:	143.6 KB 
ID:	10011

    I decided not to bed under the barrel nut so left that entire area open.

    I blocked out areas with playdoh and then filled the target bedding area with epoxy, set the action in, hand tightened nuts on the action screws and then wrapped it with vet-wrap & tape then removed the action nuts to let it dry 5 hrs before nocking it loose and replacing it for overnight curing…
    Click image for larger version. 

Name:	Pillars-14.jpg 
Views:	42 
Size:	185.1 KB 
ID:	10012

    Click image for larger version. 

Name:	Pillars-15.jpg 
Views:	46 
Size:	224.3 KB 
ID:	10013

    One area might be a problem and I might have to tear it out and redo later… the top sides of the action didn't completely bed- some of it did but other areas sho the epoxy depresses and no squeeze-out was evident.
    It doesn't look like an easy task so I'll mess with this only if it doesn't shoot as I expect.

    Click image for larger version. 

Name:	Pillars-16.jpg 
Views:	44 
Size:	134.6 KB 
ID:	10014

    This has definitely been a learning experience and it may be a while before I do another but I'm not as shy about it now and I can think of a couple others I might try in the future…

    Thanks for all your help, I couldn't have gotten this far without it.

    One thing I'm still deciding is whether to paint the exposed blued action the same as the barrel.
    The original 22-250 barrel is blued and this is supposed to be a switch barrel setup... I originally thought I'd keep the originals blue and then spray each additional barrel a different color for easy ID. Now I'm thinking to do the entire unit (and any others) the same color.

    Click image for larger version. 

Name:	Almost Finished.jpg 
Views:	42 
Size:	91.7 KB 
ID:	10016

  12. #12
    Banned
    Join Date
    Jan 2016
    Location
    Suburb of Filthadelphia.
    Age
    45
    Posts
    5,704
    Looks great! Well done.

Similar Threads

  1. Mount is ready
    By big honkin jeep in forum Let's Talk Hunting!
    Replies: 10
    Last Post: 06-21-2021, 10:55 AM
  2. Replies: 3
    Last Post: 04-18-2014, 11:48 AM
  3. New gun, how to get ready?
    By stash in forum 110-Series Rifles
    Replies: 10
    Last Post: 08-21-2010, 10:12 AM
  4. Why do I need a piloted counter bore to install pillars?
    By jonrobinson in forum 110-Series Rifles
    Replies: 4
    Last Post: 12-02-2009, 12:01 PM

Bookmarks

Posting Permissions

  • You may not post new threads
  • You may not post replies
  • You may not post attachments
  • You may not edit your posts
  •