

 Reply With Quote
I do have a wheeler lapping kit.. thinking I should try? Obviously the rings aren't in alignment


So I got the threads chased (previous thread). Tried the factory cheap scope bases and they seemed "off". Tried leupold rifleman 2 piece base.. seemed off. So I picked up a Warne 1 piece base and this is what I got... my reciever is not flush front to rear... you can how the rear goes "uphill"... base is contorted to the front where it appears correctly flush and nice and straight. Anyone ever see this? It's a hunting rifle, won't see shots past 150 so I think it'll be fine, but this is new to me. Never seen a rifle out like this before.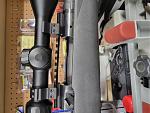
I do have a wheeler lapping kit.. thinking I should try? Obviously the rings aren't in alignment
So this is with a rule laying across.. you can see the dip downward at the rear of the reciever and the gap.. is this normal??

No, that’s not a normal thing unfortunately. An option in your case might be bedding the rail. Bedding with something like Devcon Plastic-Steel (my favorite), or equivalent will give you a nice flat surface. Then you can chased the threads with a tap. You may need a couple slightly longer screws for the rear as well. Do this & you’ll be GTG.
I use his: https://www.amazon.com/Devcon-62345-...72&sr=8-3&th=1
Here’s a better picture orientation.

It's unfortunate but I believe you'll be 100% good to go bedding it as Dave suggested. My local Ace Hardware has a nice assortment of those 6-48 screws, I don't know how many times I waited for an order to be shipped before I figured that out.
Many people Bed the rails regardless. I was tempted to as there was a sliver of imperfection. However there was no interference with torquing down & all was flush after. Rings still aligned correctly. So I let it go.
Where are you located Sh40674? I’m a bit South of Philadelphia. If you are anywhere near, I’d be happy to give you a hand, if you have any reservations. It’s easy peasy lemon squeezy, long as you know the steps


there hand buffed and sometimes its Friday afternoon. bed it or go with 2 piece base & Burris Signature rings.
.223 Rem AI, .22-250 AI, .220 Swift AI .243 Win AI, .6mm Rem AI, .257 Rob AI, .25-06 AI, 6.5x300wsm .30-06 AI, .270 STW, 7mm STW, 28 nosler, .416 Taylor
I am gonna say go with Blue Avenger on this one. 2pc base and Burris Sig Zee rings. Been a winning combo for me many times in similar situations.
Bedding will get it done nicely also, I guess it just depends on what you have at your disposal.
If you are anywhere near Iowa City, I do believe Scheels in Coralville had some Sig Zee's in stock last time I was there a few weeks ago.
Last edited by bootsmcguire; 11-27-2022 at 11:39 PM. Reason: I'm brain dead
204, 22 K-Hornet, 222, 223, 22-250, 22-250AI, 6BR, 243, 243AI, 6-06, 6-WSM, 250-3000AI, 270, 7-08, 7RM, 30BR, 308, 30-06, 375 H&H, 444 Marlin, 450BM, 458WM
I wouldn’t two piece. The rings won’t line up even a little bit! Be trying to mount the scope on two different planes. I really think bedding is the answer here.
I hear you there Dave, but with the Sig Zee rings the ball swivel inserts inside the scope rings allow for misalignment and let the scope sit straight and even with no added pressure to the scope tube. Bases can be pretty far off and scope still aligns well. At least that has been my experience, especially when coupled with the offset inserts available separately to allow for compensation at basically any angle.
I agree bedding would be the best, but I guess I was just leaning towards simplicity since the OP is in a time crunch.
204, 22 K-Hornet, 222, 223, 22-250, 22-250AI, 6BR, 243, 243AI, 6-06, 6-WSM, 250-3000AI, 270, 7-08, 7RM, 30BR, 308, 30-06, 375 H&H, 444 Marlin, 450BM, 458WM
Gonna give bedding a try. I'll update how it goes since it'll he my first attempt lol
My big worry was I bent my new Warne base, which is normally 60 bucks but I got the last one on clearance for 30 lol, luckily I laid the rule across it and it appears straight. At least I have that going for me
Set the base on against a piece of glass. or a known perfectly flat surface if you have one.
If you want any pointers on bedding the rail, let me know. I have a pretty good system for it. Does a nice job, cuts down on mess, etc.
LOL Back in the 70s there would probable be a sliver of pop can for a shim. did not have as many better choices
.223 Rem AI, .22-250 AI, .220 Swift AI .243 Win AI, .6mm Rem AI, .257 Rob AI, .25-06 AI, 6.5x300wsm .30-06 AI, .270 STW, 7mm STW, 28 nosler, .416 Taylor
First I would mic to the best of my ability from front to back. Should measure around 1.355. Then I would set the barreled action up in some v blocks with something on the barrel end to control thrust. Hang the action off the end of the v block. Remove the trigger and hanger. Then put an indicator at the rear action where you have the most surface to run a TIR. Just behind the mag port is best. Let us know what your readings are. This will tell you your next move. There are people that screw actions up by using a tool in the mag port/ejection port to remove the barrel. A big no no. There are people that will sell the screw ups too.
The Dunning-Kruger effect is alive and well.
Then there are people like me that fix the screw ups.....I've straightened many a twisted and bent receiver.
"As long as there's lead in the air....there's still hope.."
The pictures don’t look like it’s twisted. It looks exactly as Blue Avenger mentioned, the Action had material unevenly removed. The straight rule is touch the front portion of both screw locations. It then leaves light showing through at the rear of both screw locations. A twisted Action doesn’t look like this. Twisted, the screws won’t be aligned. This is a simple bedding fix. OR: It could be welded. Build up a pool material & turn it back down. Then drill/tap the screw locations again. Uh-huh… I’d bed it!
Well my first bedding attempt thankfully didn't go well (I say thankfully because I caught it).
I checked out a video where a guy after about 6 hours released it to more easily clear the screw holes. I did the same, I used shoe polish as a release agent. However, the polish did not do a good job, it was slightly gummy still. I kinda messed up and broke the gap so I decided to pull and start over while I could still get the jb weld off. To my surprise it was just as adhered to the reciever as it was the mount. I didn't clear the old out of the screw holes in the base, I'll just have to carefully drill those, but I started over and used Vaseline this time. I'll check in the morning, should be about 12-13 hours by then.
Well, I told you to contact me.I could have easily walked you through step by step.
I just hope you didn’t tighten down all 4 screws. And just checking; the video you watched.. I hope it did show you apply epoxy to the rail itself, not the Action surface.
Absolutely. I had no questions,seemed pretty straight forward. Just surprised it pushed through the polish
Yeah… That’s why I don’t use polish. I would have told you Vasoline from the start.
my first thought too, but some people are shy about that. It's not very hard if your patient and don't try for all of it at onceOriginally Posted by sharpshooter

.223 Rem AI, .22-250 AI, .220 Swift AI .243 Win AI, .6mm Rem AI, .257 Rob AI, .25-06 AI, 6.5x300wsm .30-06 AI, .270 STW, 7mm STW, 28 nosler, .416 Taylor
This is your best way to go. 2 piece with Burris signature.
OK… Once again, adjustable rings do nothing for the rail not fitting due to too much material removed from the Action. So no they are not best. More like a “jury rig” at best. The best way to go is addressing the absent material of the Action.

Ddepends on the age of the action we're dealing with Greg. As the pic's show, this one is a round top so clearly it's 2003 or newer.
It was around 2004 or 2005 that Savage started using the rotisserie vibratory polishing system - the same time that they came out with the high luster bluing on the then new Model 14/114 Classic's. While the high luster finish is no more, Savage still uses this process. Only difference between the "standard matte" finish and the "high luster" finish was that the high luster guns went through a second process in a second unit that had a finer grit of stone in it.
"Life' is tough. It's even tougher if you're stupid." ~ John Wayne
Under certain circumstances, urgent circumstances, desperate circumstances, profanity provides a relief denied even to prayer. Mark Twain
 Posting Permissions
Bookmarks