


 Reply With Quote
De-cock it, and use a 1/4" allen wrench.


I recently picked-up a very accurate old JC Higgins Model 50 (Mauser action/High Standard barrel) in 270 Win so I'm thinking about converting my almost 2-year old Axis II XP to become my first medium bore rifle (35 Whelen or 375 Ruger). I've already invested in a Boyds stock and improved scope for the Axis and the rifle is accurate so I'm okay with throwing a little more money into an inexpensive rifle for an ER Shaw barrel. I'm leaning toward the 375 Ruger, which would require me to also buy a new 110 Magnum bolt head and mill the bolt head shank shorter, as described here (thanks for the vid, DrThunder88):
http://www.savageshooters.com/conten...cation-(Video)
After reading this, I just attempted to disassemble my bolt:
http://www.savageshooters.com/conten...y-Instructions
I didn't get very far, because my bolt assembly screw (BAS) doesn't have a slotted head or the expected newer hex head on it. In fact, there doesn't appear to be a screw at the back end of the bolt at all; there just appears to be a bare pin sticking out.
So before I grab it with a pair of vice-grips(LOL), I figure I'd better ask here for bolt disassembly advice and also opinions and advice on the conversion in general.
Thanks a bunch!
De-cock it, and use a 1/4" allen wrench.
"As long as there's lead in the air....there's still hope.."

That pin is the cocking indicator to let you know when the rifle is cocked. As Fred noted, you have to decock the bolt (move the cocking pin up the ramp using the edge of your workbench) which will lower the cocking indicator (its the tail end of the firing pin) revealing the flats for the allen wrench.
"Life' is tough. It's even tougher if you're stupid." ~ John Wayne
Under certain circumstances, urgent circumstances, desperate circumstances, profanity provides a relief denied even to prayer. Mark Twain
Well that was easy. Thanks, Fred!Originally Posted by sharpshooter

I somehow expected to see the flats before decocking it. Duh!
I did experience one other thing that I didn't expect. The spring came out in three pieces. The spring next to the BAS has both ends squared and ground. The forward spring that holds the cocking piece in its hole isn't forged square and ground but it doesn't look like the little circular piece of spring steel between them (acting like a washer?) broke off either. At first I thought I had a broken spring, but I guess it's supposed to be in three pieces in my bolt. I had to pry the last spring piece out of the bolt body before I could remove the cocking piece, of course.
It will be a simple matter to mill the shank of a new magnum bolt face to match the shank length of my current bolt face so it looks like this part of the puzzle is a go for a Ruger 375 conversion!
Thanks,
-Cal
Yup (as everyone here probably already knows)--Axis firing pin springs are now 3 pieces:
http://www.savageshooters.com/showth...ing-pin-spring
Last edited by calinb; 11-02-2018 at 12:52 AM. Reason: new 3-piece spring info
Let us know how it all turns out please !!
The 3-piece spring is normal for an Axis and many of the 110 Package rifles these days (also used in the 212 and 220 slug guns). Basically the middle "washer" piece just acts like a bushing in case the end of the longer spring digs into the BAS.
"Life' is tough. It's even tougher if you're stupid." ~ John Wayne
Under certain circumstances, urgent circumstances, desperate circumstances, profanity provides a relief denied even to prayer. Mark Twain
Sounds like a really interesting project! I had briefly considered building a 375 Ruger Axis after building my 338 Edge Axis, but it would have been too impractical for me. I would really like to see it come to life though!
I will follow as well. I have had thoughts about a .450 Marlin barrel.
I'm still trying to decide on a conversion cartridge. Now I'm also considering the 358 Norma Magnum. Hunters that use and know the cartridge like it and it seems to offer a performance sweet spot that goes beyond its "numbers." From my online studies, it's really a shame that it never took off. 300 Win Mag brass provides probably the best source for relatively inexpensive reformed brass for the Norma. You can also optionally use a 35 Whelen reamer to cut an existing 358 Norma chamber neck longer, which has a couple of benefits, including not having to trim 300 Win Mag brass so much when used to make 358 Norma Magnum brass.
It would be significantly cheaper for me to just order a 35 Whelen ER Shaw barrel "kit," which includes the headspace gauges and a barrel nut wrench, and the kit barrels have a finished stainless or blued surface too. The other pre-fit Savage barrel options I'm considering will required a special order from ER Shaw, which is what mostly drives the conversion price up, but the magnums are calling me and the whole idea of creating another DrTHunder88-inspired Maxis is very appealing. Of course I could just do a 300 or 338 Win Mag conversion and follow in DrThunder88's footsteps exactly, but the Win Mags are too close to duplicating the performance of the Ruger M77 Hawkeye rifles in 300 RCM and 338 RCM that I already own (though the Win Mags are somewhat more powerful--especially given the 20" barrels on my compact Rugers).
I'll let everyone here know what materializes from my musings for sure!
Thanks to you, I'm not at all worried about converting a bolt head. Actually, I'm more worried about needing to bed my Boyds laminate stock after a big step up in power and recoil. It looks like an Axis bedding job might have a few unique challenges with the trigger needing to remain in place and I'm not sure about how to best bed the recoil lug. I need to study this potential side effect of a Maxis conversion here on the forum too.
I noticed that a 450 Marlin Savage barrel can be ordered on the ER Shaw site! :)
Last edited by calinb; 11-10-2018 at 02:29 AM. Reason: note about my Rugers
Yes, they do.
...and not that I'm trying to conscript a partner to my Maxis madness, Charlie, but I just received an eabco.com 10%-off / $4.99 shipping sitewide Black Friday "preview" coupon in my inbox ("EARLY"). Good 'til Sunday (tomorrow). FYI only.
I'm new here so I checked the forum rules and they say I can't link any ad listings here (if the eabco barrels page constitutes an ad), but you can easily find a stainless eabco Savage Accuracy Barrel kit in 450 Marlin (varmint profile) on the eabco site at present, if it might be something of interest to you. I don't have any relationship with eabco and I've never even ordered anything from them but, if they had a 375 Ruger kit right now with either an ER Shaw barrel or their "Accuracy" barrel, my order would be in the works!
-Cal
The ad listing rule is for classified ads on other sites (one item for sale). Posting a link to a manufacturer or retailer's page is perfectly ok.
"Life' is tough. It's even tougher if you're stupid." ~ John Wayne
Under certain circumstances, urgent circumstances, desperate circumstances, profanity provides a relief denied even to prayer. Mark Twain
Thanks for the clarification, J. Baker. Sounds good!
Thanks. My idea is for when my .223 barrel is worn out so it will be in a couple of years :)
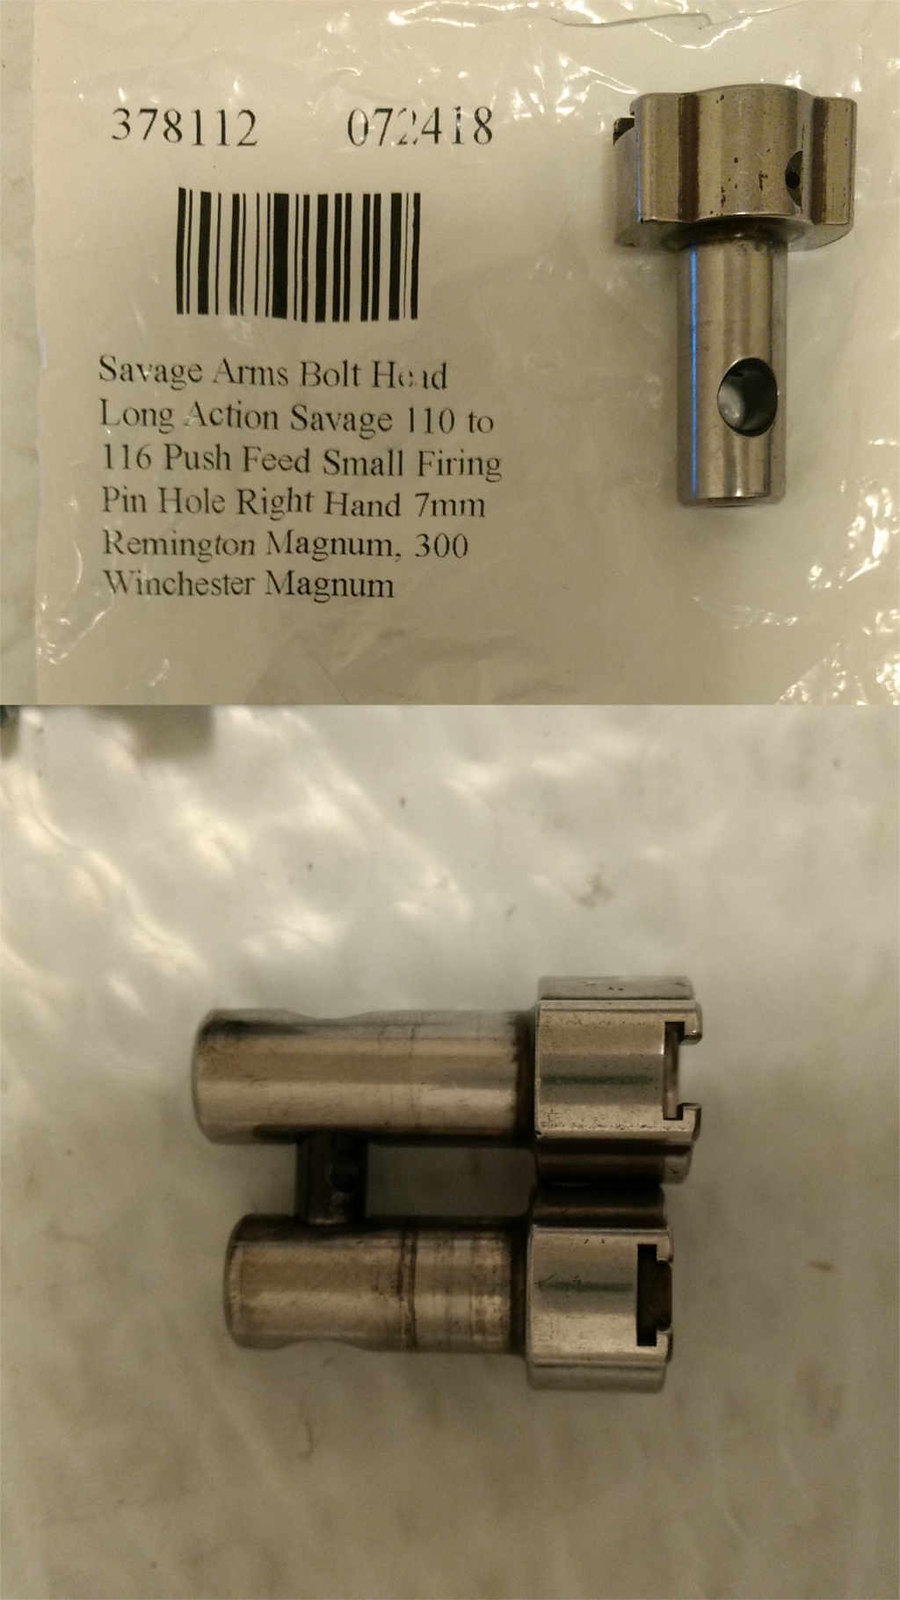
I just received my103960 bolt head and I hope DrThunde88 drops by to confirm that it will work. I ordered part number 103960 from his build report here:
http://www.savageshooters.com/conten...-s-Maxis-Build
Here's the order page where it says 103960:
https://www.midwayusa.com/product/37...chester-magnum
Here's what I received:
Notice that not only is the shank longer (which is what I expected, because it needs to be set back by filing it down or milling) but the lugs of the bolt head are longer too. I removed the firing pin and springs and it will not close in my action, of course. Will it close when the new barrel is installed and I set the headspace (by adjusting the barrel relatively more forward in its threads). It's a pretty big difference!
I was about to commit to Thanksgiving and Black Friday discounts on a 358 Norma Magnum ER Shaw barrel and everything else I'll need!
Does this look right?
I also think I should order the 338 Win Mag magazine, given that a 358 Norma is not much at all different from a 358-300 Win Mag. It seems that getting a bottom latch version is the key thing for my rifle. It would appear that both the bottom latch and side latch (earlier) versions have the same Savage part numbers (and Savage seems to use two part numbers that point to the same thing for just about all of these magazines). Arrghhh!
I studied long and hard for many hours before deciding on the 358 Norma vs. the 375 Ruger. It was a tough decision and maybe I'll go over my thoughts about it after I get this straightened out an my orders placed.
Your help is much appreciated!
-Cal
Update:
I took a frame capture of the bolt head from DrThunder88's video and measured the length of the shank and locking lugs in pixels using The Gimp computer program. Then I measured the same features of the bolt head I got from MidwayUSA. In both cases, the lugs are 30.5% of the total bolt head length so I'm pretty sure my magnum bolt head is the same as DrThunder88's bolt head. I also did pixel measurements on a photo in the Axis bolt head in the "Savage Axis Bolt Disassembly and Assembly Instructions" article and it matches my original bolt head so it's unlikely that Savage has changed anything to try to keep us from building a Maxis!
So I guess I'm good to order-up some online deals tonight.
Both ER Shaw on McGowan have 15% off deals right now. McGowan offers more custom features than Shaw, like various twist rates, whereas I'm stuck with 1:14 with ER Shaw. Shaw is less expensive but online reports seem to be just as favorable as McGowan reports, though perhaps some say the Shaw needs more break-in before the bore cleans up.
Some people recommend 1:12 for the longer 358 bullets but every stability calculator I've consulted , (including the calculator on the McGowan site) says that 1:14 is more than adequate--even for the 310 gr. Woodleighs or largest Barnes projectiles. I've learned a lot about the 358 Norma from Nathan over at ballisticstudies.com (where I also started a thread) and he turned me on to the Norma. He has a ton of experience with 35 cal. barrels. He said the lighter projectiles need to be down-loaded a bit (<2950 fps) for best accuracy with 1:12 so I'm going with 1:14. I'm hopeful that the very reasonably priced 180 gr. Speer Hot-Cor will work well on our smallish whitetails around here but I'm also hopeful that I'll get good accuracy from the heaviest bullets too. (Quickload predicts over 3300 fps with the Speer Hot-Cor and a 26" barrel!)
Well, life on this old homestead got in the way of this project. I acquired two sets of bolt head parts (including all the extra bolt head internals) but I never found the time to hot blue and fit my Shaw 358 Norma Magnum barrel and make the necessary bolt mods until now. I drew a pretty good Idaho moose tag this year so I've re-prioritized this project off the back-burner!
Since I started this thread, Desnolen68 made this discovery:
https://www.savageshooters.com/showthread.php?64828-Axis-Magnum-Conversion-Firing-Pin-Too-Short-Fix
It looks like I'm going to have the same problem with the cocking pin bottoming in its slot/ramp. Desnolen68's solution to extend the cocking pin slot slightly and it seems like a reasonable one (plus, he reported that it worked
The other solutions I've contemplated are a lot more work and sometimes very expensive, compared to the price of an Axis. They include custom PTG bolt head, custom machined or re-turned firing pin after TIG welding up the stop surface flange to move the stop surface rearward, etc. (I don't TIG weld and there's probably not enough meat on the firing pin's stop flange to comfortably set it back on the lathe without adding some TIG-metal, which is always a tricky proposition). The firing pin is also likely to be very hard. The firing pins I've made in the past I made from annealed 440C and I heat treated afterwards. I don't know what Savage does. Annealing and re-heat treating might be required so I estimated the additional cocking slot length required with careful measurements, as follows.
The locking lug aft surface to bolt face dimensions of my bolt heads are 0.382" and 0.333" for the longer magnum and shorter original bolt heads, respectively (micrometer and depth micrometer measurements). My current cocking pin to slot clearance is 0.032". My firing pin protrusion is 0.055". If I wish to preserve them both current cocking pin clearance an firing pin protrusion, I would need to lengthen my cocking slot by 0.382-0.333=0.049".
Of course I could get by with less firing pin protrusion and cocking pin clearance but how much less? If I reduce the firing pin protrusion distance to 0.035" (a number I hear commonly tossed about as adequate) and reduce my cocking pin clearance in half to 0.016", then I would only need to lengthen the cocking pin slot by 0.013".
Given that I can always take more metal off of the parts, but I can't easily add it back, I think I start with those reduced numbers and shorten the shank to produce the 0.035" firing pin protrusion, see where I'm at with cocking pin clearance and shoot for at least the 0.016 to start. I test performance the same way I test my muzzleloaders by cold soaking the barreled action in the freezer. If the frozen ignition source reliably goes bang, I'll call it good.
That's my plan right now, anyway.
Desnolen68 reported that it took him two hours to mill the slot so, even very careful grinding might be a better option than milling. I can always start by milling a see how it goes I guess.
I don't know why DrThunder88 didn't encounter this cocking slot/pin interference. Maybe his bolt had a long lug non-magnum bolt head too (which we didn't get a good look-at) so his long lug magnum bolt head only needed to have its shank shortened. I'm nearly certain that DrThunder88, Desnolen68 and I are using the same magnum bolt head (same part numbers) and I verified the dimensions of my magnum bolt head against DrThunder88's magnum bolt head using screen captures from his video (by measuring pixels). Maybe he will drop by this thread again and give us his thoughts. I'd sure appreciate hearing from him.
Last edited by calinb; 06-13-2022 at 09:19 PM. Reason: clarification
The latest:
I used my lathe and a Arthur Warner T15 toolbit to face the shank back enough to obtain 0.036" of firing pin protrusion. After temporary assembly of the bolt, I found that I'd lost 0.004" of firing pin protrusion, due to negative cocking pin clearance in the slot (assembled bolt firing pin protrusion is 0.032", post bolt assembly).
Near the end of his video, DrThunder88 mentioned that he ended up with "5/100ths" of firing pin protrusion when placing the firing pin in the newly reworked bolt head. (He used the firing pin as a test gauge to check his progress while shortening the shank.) I suspect that, after bolt assembly, he may have been cocking pin clearance-limited and ended up with something more like my 0.032 but didn't realize it. 0.032 of pin protrusion is probably still enough to make the gun go "bang"!
From where I'm at now, I need to lengthen the slot by 0.004 plus whatever extra clearance I wish for "guardband" between the cocking pin and the cocking slot. I'm feeling pretty comfortable with 0.010" cocking pin clearance right now and that would only require only a 0.014" increase in the slot length. I also feel pretty comfortable in reducing the shank length even more to get up to 0.050" or even the original 0.055" firing pin protrusion and then, accordingly, increasing the slot length an additional 0.014 or 0.019. That would require increasing the slot length by total of 0.028 or 0.033" for .050 and .055 protrusion, respectively.
I'd be interested in what others think. Should I lengthen the slot by 0.014" first and see how well my current 0.036 protrusion works or go for more protrusion straight away?
Edit: After reading-up about firing pin protrusion settings, I'll stick with 0.036 and relieve the cocking pin slot the little I need to get it. "Bob Greenleaf, retired Savage engineer, usually sets them at .035", so I read here:
https://forum.accurateshooter.com/th...g-pin.2798511/
Which pretty well agrees with the information here at SavageShooters too and "035" is optimum."
https://www.savageshooters.com/content.php?143-Firing-Pin-Protrusion-Data

.035 is plenty. The new firing pin I machined for my setup with a 20lb Flat Wire spring is getting reliable primer strike with slightly less! Its maybe .031. .055 is way to much protrusion. Just adds to pin wear, distortion, etc.

Thanks for helping me to finish this project, Dave! I'm only a hobby machinist and gunsmith. I rely on others to learn what works (but I guess that's learning in general). I thought about making a custom firing pin, but it's not a simple pin to make like the ones I've made in the past--especially if I made one that's adjustable).
But now I don't think I need a new firing pin and I don't think I'll need to buy a PTG bolt head either. I think it's probably worth the money for those planning to shoot very high volumes of magnum ammo and I did compare the prints on the PTG website to my original bolt head dimensions. I think even the non-custom PTG magnum short action bolt head would work for a Maxis conversion with few or no modifications.
I think my learning from this project is Savage used a short action bolt head (7/16" lugs) on the long action Axis models (as well as the short action Axis models, I guess). Thus the challenge with a "Maxis" conversion using a Savage replacement bolt head is Savage doesn't make a magnum face bolt head with 7/16" lugs (but PTG has one) and the Axis firing pin is not adjustable.
Machining the shank back to accommodate the Axis firing pin is relatively simple. However, the interference point then becomes the cocking pin against the cocking slot and, given the 1/2" long lugs on the magnum bolt face, the firing pin protrusion is limited to about 0.030" So there's limited "goodness" in shortening the bolt head shank beyond what's required to make the gun reliably go bang and there's not much point in shortening the shank anywhere near enough to try to achieve the ~0.055 original firing pin protrusion length when testing the pin in the bolt head during shortening. That results in a non-optimally shortened shank. I think shortening the shank for about 0.035 protrusion using the firing pin "gauge" is optimum, which warrants only a small change to the cocking pin slot to keep the cocking pin from bottoming in the slot.
I'll machine or carefully grind and polish my cocking pin slot a little deeper today, being careful to preserve the "ramp" angle of the slot near the bottom but it's impossible to preserve the ramp angle without making the slot at least slightly wider on the straight edge side or maybe a few thou of additional length can be gained by distorting the original constant radius of the slot while still fitting the pin. To otherwise make the slot longer without widening it requires making the bottom of the cocking ramp angle steeper, which would impact cocking effort to some extent. In any case, the un-cocked position of the cocking pin also moves, which could become a problem at some point.
In summary, my advice to others doing the Maxis mod is to measure all your parts carefully (micrometers and depth micrometers recommended, though you could get by with calipers) and plan your work on the shank to not remove more than what's needed to obtain about 0.035 of firing pin protrusion. Limiting your firing protrusion to 0.035" reduces the amount the cocking pin slot should be lengthened in order to keep the cocking pin/piece from bottoming, and it appears likely to offer better ignition reliability than more protrusion too.
Last edited by calinb; 06-14-2022 at 03:04 PM. Reason: Tried to clarify some of the complex tradeoffs!
Im the same thing my friend. Hobbyist. I’ve never made a living as a Gunsmith, machinist or the Custom Knifemaking I do. And the knives are the only thing I’ve ever charged money for. Anything having to do with gunsmithing/fixing/building and machining, I’ve always done free of charge. 20 years about, and I’ve never charged a dime.
Machining a firing pin is easier than you may think. I’ve shown this in other threads… I did this one in S7 Tool steel for the extra weight, but I’ll likely make one in Titanium at some point. I turn these small parts on my mill also. I don’t have the space for a proper sized lathe. The pictures show the factory pin on (Top) and the one I machined (Bottom)
And with the matching cross pin because the pin is thicker in this region. The Cross Pin is made of Titanium.
And the finished pin.

Wow--so nice! And no lathe either. Your result is proof of what I often say; the end result is 90% machinist and only 10% machine. Well--that's assuming few time constraints and I know that production machine work is another story, but clever and ingenious and often time-consuming setups can make up for much of the lack of machine! I'll search for your other treads.
Off topic:
Your photos remind me that I need to repair my good digital camera (for a second time) so I can document my work for others to peruse too. My cheap smartphone takes crappy close-ups! The repair of my better digital camera requires something like 2 hours of microsurgery to access a sticking iris and re-assemble it. It's a plastic iris and, though probably made from thin nylon or other "self lubricating" material, its gets sticky in time. It's a known bug in these otherwise nice but older Sanyo Xacti cameras and the fix is to clean the sticky factory factory-applied lubricant using denatured alcohol and re-assemble it without any lube. It worked for a couple of years after the last time, but it's sticking again. I now suspect the plastic might be denaturing in time and shedding some kind of sticky substance. I might try soaking it in Frog Lube after cleaning before wiping it dry this time, but I have to find the time to do it.
Hahaha! Those pics are with my my IPhone 12 mini. I will say, it takes pretty darn nice pics. LOL!
I can't complain about my phone for the price ($150 base price but I upgraded memory so $200). It's a Pinephone (Linux based and designed not to spy on its users) but it's still very much under development. Still, I like the open source hardware and software and, though I don't code much anymore, I participate in testing, debugging, bug reporting and I assist in the community development effort. I've run and worked on Linux-based machines of a wide variety about as long as there's been Linux (early Slackware Linux days).
I'm very happy with my cocking slot rework. A cheap Chinese TiN coated high speed steel end mill wouldn't touch it though. I had to use a quality USA-made TiCN coated carbide end mill.
The part of the cocking pin that rides against the side of the slot is 3/16 diameter so I touched off the straight side of the cocking pin slot in the bolt body and milled into the tight corner where the pin was bottoming at maximum protrusion. I thought the radius at the end of the slit looked slighter greater than the pin radius and sure enough--I was able to mill along the straight side of the slot and lengthen the slot by my goal of 0.014 without changing the angle of the other angled side of the slot (so no change to cocking effort). After cutting the slot 0.014 longer, I used my DROs to turn both x and y handwheels to change direction and blend my new very slightly smaller radius right into the angled side of the slot. The geometry turned out to be perfect to give me another 0.014 with no change to the angle on the cocking side of the slot.
Though the machined finish was very good, I used a Cratex fine grinding/polishing bit and my Dremel tool to smooth and shine it up and then I put the bolt back together. I measured 0.036 firing pin protrusion and the cocking pin wiggles easily in the slot a little so I'm sure I realized the 0.010 clearance that I wanted and the firing pin stop is now the bolt head shank instead of the end of the slot, just as it should be.
Next step is hot bluing my new 358 Norma Shaw barrel and installing it to the action. Then I'll open up my Boyds Pro Varmint barrel channel to clear and free float the new heavier barrel and bed the action to the stock.
 Posting Permissions


Bookmarks