

 Reply With Quote
What pull weight do you have Your Sav 2 set at?
Thanks...Jim


I took a few pictures prior to my second Sav2 install in a XLR bottom bolt release chassis. The plan is to make a provision in the hanger for the sear spring to function correctly. We need to modify the sear where it will move forward enough to catch the trigger ledge of the SAV2. We will have modified both the trigger hanger and the XLR bolt release mechanism to allow for the proper amount of sear travel for the bolt release to function correctly.
The Dunning-Kruger effect is alive and well.
What pull weight do you have Your Sav 2 set at?
Thanks...Jim
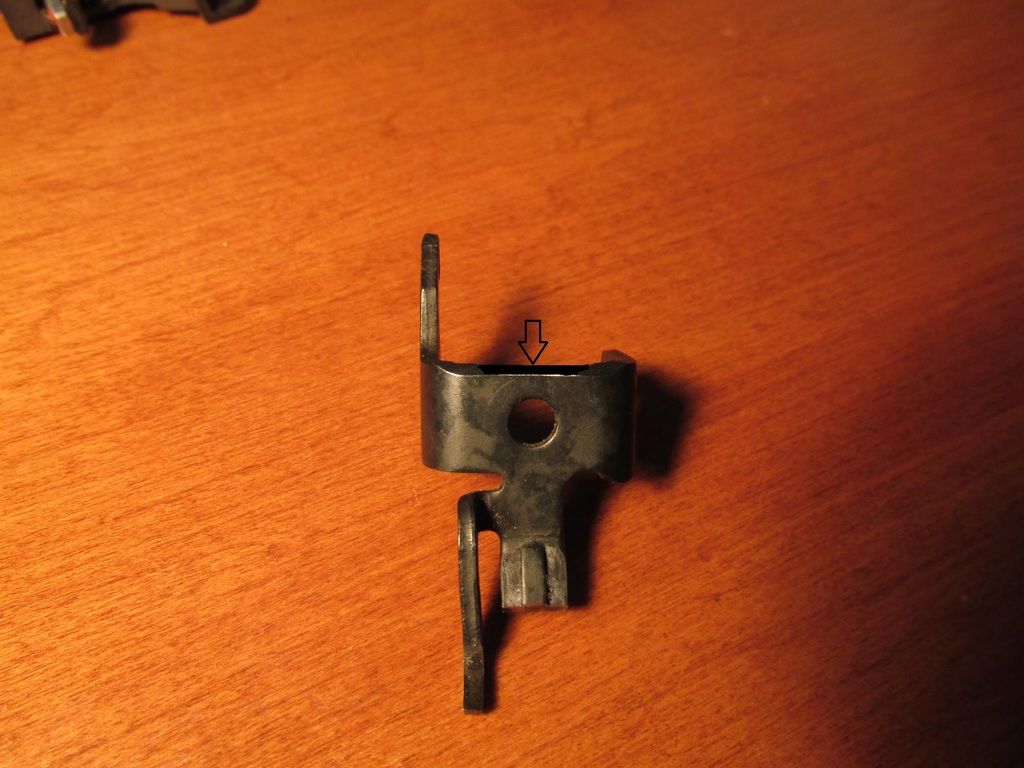
OK got them uploaded. I'm not as good with words or penmanship as some of the better contributors on the site so work with me on this. First off the sear return spring does not work well with the Save 2 trigger hanger. You have to remove material off of the hanger. To make it work test and fit. you will take a pretty good amount off. I blacked out the area that needs massaging.On two separate installs the SAV2 trigger would not catch the sear. Not sure why the design did not allow for this or why it is so much different than a regular sear. Rifle basics may have moved the trigger forward to minimize the travel on hand off allowing for more firing pin travel. In this step we need the sear to move enough to allow it to be caught by the trigger. How I handled this issue was to remove metal from the back edge of the sear where the arrow points. When you assemble the trigger you will see that this area rests on the bottom of the action. Remove metal until it clears the trigger sear. The hand off will be very close. If you see something I missed let me know. If you don't have this problem move on to the next stage.
The Dunning-Kruger effect is alive and well.
Now for the bolt release. The XLR bolt release slide button and the SAV2 trigger hanger are too wide to function together. I chose to modify both the hanger and the slide on the chassis. I will let you decide how much you want to remove. everything is visible when you assemble the components if you look through the bottom of the trigger guard. Take the trigger guard off(one screw to remove the grip and one screw to remove the guard) to reveal the bolt release slide so you can file on it in a vice or suitable tool. In this photo I show the modified slide.I am going to let you do the fitting as the metal gets thin here but I have had no adverse effects to the removal of material. This is the area that needs clearance for the XLR Bolt release mechanism to pass along side of. Be careful and judicious. Again the area to file or mill is blacked out. Assemble and inspect. Tear down and fit, repeat.
As a recap you have made a provision in the hanger for the sear return spring to function correctly. You have modified the sear to move forward enough to catch the trigger. You will have modified both the trigger hanger and the XLR bolt release slide to allow for the proper amount of sear travel for the bolt release to function correctly.
The Dunning-Kruger effect is alive and well.
Jim, I did not follow the SAV2 instruction with regards to how they modified the sear. I hone the sear surface very sharp then polish to a mirror finish with a jewlers wheel and fine compound. I don't use a trigger scale so I do not know the exact weight of pull. It is very light and crisp is all I can say. Maybe too light. the screw has easy access if I need to change it. There are a couple of springs with the kit and a 3 trigger pin locations to change leverage and so on. Was their a more specific question I dd not answer?Originally Posted by FW Conch

The Dunning-Kruger effect is alive and well.
No, good answer. I, like You said, probably have mine set too low also. But it's good to know I have a trigger that can be set as low as I need it, and still have the safety work. And, as You also pointed out, it's easy enough to raise the pull weight if needed. :-)
 Posting Permissions
Bookmarks