


 Reply With Quote
Please keep this updated , very interesting


Thought I would share a few photos of a barrel under construction for the general amusement of the group.
I'm starting with a 308, 1-8 twist, chrome moly barrel blank from Green Mountain. I went with a cheap blank since this is a new experience for me. I typically use a pre-threaded & contoured barrel from a commercial maker, since my lathe is pretty old, small, and beat up (bought it second hand and use it mostly on aluminum small parts.)
Layout markings on the barrel.... 18" Long, 0.750" at the muzzle, straight sides with a radius near the breach, and a 5/8th thread at the muzzle.
On the lathe, blank is cut to length, muzzle roughed out, and starting the contour cuts.
Contour complete. Outside of the barrel has been filed and sanded down to about 220 grit, then given a quick coat of cold blue to see how bad the surface is. Still have lots of sanding left to do, but that will wait for a few weeks. It might be a month or two before I can do the breech end & chamber the barrel.


Please keep this updated , very interesting
Yeah. I wanna see more of this
Happy to. Some folks will get a laugh out of some of my approaches to the tasks, most of which are directly related to the limitations of using a small lathe. (Mine is a 6x24 Atlas from the 1960's, with an extra bed extension for longer parts... I really miss having access to a 12x48) My advice to anyone starting from scratch: Get a bigger lathe! Like a 10 or 12 model with a headstock bore big enough to pass a barrel blank through instead of being forced to use centers. More money up front, but some tasks are much easier and inherently more accurate when you can work closer to the headstock.
My guess is threading will be the most challenging part, assuming you're able to center the chamber precisely.
I don't see a taper attachment did you cut the taper by offsetting the tailstock ? BTW keep the pictures coming
It looks like he cut it in steps and filed the steps out by hand.
No, I had to do it as a staircase of light cuts. I would advance the stop on the bed 0.05" on most of the passes. The last few, as I got close to the desired 0.750" diameter, were done by eye to create a radius. Then I used a mill file to remove the "stairs" and blend it into the diameter of the rest of the barrel.Originally Posted by JWW123

Finding the center of the barrel is a piece of cake. I've already cut a 60 degree chamfer on the muzzle end to ride in the live center of the tailstock. (I used a steady rest to get the barrel bore centered on a piloted cutter in the headstock chuck, then cut the chamfer by using the tailstock to advance the barrel into the cutter.) For the breech end, I'll have to repeat the process before turning the outside of the barrel down to the thread dimension. The chamfers don't have to be very deep, just enough surface to keep the rifle lands off the live center. The chamfers will be cut away when the barrel is crowned and chambered.
The actual threading is a pain... there is a lot of slop in the backhead gears, so I end up cutting threads by rotating the chuck by hand. I can get them roughed out pretty well, then chase them with a split die down to a tight fit to the receiver threads.
Well, been a few weeks waiting for a chamber reamer to show up. Meanwhile, I have a few barrels to cut, thread, and crown today. So, while I had the lathe set up to thread, I figured I would finish the muzzle end of the 300 Blackout barrel.
Sadly, I got so wound up with the threading that I forgot to take some photos of that operation (not much to really see, just winding the lathe by hand as it cuts a pass, winding it back to the start of the thread, and repeat... over, and over, and over.)
It was only when it came time to make the relief cuts on either side of the thread that I picked up the camera. So, this cut is just a simple plunge into the barrel to the minor diameter of the 5/8th -24 thread. This basically terminates the thread and prevents a potential stress point.
Next up, the barrel is set up to cut a crown into the muzzle. I'm using a commercial piloted cutter with a radius (it's actually for crowning M1 Garand barrels, but I don't have any reservations about using it on a 300 blackout barrel. It is destined to be a short-range brush/stalking rifle.)
Normally, you would pass the barrel through the headstock of the lathe. But since the spindle bore on mine is so small, I end up running the barrel through a steady rest and bearing to support it. The tailstock of the lathe will provide the pressure to advance piloted cutting into the muzzle while I hang on to the tap handle to keep it from rotating. The whole cutter and bore is liberally flooded with cutting oil.
Basic crown shape is cut. Time to break the sharp edges with a mill file and start sanding the crown to polish it out.
And... all done with the muzzle end. Just need to apply a little blueing to the bare metal. I used to make knurled thread protectors from scrap chunks of barrel, but anymore they are dirt cheap to buy ready made on eBay. One of the reasons I chose to contour the barrel at 0.750"... the size of an AR barrel. Which makes it easy to add off-the-shelf threaded muzzle devices that look custom made just because they match the barrel diameter.
Now that I have several factory Savage barrels to compare against, I guess it is time to flip the barrel around and start threading the breech end.
Ok, I've had enough for one night. Barrel breech turned down to 1.055", ready to start cutting 20 tpi threads.... that is, as soon as I sort out which gears to use so the leadscrew will do 20 tpi. (Never used that thread pitch before, so I've got to resort to the gear tables, set it up, and then use ink and scribe to see if it actually is going to cut that pitch.) This part is not to be rushed, I only get one shot at threading the breech. If I blow it, um... well... I don't want to go there.

wow nice work keep the pictures coming
Well, that went better than I expected. Just used a HSS threading bit, and out popped the thread... after about an hour of winding and re-winding the spindle to keep making the thread a little deeper on each pass.
My new barrel, next to a factory Savage 10 223 Rem barrel. The barrel nut feels about the same when threaded onto either one, so I guess I have the clearances right.
Now... to wait for a 300 Blackout chamber reamer to show up. Perhaps polish and blue the barrel while I'm waiting... dumb-de-dumb-de-dumb... twiddling my thumbs.
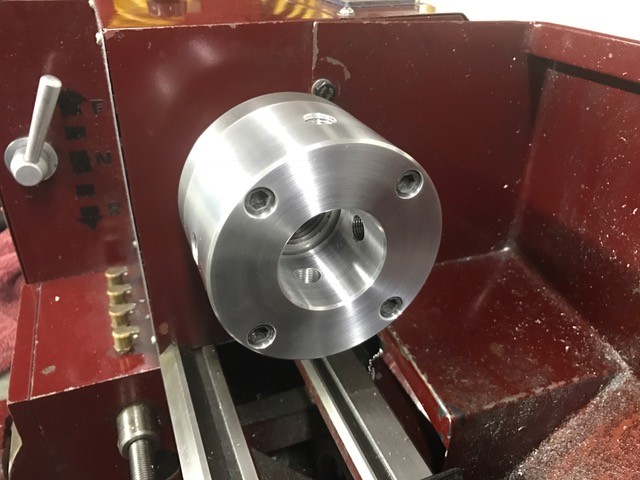
Looks like it's coming along nicely. What 60 degree cutter did you use and where did you buy it from? What is the size of your spindle bore. Th spindle bore on my 9x20 is only .750", so I'm limited too. I made this spider to hold the and indicate the barrel while chambering. I bored the center hole to 1.500" so I can get a little more room. There are 4 fine thread allen head bolts with brass ends to hold the barrel. It works really well when dialing in a barrel. Keep up with the pics.

Nice. You're a patient person. If I had to use that rocking horse tool post I'd take my machine to the junk yard. Hahahahaha. Not picking on you at all, a compliment.
Lol! I agree. The tool post on the 9x20's arent very rigid. I changed mine out a long time ago to a quick change tool post and I use a pitkin donut, it's much more rigid. Here is a pic of it being built. When I really want no deflection, I use the tool post in the second pic. If you're patient and you don't mind making some upgrades, you can accomplish a lot with these little import lathes.
Been a while, but I finally got my chamber reamer. It took the slooooooooow boat from Serbia. But, now that it is here, I can finish reaming the barrel.
The special tools needed: The reamer, go and no-go gauges. I'm going to cut the entire chamber using just the finishing reamer. Most cartridges need a roughing reamer to remove the bulk of the material, followed by a finish reamer to complete it. But the 300 AAC Blackout cartridge isn't much larger the the 30 caliber bore, so one reamer is all one needs. This one is piloted, so it will guide itself down the barrel.
I'm also not going to ream this chamber using the lathe. I am just going to ream it by hand, just like tapping a hole for a bolt. For anyone who wants to do this by hand: First, be gentle. The first cuts are the chamfer of the rifling and it is easy to jam the reamer. Once it makes a few revolutions, it will start to form the freebore area of the chamber. It will turn smoothly from that point on. Use plenty of cutting oil on the reamer, stop often to clean the chips out of the reamer. Also... NEVER turn the reamer counter-clockwise! Always turn it clockwise. That will keep you from chipping the cutting flutes on the reamer.
After a little while... and a lot of turning.... the reamer will have cut enough of the chamber where you can use the GO gauge to check your progress.
When it starts getting close to the correct depth (near the cutout for the extractor.) start measuring. On my 223 Rem bolt, the bolt face to bolt nose measured 0.1090". Add a little extra to provide clearance between the bolt and barrel breech, so I'm going to stop reaming when the GO gauge extends 0.1200" beyond the face of the breech.
And... Done!
All that is left to do is polish out the chamber and put a tiny radius on the mouth of the chamber.
Last edited by clm2112; 01-29-2018 at 06:14 PM. Reason: Fix picture links
To answer a few questions...
The 60 degree cutter is quite old..probably from the 1950's or earlier. It is marked with the Cleveland logo and was part of a box of tooling I found in the basement of the farmhouse. Sorry, I can't point you at where to find one (maybe eBay?)
Don't bust on the lantern tool-post :) No, I probably should make myself a quick-change post, but I keep using the lantern post. My little 6" Atlas isn't up for making deep cuts. so patience is always required.
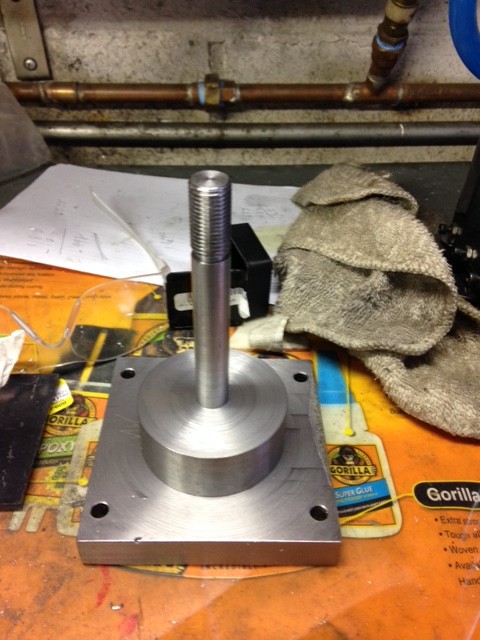
What to do with the left-over barrel chunk? Make neat stuff out of it. I like to shoot with iron sights, so I took a chunk of the excess barrel and made myself a pair of bloop-tubes to use with front sight mounts. One threaded 5/8th-24 and the other threaded 1/2-28. Screw it on the barrel muzzle and mount a front aperture sight.
What it looks like on the end of the barrel....

Good work! Never hand reamed one. You're a brave soul!
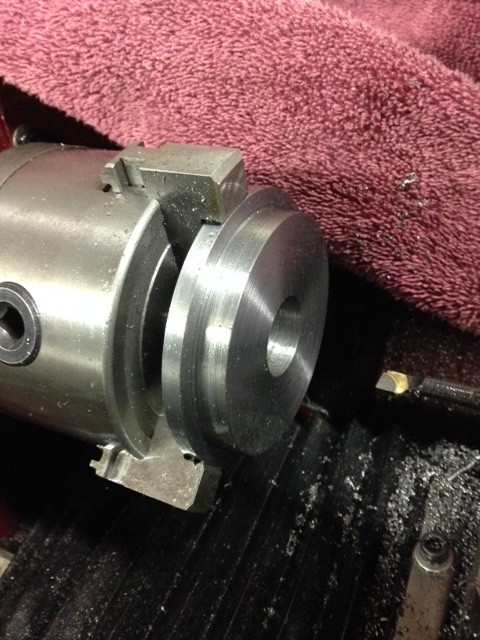
I take my left over chunk of barrel and make myself a case gauge. Run the reamer into a short piece about halfway up the shoulder. Can use this gauge along with a caliper to set FL die headspace and also fine tune bullet seating. I make one for every chamber.
Thanks. Hand reaming really isn't all that hard to do, just time consuming. I used hand reamers a lot on shotguns, to lengthen the forcing cones and do choke installations, so doing a dinky little 300 Blackout chamber seems like nothing. The reamer is doing all the work, the hands just need to spin it in a consistent way. For me, hand cutting is easier than using the lathe. I don't have a way to force cutting fluid in to clear chips, so there is a lot of effort wrapped up in that. Doing it by hand, gravity and the cutting oil washes most of the chips down the bore.
Now that I have the reamer, I'll probably use another chunk of the scrap barrel to make a copy of the chamber as a reference as well. Never hurts to have something to look back at and see what the new chamber is supposed to look like. If I end up with multiple barrels cut with the same reamer, I'll make a nicer one to use at the loading bench as a reference.
What did you think of the Serbian reamer? I've seen them advertised and wondered.
Well, aside from the time it took to get here, it is otherwise a good reamer. The flutes were sharp and uniform. The pilot bearing was a good fit and turned freely on the end of the reamer. And the chamber it cut looks just fine. It will take some ammunition run through it this spring to see what the fired brass looks like. I think it will be OK though. A few pieces of fired brass from a Rem 7 barrel were tight going into this chamber, but resized brass dropped right in like the gauges, so I don't think there are any dimensional issues with the chamber that the reamer cut.
That reminds me of something else I should try to make, to make this task do-able on the lathe. An adapter with a hose fitting on it. Thread one side 5/8-28 to screw onto the muzzle, and the other side 1/2-20 to thread onto a drill-chuck arbor mounted in the lathe tailstock. That way I could pump cutting fluid down the bore of the barrel and flush the chips out through the flutes of the reamer. That would make doing the chambers on the lathe less of a chore.
 Posting Permissions
The sole purpose of this site is to provide an online community for those who wish to interact with other Savage firearm enthusiasts.
The information and opinions expressed within this site are those of its contributors, and in no way should be viewed as the opinions or recommendations of Savage Arms.
This site utilizes affiliate programs to generate revenue and as such purchasing a product reached by clicking on a link on this site may earn us a small commission on that sale.


Bookmarks