Page 8 of 8 FirstFirst ... 45678
Results 176 to 196 of 196

Thread: Stainless 16 Lightweight Hunter 7.62x39 build

  1. #176
    Administrator J.Baker's Avatar
    Join Date
    Dec 2006
    Location
    NW Ohio
    Age
    49
    Posts
    6,464

    Quote Originally Posted by futurerider103 View Post
    That may happen. I wonder if I could just get the follower instead because in all honesty I'll never have the use for the .243 mag

    Sent from my LM-G710 using Tapatalk
    You will need the mag and follower as the followers are specific to each mag as they have notches in the sides to match the dimples in the magazine boxes.
    "Life' is tough. It's even tougher if you're stupid." ~ John Wayne
    “Under certain circumstances, 
urgent circumstances, desperate circumstances, profanity provides a relief denied even to prayer.” —Mark Twain

  2. #177
    Basic Member
    Join Date
    Sep 2013
    Location
    Springfield Mo
    Age
    39
    Posts
    482
    Quote Originally Posted by J.Baker View Post
    You will need the mag and follower as the followers are specific to each mag as they have notches in the sides to match the dimples in the magazine boxes.
    Roger that

  3. #178
    Administrator J.Baker's Avatar
    Join Date
    Dec 2006
    Location
    NW Ohio
    Age
    49
    Posts
    6,464
    Quote Originally Posted by futurerider103 View Post
    Round sits too far backand and when i push the bolt forward the round tumbles

    Sent from my LM-G710 using Tapatalk
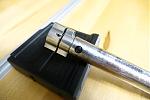
    I just had this same exact issue when I screwed my .284 Win barrel onto a short action 110 and feeding from a .308 magazine. The back tab on the mag housings angles towards the rear a little at the top, allowing the top round(s) to sit further back. As a result, they sit back further than the bolt can reach to get behind the case head so when you go to chamber a round it slides over for 1/2" or so then catches on the body of the case and pushes it forward ultimately resulting in a jam. Was also gouging the heck out of my brass.

    Took it out to Fred and had him examine it and determined the easiest solution was to simply grind some thickness off the back side of the front baffle on the right side that acts as the bolt stop on the sear to allow the bolt to come back a little further. Didn't need to take much off, roughly 3/32" to get it feeding properly and reliably.
    Click image for larger version. 

Name:	DSC02238.JPG 
Views:	41 
Size:	67.7 KB 
ID:	5659
    "Life' is tough. It's even tougher if you're stupid." ~ John Wayne
    “Under certain circumstances, 
urgent circumstances, desperate circumstances, profanity provides a relief denied even to prayer.” —Mark Twain

  4. #179
    Basic Member
    Join Date
    Sep 2013
    Location
    Springfield Mo
    Age
    39
    Posts
    482
    That is not the same as i was having. I'll post video in about an hour

  5. #180
    Basic Member
    Join Date
    Sep 2013
    Location
    Springfield Mo
    Age
    39
    Posts
    482
    This is what mine is doing

    https://youtu.be/lIshPsozrvg

  6. #181
    Basic Member
    Join Date
    Sep 2013
    Location
    Springfield Mo
    Age
    39
    Posts
    482
    Time to shape the forend andthings are about to get rough

  7. #182
    Basic Member
    Join Date
    Sep 2013
    Location
    Springfield Mo
    Age
    39
    Posts
    482
    Oh my god so stressfull. Only rough shapped and a lot more to go. I was forced to make a decision that I've beennthinking about doing anyways. The white dot in the middle of rhe rosewood is a dowel and thats where I will now be putting a quick detach cup for a sling.


  8. #183
    Administrator J.Baker's Avatar
    Join Date
    Dec 2006
    Location
    NW Ohio
    Age
    49
    Posts
    6,464
    Looking good.

    Is it just me, or does the left side of the forearm look a little thicker (wider) than the right side in the second to last photo. Maybe it's just the angle or lighting/shadow making it appear that way.
    "Life' is tough. It's even tougher if you're stupid." ~ John Wayne
    “Under certain circumstances, 
urgent circumstances, desperate circumstances, profanity provides a relief denied even to prayer.” —Mark Twain

  9. #184
    Basic Member
    Join Date
    Sep 2013
    Location
    Springfield Mo
    Age
    39
    Posts
    482
    Quote Originally Posted by J.Baker View Post
    Looking good.

    Is it just me, or does the left side of the forearm look a little thicker (wider) than the right side in the second to last photo. Maybe it's just the angle or lighting/shadow making it appear that way.
    It is. I was too freaked out with the belt sander and decised to hang it up for the night and come back with hand tools that I'm more familiar with

  10. #185
    Basic Member
    Join Date
    Sep 2013
    Location
    Springfield Mo
    Age
    39
    Posts
    482
    Its not necessarily thicker just one side is rounded more I think.

  11. #186
    Basic Member
    Join Date
    Sep 2013
    Location
    Springfield Mo
    Age
    39
    Posts
    482
    Well did a lot of work today and its starting to take better shape! At least I think. My girlfriend liked the blunt end the way it was before but oh well its my gun not hers.

  12. #187
    Basic Member
    Join Date
    Jan 2019
    Location
    WA State
    Posts
    80
    Looking good! I can't wait to see how it turns out.

  13. #188
    Basic Member
    Join Date
    Sep 2013
    Location
    Springfield Mo
    Age
    39
    Posts
    482
    Quote Originally Posted by Frontier Gear View Post
    Looking good! I can't wait to see how it turns out.
    Thank you. Its definitely a different kind of accomplishment to make a completely custom build on my own than just putting together the run of the mill parts gun AR

  14. #189
    Basic Member
    Join Date
    Sep 2013
    Location
    Springfield Mo
    Age
    39
    Posts
    482
    Got some important parts I today. I don't think I'll put then in today but maybe this weekend.

  15. #190
    Basic Member
    Join Date
    Sep 2013
    Location
    Springfield Mo
    Age
    39
    Posts
    482
    I ended up using 1 of the pillars to make both. This wasn't too hard as long as you have a belt sander, micrometer and a dremel. I did try to drill the holes 1 size at a time but it broke away the wood. This sucks but since I'll be using jb weld I think it'll be ok.

    Notching the pillars to fit the action kinda sucked but oh well.

  16. #191
    Basic Member
    Join Date
    Sep 2013
    Location
    Springfield Mo
    Age
    39
    Posts
    482
    A long over due update.
    https://youtu.be/ZOGaHD7Beu8

    Sent from my SM-G960U using Tapatalk

  17. #192
    Basic Member
    Join Date
    Dec 2014
    Posts
    17
    Very cool. Would love to se some up close photos now that it is 95% complete.

  18. #193
    Basic Member
    Join Date
    Sep 2013
    Location
    Springfield Mo
    Age
    39
    Posts
    482
    Quote Originally Posted by SavageSeminole View Post
    Very cool. Would love to se some up close photos now that it is 95% complete.
    Still more shaping to do on the for end then a light 600grit sanding to the whole thing then lacquer it. I will be installing QD swivel mounts as well. 1 in the forest where you can see the dowel that holds the rosewood and not sure where in the butt yet.
    The pictures can't show the chatoyance but soon enough is going to look awesome!
    I do want to get lower rings as well but I'm super excited to get this going.

    Sent from my SM-G960U using Tapatalk

  19. #194
    Basic Member
    Join Date
    Sep 2013
    Location
    Springfield Mo
    Age
    39
    Posts
    482
    I finally got to shoot this sweet little thing!!!! Not bad for 1st shots using TulAmmo. It's such a sweet soft shooter.

    https://youtu.be/MgjeWXfmbOA


    Sent from my SM-G960U using Tapatalk

  20. #195
    Basic Member Orezona's Avatar
    Join Date
    Feb 2017
    Posts
    444
    Great job. It must feel great to have it done.

  21. #196
    Basic Member
    Join Date
    Sep 2013
    Location
    Springfield Mo
    Age
    39
    Posts
    482
    Quote Originally Posted by Orezona View Post
    Great job. It must feel great to have it done.
    Oh it's not done. I still have to finish the final shaping on the for end and then speedy the lacquer then install QD cups THEN it'll be done except I want to get a scope with a lighted reticle for night hunting

    Sent from my SM-G960U using Tapatalk

Page 8 of 8 FirstFirst ... 45678

Similar Threads

  1. Lightweight hunter magnum build?
    By grouse in forum 110-Series Rifles
    Replies: 9
    Last Post: 10-01-2018, 09:55 PM
  2. 7.62x39 Axis build where can I get the parts?
    By Akinnepa in forum Axis Series Rifles
    Replies: 7
    Last Post: 09-01-2016, 06:58 PM
  3. New 16/116 Lightweight Hunter Stainless
    By TXCOONDOG in forum 110-Series Rifles
    Replies: 18
    Last Post: 01-24-2016, 05:21 AM
  4. 7.62x39 build questions
    By curlymaple42 in forum 110-Series Rifles
    Replies: 3
    Last Post: 04-17-2015, 12:42 PM
  5. Future stainless Lightweight Hunter?
    By Sundo in forum 110-Series Rifles
    Replies: 0
    Last Post: 11-28-2011, 12:32 AM

Bookmarks

Posting Permissions

  • You may not post new threads
  • You may not post replies
  • You may not post attachments
  • You may not edit your posts
  •