Page 2 of 4 FirstFirst 1234 LastLast
Results 26 to 50 of 91

Thread: SAVAGE and BHW chosen for 6.5 CREEDMOOR build

  1. #26
    Basic Member
    Join Date
    Jan 2013
    Age
    45
    Posts
    58

    Now its on to gluing up the blanks...
    These are the pieces for Blank #3


    The pieces that make up each blank were laid out and covered with a layer of Titebond III.
    I've seen folks using the roller technique for evenly spreading glue, so I gave it a try.


    Stand all the pieces up together (glue sides in !!!)
    Applying the clamps while holding the 3 pieces of the blank and trying to get a sacrificial piece of scrap in between the metal clamp and the curly maple...not fun.


    Since there are lots of clamps around...I applied lots of clamps...


    I finished gluing and clamping Blank #3 (far back right) and Blank #1 (front right).
    Back during the planning and sanding, I mentioned having access to a room full of woodworking equipment...there is also a gluing room, full of clamps. Its awesome.


    Here, gluing up the final blank, #2.
    I started with Blank #3, so that if I messed something up, it would be the one that I care least about.
    Next was Blank #1 (the best one). I wanted to get that one done and leave #2 for last...in case I ran out of time or glue.


    The last piece is a chunk of purpleheart. A lot of classic styled sporter rifle have an ebony wood tip on the fore end. This rifle is being built for my wife, and she requested a piece of purpleheart.


    Yes, I know I just made an entire post about gluing up boards. :)
    This project has been enjoyably challenging.
    Thanks for reading so far.
    -PB

  2. #27
    Basic Member
    Join Date
    Jan 2013
    Age
    45
    Posts
    58
    I went back today to take the clamps off and clean up the edges.

    Started with Blank #3 again...so I can learn on that one. You can see Blank #2 in the background. (did I mention its a glue up room full of clamps. it is awesome.)


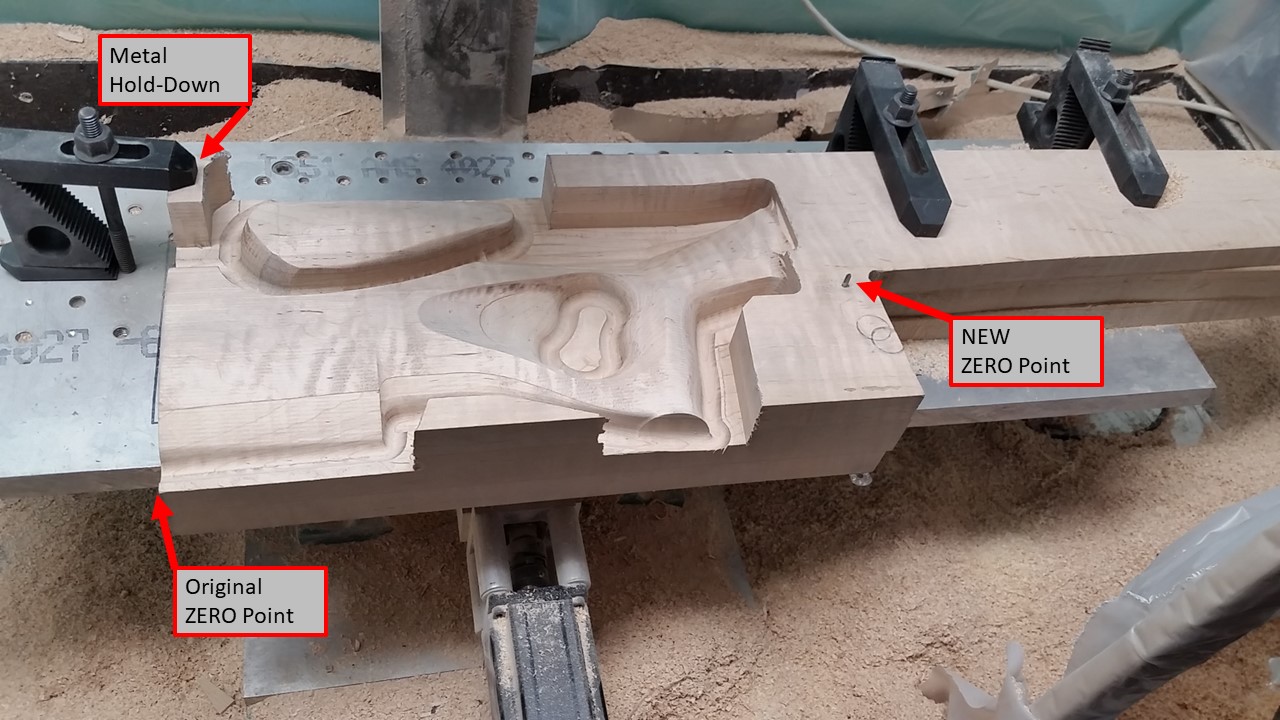
    Took the blank over to the jointer to clean up the top edge. This edge will be used during the CNC process as a fixture reference.


    I got some tear-out while jointing that edge. I think I was pushing it through too fast. This is why I started with Blank #3. I slowed down on all the other edges and didn't have any more problems.


    Next, I cleaned up the Nose and Back edges, square to the top. 12" blade Makita sliding compound miter saw.
    The back edge is also used as a fixture reference on the CNC machine later.


    I removed Blank's #1 and #2 from the clamps and did the same steps. Below are 2 pictures of the top edge of Blank #1. Lots of Tiger Stripes.

    --


    Last step for today. I brought all three blanks over to the table saw. Saw Stop brand.;
    There is a little green light near the on-off switch. The green light says the Saw thinks there is nothing conductive (like my finger) touching the blade.
    Should I get kinda dumb while making this cut...and allow my finger to touch the spinning blade, the saw mashes an aluminum brake into itself and stops spinning within 1/1000th of a second.
    I watched a few Youtube videos and was amazed. Do NOT TRY THIS AT HOME.


    I set the guide fence to JUST take the bottom edge off the Blanks.


    This one's all cleaned up.


    And...all done for the day. Here are all 3 blanks cleaned and prepped for the next stage.

    --

    --


    Next, I need to get prepared on how I am going to cut out the riser.
    Thanks for reading so far.
    -PB

  3. #28
    Basic Member
    Join Date
    Jun 2012
    Posts
    28
    Man, this is really interesting, I had no clue their were shops that would let you rent their equipment for $5 an hour. That is really awesome.

  4. #29
    Basic Member
    Join Date
    Jan 2013
    Age
    45
    Posts
    58
    This project is back on.

    A lot...a very lot has happened since this last post on this thread. However, suffice it to say that stock is being cut out. After storage for ~3 years, the stock blank that was chosen was #2 from the process above. Blanks #1 and #3 have a small bit of moisture damage. They might be salvageable, but its not worth risking for this. Blank #2 is clean, and it is in the midst of being cut on the CNC machine. Pics and details to follow.

    The forum warned me that this post was over 39 months old and that I shouldn't continue it. We'll see if that proves true.

  5. #30
    Basic Member
    Join Date
    Jan 2013
    Age
    45
    Posts
    58
    It takes some effort to get this project off the ground.
    Things change over time.

    I am not using the same CAD/CAM software anymore. I have to open those old files, export them from FreeCAD (open source CAD I was using) and import into AutoDesk Fusion360 (CAD/CAM software that I am using currently.

    This takes some effort, but I think I have done it successfully.

  6. #31
    Basic Member
    Join Date
    Jan 2013
    Age
    45
    Posts
    58
    Everything looks pretty good. It is not until further inspection that I noticed the issue. One of the Barrel Cooling Ports is closed off. This will have to be dealt with later.


  7. #32
    Basic Member
    Join Date
    Jan 2013
    Age
    45
    Posts
    58
    Part 1 of 8 (or more) is complete.
    The stock is larger than the area that my CNC machine can reach at any one time. Thus, I have to setup and cut out smaller portions of the overall stock...being careful how I align things. CNC machine has to have an origin to work from. I chose the bottom left corner of the Stock Blank as my starting point. Everything gets 'zeroed' off that point.


  8. #33
    Basic Member
    Join Date
    Jul 2012
    Location
    Northern MN
    Age
    72
    Posts
    672
    Very interesting post.
    Keep it going,
    Randy

  9. #34
    Basic Member Robinhood's Avatar
    Join Date
    Apr 2014
    Location
    South Texas
    Age
    66
    Posts
    7,795
    You have my attention.

  10. #35
    Basic Member
    Join Date
    Jan 2013
    Age
    45
    Posts
    58
    I have made a bit more progress.
    Things are slow going. I have the machine set to rough away the majority of the material...followed by 2 different finishing passes.
    Also, I am using an old craftsman router donated by a friend. While this is an improvement on the little trim router used to cut out the first stock (see 220-Swift in earlier posts), it is still slow going. This old router sounds like it is going to scream itself to a million pieces.
    The plastic tent keeps the sawdust from taking over the basement and the rest of the house.


    At the beginning of the CNC cutting, you have to Zero the machine and tell it where the material is. You have to tell it where the ZERO-Point is to start from. I used the very bottom back corner of the stock Blank as the starting point. Here, there are problems. I will be cutting this area away...and I cant 'reach' it later when I am cutting the front section. It will be too far away for my machine's limited travel space.

    SO...I have to use the original Zero-Point to make a new one that I can reach and reference later. This is actually a hole that I drill using the machine.


    The Metal Hold-Downs are very effective for keeping the Stock Blank exactly in place on the CNC table. The involve a system of cantilevers and threaded rods and grooved blocks. Regardless of how the work...the are made of hard metal, and the Wood Router Bit does not like them. I have to clamp the Stock in a manner that allows a section to be cut and also prevents the router bit from running into one of these metal pieces.

    Added to these challenges - I have to have some flat sections left after the stock is cut on this 'right' side.
    I will then (eventually) flip the Stock Blank over and cut the 'left' side. The flat areas that are left will allow me to position the Stock Blank on the CNC table in a flat and level manner.

  11. #36
    Basic Member
    Join Date
    Jul 2016
    Posts
    62
    Quote Originally Posted by PB_Crisp View Post
    I have made a bit more progress.
    Things are slow going. I have the machine set to rough away the majority of the material...followed by 2 different finishing passes.
    Also, I am using an old craftsman router donated by a friend. While this is an improvement on the little trim router used to cut out the first stock (see 220-Swift in earlier posts), it is still slow going. This old router sounds like it is going to scream itself to a million pieces.
    The plastic tent keeps the sawdust from taking over the basement and the rest of the house.


    At the beginning of the CNC cutting, you have to Zero the machine and tell it where the material is. You have to tell it where the ZERO-Point is to start from. I used the very bottom back corner of the stock Blank as the starting point. Here, there are problems. I will be cutting this area away...and I cant 'reach' it later when I am cutting the front section. It will be too far away for my machine's limited travel space.

    SO...I have to use the original Zero-Point to make a new one that I can reach and reference later. This is actually a hole that I drill using the machine.
    I love seeing guys make their own CNC equipment them use it to make parts. Great work.

    I built a small CNC and I usually make some sort of block that I rest or secure against one corner of the work piece. This way if something gets screwed up I can still reposition everything.

  12. #37
    Basic Member
    Join Date
    Jan 2013
    Age
    45
    Posts
    58
    To cut one side of the stock out of the Stock Blank, I have to cut in stages.
    Each stage involves un-bolting the Blank from the CNC Table, moving and aligning, and then re-bolting the Blank to the table.

    In addition, I have to generate G-Code for each section. Here you can see the ~4 setups for this side of the Stock.


    I tell Fusion 360 what I want the Router to do. I have a roughing operation for this area. Just for admin purposes, I name each section based on where it is.
    Back-Bottom-Right (BBR)
    Top-Back-Right (BTR)
    Top-Middle-Right (TMR)
    Top-Front-Right (TFR)

    Each of these have a roughing and 2 finishing passes.
    I set the CAM portion of Fusion 360 to do a Parallel finish for the portions that are more flat (0 - 30 degrees)
    Then, a Contour method that follows the stock shape and steps down incrementally for the portions that are steeper (28 - 90 degrees)
    There is overlap between the 2 finishing strategies.


    The CNC machine then runs this G-Code (machining language) and controls the stepper motors to tell the machine where to go and how fast and etc.


  13. #38
    Basic Member
    Join Date
    Jul 2016
    Posts
    62
    What NC Software are you using? Also what control board did you choose for your CNC? I really like seeing what other guys build and I’m thinking about building small CNC Lathe or modifying a Grizzly mini lathe.

    Also did you teach yourself Fusion 360? I’ve got 30+ years of 2D autocad experience, designing machenery and connectors. Now I’m no longer in that line of work but I’ve been teaching myself how to use Fusion 360. It was daunting for a bit, as I would design 2d sections in AutoCAD and import them as sketches into Fusion. Now I’m rapidly getting used to making sketches in Fusion so I think I’ve made it past the tipping point. You have inspired me to think about making a replacement stock for my Axis II.


    Sent from my iPad using Tapatalk

  14. #39
    Basic Member
    Join Date
    Jan 2013
    Age
    45
    Posts
    58
    Well...
    That didnt go as planned.
    The Old Router has been screaming at me. Its gotten loud enough that the kids are complaining.
    I am pretty sure the bearings are shot. The 'spindle' rattles back and forth.

    Add to that frustration, the spindle lock that lets you loosen or tighten the collet on the bit wouldn't work.
    I took it apart to see what was up.
    Seems the spindle lock mechanism has been rubbing the spindle and eating itself.


    I am going to need a new Router.
    Craigslist for a replacement!

  15. #40
    Basic Member
    Join Date
    Jul 2016
    Posts
    62

    SAVAGE and BHW chosen for 6.5 CREEDMOOR build

    Quote Originally Posted by PB_Crisp View Post
    Well...
    That didnt go as planned.
    The Old Router has been screaming at me. Its gotten loud enough that the kids are complaining.
    I am pretty sure the bearings are shot. The 'spindle' rattles back and forth.

    Add to that frustration, the spindle lock that lets you loosen or tighten the collet on the bit wouldn't work.
    I took it apart to see what was up.
    Seems the spindle lock mechanism has been rubbing the spindle and eating itself.


    I am going to need a new Router.
    Craigslist for a replacement!
    Man sorry to hear that. What is your router Budget? We have a few Porter Cable 3.5hp models at the shop that are very solid workhorses.


    Sent from my iPad using Tapatalk

  16. #41
    Basic Member
    Join Date
    Jan 2013
    Age
    45
    Posts
    58
    Quote Originally Posted by ToolAA View Post
    What NC Software are you using? Also what control board did you choose for your CNC? I really like seeing what other guys build and I’m thinking about building small CNC Lathe or modifying a Grizzly mini lathe.

    Also did you teach yourself Fusion 360? I’ve got 30+ years of 2D autocad experience, designing machenery and connectors. Now I’m no longer in that line of work but I’ve been teaching myself how to use Fusion 360. It was daunting for a bit, as I would design 2d sections in AutoCAD and import them as sketches into Fusion. Now I’m rapidly getting used to making sketches in Fusion so I think I’ve made it past the tipping point. You have inspired me to think about making a replacement stock for my Axis II.


    Sent from my iPad using Tapatalk
    ToolAA:
    I am using LINUXCNC to run the machine. The setup is a bit more challenging vs Mach 3-4. (Or so I've read)

    The 'control board' isn't really a thing in this setup. You can find what I have in my CNC here:
    http://www.migration.g0704.com/G0704_electronics.html

    Linuxcnc sends step signals out the DB25 parrelel port. They hit the C10 breakout board. The get split out from there to each axis Digital Stepper Driver (Keling brand). Essentially, I bought the Hoss recommended Heavy Duty Digital package when I put this machine together 5 years ago.

    I taught myself both CAD and CAM.

    The first stock (220 swift) was done in FreeCAD. The friend who's Dad it was made for did 99% of the CAD on that one.

    I did all the CAM using a program called CAMBAM. It is easier to learn than Fusion360. However, price and functionality were worse.

    FreeCAD is way harder to use. I learned sketches and 3d models in that software. Porting those skills over to Fusion360 w has been a breeze.

    The CAM in Fusion360 was the harder part. CAMBAM is much more limited, so you get good fast...not realizing you know very little of true 3d CAM.

    CAM is all about knowing your recipes. I used a few test pieces for this stock. One was just 2x4 pine. The other was hard maple, just not the laminated tiger maple Blanks.

    I think I've gotten a decent handle on CAM for this project. We'll see.


    Sent from my SAMSUNG-SM-G870A using Tapatalk

  17. #42
    Basic Member
    Join Date
    Jan 2013
    Age
    45
    Posts
    58
    Quote Originally Posted by ToolAA View Post
    Man sorry to hear that. What is your router Budget? We have a few Porter Cable 3.5hp models at the shop that are very solid workhorses.


    Sent from my iPad using Tapatalk
    The goal would be cheap and local (sw ohio). I've got a bead on a few sub $50's on local CL.

    Sent from my SAMSUNG-SM-G870A using Tapatalk

  18. #43
    Administrator J.Baker's Avatar
    Join Date
    Dec 2006
    Location
    NW Ohio
    Age
    49
    Posts
    6,468
    I just want to know where that woodworking shop full of tools is that can be rented for $5/hour.
    "Life' is tough. It's even tougher if you're stupid." ~ John Wayne
    “Under certain circumstances, 
urgent circumstances, desperate circumstances, profanity provides a relief denied even to prayer.” —Mark Twain

  19. #44
    Basic Member
    Join Date
    Jan 2013
    Age
    45
    Posts
    58
    Quote Originally Posted by J.Baker View Post
    I just want to know where that woodworking shop full of tools is that can be rented for $5/hour.
    I work on WPAFB. The MWR here has an auto-hobby shop and a craft facility. Within the craft building is the well equipped wood-shop. $5 an hour for those who aren't junior-E.

    Sent from my SAMSUNG-SM-G870A using Tapatalk

  20. #45
    Basic Member
    Join Date
    Jan 2013
    Age
    45
    Posts
    58
    New router acquired.
    New to me anyways.


  21. #46
    Basic Member
    Join Date
    Jan 2013
    Age
    45
    Posts
    58
    When I used the CNC machine to cut out the 220-Swift stock (back in 2014) I had made a clamping bracket out of deck-board mahogany. I used this to squeeze clamp the trim router I had (borrowed) onto the spindle of the mill-head. This arrangement worked well enough for the project, but caused a few small issues. I had to slow the acceleration parameters in the control software to overcome the additional weight I had added to the Z-axes. In addition, only small cuts could be made...half due to the trim router limited horse power...and also due to the kinda precarious nature of the clamp mount.


    Almost immediately after finishing that stock, I bought some scrap aluminum and fashioned a more robust mount for the larger router I had been given.
    This new mount actually replaces the metal cutting mill-head for when I am working on a wood project.
    The back plate has the Z-axis bolt pattern cut into it, and the bottom plate has a hole cut to fit the router.
    Another mahogany deck-board clamp was made to mate the router to the aluminum plate bracket.


    I tell all this back-story and show all this detail to get to this point.
    The NEWest router is even bigger...and the mounting plate that I made for it is does not have a big enough hole in it. The 1/4" thick 6061 aluminum mounting plate...needs a bigger hole cut in it.
    There are lots of ways to accomplish this...jigsaw, grinder, etc.
    I decided to take the router mount off the CNC machine and replace it with the Mill-head...and cut the hole out that way.


    I cut both the aluminum plate and the mahogany clamping blocks with the Metal cutting Mill-head.


    After all that - trim router, clamp blocks, aluminum mount, bigger router, broken router, redo mount, etc...
    But...thats all finally done. Whole evening gone just getting this done.


    I think I am back on track with this project...I dont know if I can handle many more glitches.

  22. #47
    Basic Member
    Join Date
    Jan 2013
    Age
    45
    Posts
    58
    I dont know if folks are actually reading this.
    Please let me know if this is too detailed - or has too many pictures - or is too hard to follow.
    I am enjoying the project, and I would like for anyone interested to also be able to enjoy reading about it.

  23. #48
    Administrator J.Baker's Avatar
    Join Date
    Dec 2006
    Location
    NW Ohio
    Age
    49
    Posts
    6,468
    Quote Originally Posted by PB_Crisp View Post
    I work on WPAFB. The MWR here has an auto-hobby shop and a craft facility. Within the craft building is the well equipped wood-shop. $5 an hour for those who aren't junior-E.

    Sent from my SAMSUNG-SM-G870A using Tapatalk
    Well I guess as a bona-fide tax payer.....you're welcome! LOL

    My neighbor has a 24x40 woodworking shop with all the toys, just not as big as those. 14" planer, 6" jointer, 52" Delta Unisaw, drill press, 48" drum sander, shaper, wood lathe, and yes.....more clamps than you could ever possibly need.
    "Life' is tough. It's even tougher if you're stupid." ~ John Wayne
    “Under certain circumstances, 
urgent circumstances, desperate circumstances, profanity provides a relief denied even to prayer.” —Mark Twain

  24. #49
    Basic Member
    Join Date
    Jul 2016
    Posts
    62
    Have you ever thought about using your existing cnc machine to build another larger one. I’ve seen some really cool plywood designs that seem to work great.

  25. #50
    Basic Member
    Join Date
    Dec 2006
    Posts
    3,359
    When did stock making get so complicated..?
    "As long as there's lead in the air....there's still hope.."

Page 2 of 4 FirstFirst 1234 LastLast

Similar Threads

  1. Creedmoor Build
    By Joshm28 in forum Picture Post
    Replies: 11
    Last Post: 03-08-2017, 05:05 PM
  2. 6.5 Creedmoor Build
    By Vanilla Gorilla in forum Ammunition & Reloading
    Replies: 13
    Last Post: 01-26-2016, 04:25 PM
  3. Savage 110xp or 10xp for 6.5 creedmoor build
    By johnny-bravo in forum 110-Series Rifles
    Replies: 37
    Last Post: 03-31-2013, 06:41 PM

Bookmarks

Posting Permissions

  • You may not post new threads
  • You may not post replies
  • You may not post attachments
  • You may not edit your posts
  •