Results 1 to 11 of 11

Thread: Help reassembling short action Model 16

  1. #1
    Ir0nRaven
    Guest

    Help reassembling short action Model 16


    Hello all,

    I have a Savage .308 Model 16 (Which is same as Model 11, just different finish, etc.)


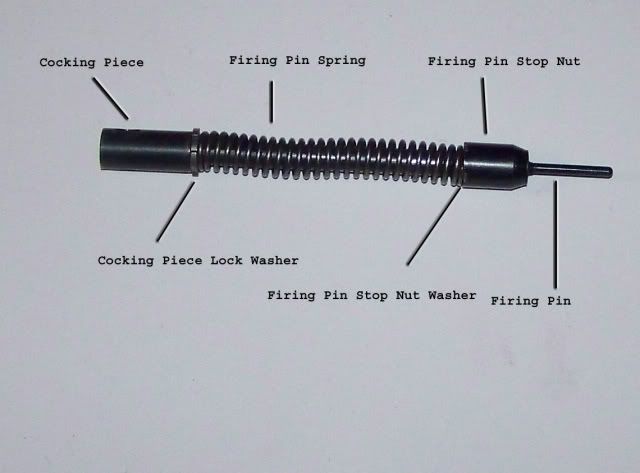
    I disassembled for no reason other than to understand. I wrote down that my recoil spring was compressed at 1.35". When I took it apart, I did not change or disassemble the firing pin stop nut or washer, so i shouldn't have changed my firing pin protrusion depth. When I reassemble, I'm unable to compress the spring to 1.35" (the threads bottom out), so I can only assume I misread that measurement. I've tried bottoming out the cocking piece and cocking piece washer, which compresses the spring to 1.80". Trying to reassemble the bolt using that tension, I'm unable to turn the bolt to the cocked position so I can only assume that the tension is much too high.

    Here are my measurements of the firing pin. Note that this is the stepped firing pin model where the this diameter is about .066" and the larger is closer to .095".

    Compressed spring: 1.80"
    Firing pin tip to front of firing pin stop nut: 1.365"

    I'd appreciate some advice. If possible, I'd really like to find a savage document that outlines these numbers - I can't find it anywhere on the 'net.

    Note that I found this thread:

    www.savageshooters.com/archive/index.php/t-14325.html

    Which gives some short action measurements but they don't seem to make any more sense than what I have.

    Thank you!

  2. #2
    Basic Member Hotolds442's Avatar
    Join Date
    Nov 2013
    Location
    Clark County, WA
    Age
    64
    Posts
    3,758
    I don't have a stepped firing pin assembly to assist you with, but did you measure the spring with the cocking piece in the cocked or uncocked position? You can back the bolt assembly screw off, cock the cocking piece, and then tighten the assembly screw and see where your measurement ends up with it in the cocked position.
    Originally Posted by keeki
    Guess it doesn't really matter. If ya cant afford $15, you won't be buying much anyways

  3. #3
    Basic Member Robinhood's Avatar
    Join Date
    Apr 2014
    Location
    South Texas
    Age
    66
    Posts
    7,813
    Man I am sorry but this is funny. I used to do stuff that way when I was a young man. It is painful but you learn a lot.

    One thing I have done to combat my desire to go in too deep and not find my way back was by taking pictures before I tear into anything. Like you I take notes as well but it seams like some distraction keeps me for noticing that one little thing. So out comes the camera.

    SavageShooters.com is a good resource for stuff like this and somebody will be along shortly to help out.

  4. #4
    Basic Member Robinhood's Avatar
    Join Date
    Apr 2014
    Location
    South Texas
    Age
    66
    Posts
    7,813
    I don't know how much you took it apart but I usually start with firing pin protrusion when I have taken one down completely.

    I took this off of the link you posted. It may help you as you discuss your solution.

  5. #5
    Basic Member
    Join Date
    Feb 2013
    Location
    Grand Blanc, MI
    Age
    59
    Posts
    3,677
    I am not good enough to follow everything you are saying, but the first time I broke down the bolt I got frustrated with trying to reassemble because the pin was uncocked. You can't really replace the Bolt Assembly Screw unless it is cocked. To cock it before reassembly, push the cocking piece into the cocked position with a strong, heavy PUSH with the end of a wooden hammer or along the edge of a workbench or something. (Solid wood that doesn't matter if it is marred) You kinda gotta push and rotate it as you go. Once it is cocked you can reassemble everything and it should be good to go.

  6. #6
    Basic Member Hotolds442's Avatar
    Join Date
    Nov 2013
    Location
    Clark County, WA
    Age
    64
    Posts
    3,758
    True that the hollow screws with the cocking indicator cannot be tightened when cocked. Others can.
    Originally Posted by keeki
    Guess it doesn't really matter. If ya cant afford $15, you won't be buying much anyways

  7. #7
    Basic Member
    Join Date
    Feb 2013
    Location
    Grand Blanc, MI
    Age
    59
    Posts
    3,677
    Quote Originally Posted by Hotolds442 View Post
    True that the hollow screws with the cocking indicator cannot be tightened when cocked. Others can.
    Well, you can if you cock it first just so you can get it started into the threads. Once it is started, de-cock and tighten,

  8. #8
    Basic Member short round's Avatar
    Join Date
    Jun 2011
    Location
    Georgetown, ohio
    Age
    77
    Posts
    562
    Firing pin spring, on assembled FP should measure about 1.940" between cocking piece lockwasher & stop nut washer. Easy way to get close, is to turn FP piece till it bottoms out & won't turn any further, turn back FP piece 3 full turns. Assemble bolt & check for cocking piece pin clearance, to bolt body, in fired position, the pin should have clearance, not hitting bolt body.

  9. #9
    JRexA
    Guest
    I had a similar problem.

    I took over an old 111, where the previus owner had it assembled incorrectly.
    I am sorry, I cant find the instructions, that I used.

    First step: Set the correct Firing pin protrusion

    You can find some pictures here: http://www.savageshooters.com/conten...rotrusion-Data

    I set mine to 1.2mm (aprox 0.05")

    You do this by dropping the firing pin into the bolt assembly, WITHOUT THE cocking piece mounted
    Then you meassure and adjust the front nut.

    After this is done, assemble the firing pin, and put in the cocing piece.
    Drop the firing pin into the bolt and check protrusion.

    If there is too little protrusion, then the Cocking piece hits the bolt.
    Adjust the rear nut, so that the cocking piece has a little "wiggle room" when the firing pin is "bottomed in" and has the correct firing pin protrusion.

    It doesn't matter if the wiggle room is 0.01mm or 0.5mm just that there is a some, and not way too much.

  10. #10
    Ir0nRaven
    Guest
    Thank you all! I will reassemble tonight using data & techniques given. Thanks!!

  11. #11
    Team Savage jonbearman's Avatar
    Join Date
    May 2010
    Location
    NY
    Age
    66
    Posts
    1,382
    Make sure you report back and let us know it worked out ok.
    Willing to give back for what the sport has done for me!

Similar Threads

  1. reassembling accu-trigger Cabela's model 10
    By Jedomejd in forum 110-Series Rifles
    Replies: 8
    Last Post: 07-03-2018, 09:05 PM
  2. Anyone built a 7 WSM in a Model 10 short action?
    By WinnieTheBoom in forum 110-Series Rifles
    Replies: 4
    Last Post: 10-27-2015, 11:19 PM
  3. when reassembling, can your bas catch threads on a cocked action?
    By logic factory in forum 110-Series Rifles
    Replies: 7
    Last Post: 09-09-2012, 10:36 PM
  4. Model 10 Short Action (old feed)
    By killbilly in forum 110-Series Rifles
    Replies: 7
    Last Post: 11-19-2009, 09:35 AM

Members who have read this thread in the last 1 days: 0

There are no members to list at the moment.

Bookmarks

Posting Permissions

  • You may not post new threads
  • You may not post replies
  • You may not post attachments
  • You may not edit your posts
  •