Results 1 to 13 of 13

Thread: Post your bedding jobs

  1. #1
    Basic Member upSLIDEdown's Avatar
    Join Date
    Mar 2014
    Posts
    568

    Post your bedding jobs


    Felt like this would be better here than the Picture Post forum, but if someone disagrees, feel free to move it.

    I'm looking for pics of your bedding jobs. I've bedded two rifles now, but they were both Axis rifles. They don't have the metal tang at the rear like a regular 10/11/110/111 action. I'm building a 111 now, and getting ready to bed it. Trying to figure out how much of the 'tang' needs to be floated, and how far up into the action is considered the 'tang'.

    Just want to see what you guys have done so I don't have to redo this bedding job. My first Axis came out ok, but the 2nd one is much better. I'm hoping this one ends up more like my 2nd Axis... lol.

    Just looking at things, it looks like I would probably stop the bedding right around the rear action hole/pillar. Just want to see if anyone carries it past that at all, or how you get a nice finished line.

    Thanks in advance!
    Bryan

  2. #2
    Basic Member
    Join Date
    Feb 2013
    Location
    Grand Blanc, MI
    Age
    59
    Posts
    3,677
    I don't have pics, but the rear part is the hardest to do. Most of the area behind the rear pillar needs to be open for the sear and trigger assembly, anyhow. , and even the area beside the pillar is quite small. Mine have certainly never been done neatly back there, either. My only goal is to get the action screws to turn freely than suddenly STOP. This tells me there is no binding on the action when the screws are tight.

    Pics would be good, though. Interested in seeing wat others have done.

  3. #3
    Basic Member upSLIDEdown's Avatar
    Join Date
    Mar 2014
    Posts
    568
    Yeah, that's my issue. The first Axis I did turned out pretty ugly, IMO. The 2nd one looks pretty good. I just want this one to look good. I don't like ugly work. lol That's why I've never posted pics of the Axis. I was embarrassed. Haha After googling savage bedding for pics, the first job really wasn't that bad. Looks like they all turn out a bit messy.

  4. #4
    Basic Member Redandwhite_72's Avatar
    Join Date
    Nov 2013
    Location
    Missouri
    Posts
    122
    When I did this one I went just passed the bolt handle a little bit as you can see. I think the next one I will only bed back to just behind the rear action screw. This was only the second one I've bedded. I don't know that I did either one of them correctly. I sold this gun over the weekend so I don't know that it makes much difference now anyway.


  5. #5
    Basic Member
    Join Date
    Mar 2012
    Posts
    114
    First effort so far. I left the trigger & magazine box attached because I didn’t know how to take them off. I’m not sure I would do the next one any different. Pillars were installed at the same time. Rifle is a 260 Remington on a Savage long action and it shoots very well.


  6. #6
    Basic Member
    Join Date
    Feb 2013
    Location
    Grand Blanc, MI
    Age
    59
    Posts
    3,677
    Not bad. My only concern is it does not look to me like you relieved enough wood to allow for a thick enough bed of epoxy. I am basing that off of the wood I see showing through around the front and rear action screws. When I do mine, I like at least an 1/8 " of epoxy. Also, I dont bed at all behind the rear screw. Just make sure the tang is floated. Otherwise, it looks good.

  7. #7
    Basic Member
    Join Date
    Dec 2006
    Posts
    95


    6CM

  8. #8
    Basic Member
    Join Date
    Mar 2012
    Posts
    114
    Quote Originally Posted by foxx View Post
    Not bad. My only concern is it does not look to me like you relieved enough wood to allow for a thick enough bed of epoxy. I am basing that off of the wood I see showing through around the front and rear action screws. When I do mine, I like at least an 1/8 " of epoxy. Also, I dont bed at all behind the rear screw. Just make sure the tang is floated. Otherwise, it looks good.
    More Bedding Job Photos Please!

    Thanks foxx for pointing out a few things. I need information like that so, rather than hijack this thread, I started another in this section titled, "Pointers Please-Bedding".

  9. #9
    LongRange
    Guest
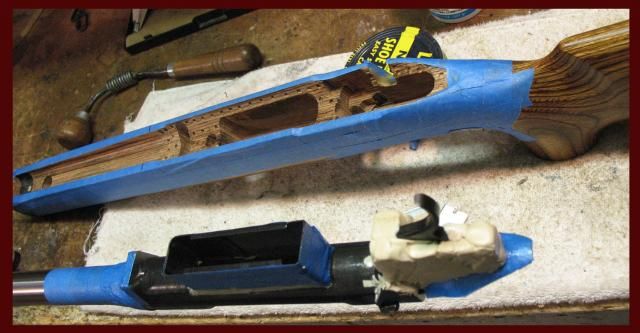
    you guys have seen this a hundred times lol...this was a really fast bedding job that i started on a thursday night and shot in a match that satuurday...i ground about a 1/4" off the alum block in front of the recoil lug,ground off about a 1/16" off the block where the action sits and set the third pillar 0.070 higher than the bedding block. on the thursday night i started i pulled the action and barrel and did all the grinding drilled the stock and set the third pillar...friday i got home about 130 and by 2 had the riffle hanging upside down and bedded...


  10. #10
    Basic Member
    Join Date
    Mar 2012
    Posts
    114
    [QUOTE= set the third pillar 0.070 higher than the bedding block....[/QUOTE]

    I'm not familiar with the target action. Would you please explain setting the 3rd pillar higher? Is that to make up for the quarter inch you ground off the aluminum block?
    Thanks

  11. #11
    LongRange
    Guest
    Quote Originally Posted by hnts4fun View Post
    I'm not familiar with the target action. Would you please explain setting the 3rd pillar higher? Is that to make up for the quarter inch you ground off the aluminum block?
    Thanks
    no i set the third pillar at 0.070 higher to get a nice thick coat of devcon in between the action and the bedding block...the action set low in the stock to begin with so moving the action up set the ejection port even with the stock...i ground a 1/4" off the front of the alum block because 1 my lug was only making contact with the alum block on the right side and contact was about the size of a pencil and 2 i wanted a a very thick coat of devcon at the lug. i REALLY like the stock(bell carlson A-5)but to be honest they are a mas production stock and not very well built...or at least mine wasnt.

    kind of a crappy pic but before bedding the gas hole(front of action at barrel) use to be about a 1/4 of the hole below the edge of the stock...

    Last edited by LongRange; 01-03-2015 at 05:04 PM.

  12. #12
    Basic Member
    Join Date
    Mar 2012
    Posts
    114
    Thanks, looks good!

  13. #13
    LongRange
    Guest
    Quote Originally Posted by hnts4fun View Post
    Thanks, looks good!
    thanks...not one of my best jobs for sure so it will get a skim coat to clean up the ruff areas when i rebarrel.

Similar Threads

  1. Cerakote jobs on 10/110 Pics Please
    By Londerko in forum Picture Post
    Replies: 5
    Last Post: 04-06-2016, 12:07 PM
  2. Replies: 0
    Last Post: 09-15-2014, 11:28 AM
  3. Camo paint jobs question
    By missed in forum 110-Series Rifles
    Replies: 6
    Last Post: 01-17-2013, 02:29 AM
  4. Range trip #3 with 6BR. Post bedding.
    By MDM in forum 110-Series Rifles
    Replies: 22
    Last Post: 11-21-2010, 09:08 AM
  5. glass bedding jobs
    By flatshooter in forum 110-Series Rifles
    Replies: 4
    Last Post: 07-26-2010, 08:40 PM

Bookmarks

Posting Permissions

  • You may not post new threads
  • You may not post replies
  • You may not post attachments
  • You may not edit your posts
  •