

 Reply With Quote
I don't think your rifle is changing that much. Are the bases tight? Did you check the two action screws? Are they loose?
David

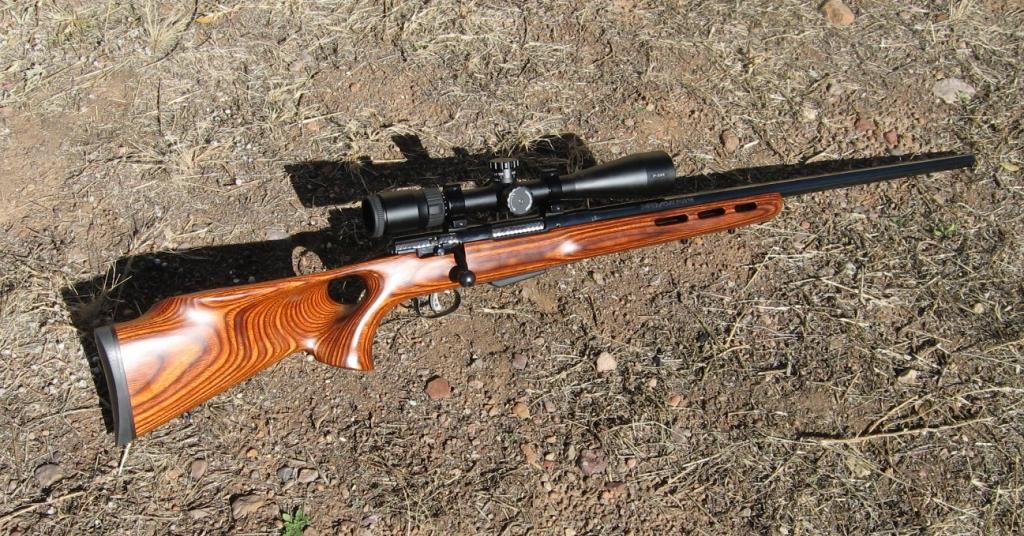
I purchased a mode 25T at a gun show and had difficulty when sighting it in. The elevation adjustment for the scope worked just fine, but windage adjustment was uncertain. Once I got it sighted in, it shot great groups - but next time I brought it to the range, it would shoot a couple of inches to one side from where I had sighted it in before.
I thought the scope was bad, so I put on another scope that was known to be reliable, with a different set of rings. - And it behaved the same way as before! Windage adjustments not always effective, and changes are noticed after taking it home and bringing it back to the range again. Elevation is just fine, but windage would change all on its own.
Then I thought, the bases must be loose. But no, I could not get the bases to budge, and the screws were good and tight, popping loose only after applying considerable force.
Then I thought, loose barrel? - But it appears to be rock solid. This rifle is the older style with the dual barrel pins.
Could it be a bedding issue? The rifle is not glass bedded, but I can see where the action is leaving an impression upon the wood, it looks to be bedded fairly solid.
I do have one more scope that I could try, but the last one came off of a .270 WSM, where it worked just fine on that gun. Two scopes misbehaving the same way, one of which is proven seems so unlikely.
Now I'm out of ideas... Any ideas? This is my first model 25, I dunno much about them.
Last edited by Salvo; 10-15-2014 at 10:17 PM.


I don't think your rifle is changing that much. Are the bases tight? Did you check the two action screws? Are they loose?
David
Not trying to be a smarty, but if elevation is constant and windage is changing, could it be wind?
Good ideas. All of the screws were tight, and I don't go out if its windy. My favorite time to shoot is early in the morning on a weekday. It's generally calm then, and I end up with the gun club to myself, more often than not.
With hunting season coming up though, I'll see other shooters a lot more often in the next month or two. The club has 500 members, mostly folks who drive or fly in to hunt once a year.
Just for drill I took everything apart, and put it all back together again with an inch-pound torque wrench. Next thing I'll try is glass bedding. (Epoxy bedding, actually)
It will probably be a week or so until I make it back out to see what it does, I'm retired and the "boss" has a lot of Honey-do work lined up for me.
So far, the gun has grouped well with almost anything I put into it. It's a shooter so I'm hoping to get this problem resolved soon. Eventually I'm planning on Conetrol Custum mounts and rings for it, and a new Swift varmint scope, a 6-18x44 with the Sure-Lock system that locks the adjustments down after you get it sighted in.

How are your transporting your rifle? I'm guessing it's probably laying on it's side (where the elevation adjustment would be up and down and affected by bumps and jars while driving). Not common, but you've ruled most everything else out by checking the mounting screws and such.
Could also be your bag/rest setup. If you're shooting off front and rear bags and they're not in proper alignment the recoil could be pulling the shot to the left or right a little. This is especially true if/when you're having to fight the gun in the bags to keep the crosshairs on the bullseye - that's a clear indication your bags aren't aligned.
"Life' is tough. It's even tougher if you're stupid." ~ John Wayne
Under certain circumstances, urgent circumstances, desperate circumstances, profanity provides a relief denied even to prayer. Mark Twain
Lately I've been putting it in a zip-up case, and leaning it on the passenger seat in the front of my van. The gun club is only a few miles away, smooth roads until you get there.
I use front and rear shooting bags, and scoot the gun forward or back to get elevation set. - I try to get it set up so that I'm not touching it that much, just enough for trigger control when firing. Get good groups with it.
Have it apart again to bed the action to the stock. Haven't been shooting for a week or so, still up to my ears in stuff to do around the place.
Bedding this model 25T is different from what I am used to, have been planning how to go about it. By the pressure marks in the stock though I really don't think that bedding is the problem, it seems to be well-seated. - Won't hurt to bed it anyway though. Still need to dig up some modeling clay, the stuff I had was dried up.
The biggest problem with the M25's is that they don't have a dedicated recoil lug, or pillars. This causes shift on every shot.
"As long as there's lead in the air....there's still hope.."
This would have to allow loose stock screws which should never be loose whether floating or bedded or fore end pressure applied to barrel. All stock screws should be snug. There is only one way to snug stock screws to a receiver and it was not my idea it was Jim Carmichael's mechanical order of turning stock screws in a bolt action rifle like Winchester or Remington or Ruger or any other bolt action not fitting any of the above by a simple rule: The screw that gets wound down first and tightened snug is the lug portion of the receiver (with or without a lug but ahead of the breech face) that pulls the barrel/receiver assembly into the screw ahead of the breech face of the locked and cocked bolt. However, BEFORE tightening THAT screw make sure the wood and the metal are dropped into eachother by allowing the rifle to drop a couple inches or so on a rug with wood underneath to make the receiver bed entirely back ward into the stock to the end of it's progress. THEN tighten that screw first and follow the rest. That's Jim Carmichael's advice who wrote "The Book Of The Rifle" and dedicated this particular advice to the Varmint Hunter section.Originally Posted by sharpshooter

I want to suggest another out of the ordinary thing and that is possible astigmatism in your scope eye.
You've completely missed the point. A model 25 has no recoil lug, or pillars to support the screws. With no lug to control fore and aft movement, it relies on the screws, which are not supported by any pillars. If you study the big gaping cavity under the action you will see there is NO solid foundation to anchor anything to with any rigidity. Tightening the screws tighter will only compress the wood and actually spread the stock from lack of material, not to mention induce stress on the receiver.
By the way, I know Jim Carmichael...and his advice does not apply to this particular rifle.
"As long as there's lead in the air....there's still hope.."
Apparently you misunderstood what I said.
No lugs no pillars doesn't change the method of installment of receiver to stock in any bolt. My 25 is snug and tight at the end of all receiver progress into the stock from the butt and the fore ward receiver screw that is usually the short one on a Remington 700 or Winchester 70 or Ruger 77 is screwed in tight. The method of removing the receiver and putting it right back where it is is completely sound without your mentioning of pillars (aluminum?) or lugs.
I didn't misunderstand, I just plain don't understand. Your last paragraph makes absolutely no sense.
"As long as there's lead in the air....there's still hope.."
I'll be glad to clear this up.
The problem was fixed by epoxy-bedding the action, and replacing the sighting system. Here's what I found when doing this job:
The action has two cylindrical lugs attached to it, that the stock screws go into.
The stock has two round holes that the lugs fit into. The front lug acts as a recoil lug, and it's screw pulls the action down into a close fitting hole in the stock. The rear lug has no front to back contact to speak of, but instead is pulled down to snug the rear of the action into the inletting.
I discovered that the front lug, the recoil lug fit fairly well, and the action's fit to the stock there was very good. It got the epoxy treatment but only a very thin layer of epoxy remained after the action was clamped down upon it and was allowed to cure. I put epoxy on the rear side and bottom of the hole only, to facilitate removal of the action.
I clamped the action into the stock for bedding with black electrical tape, several layers pulled tight, fore and aft as close to the lugs as I could get it.
The rear lug had a problem. The first application of epoxy placed in the bottom of the round vertical hole for it was untouched after it was allowed to cure and the action was removed. A second application below the rear lug finally ended up touching the lug, providing support below it and to the rear. (Ahead of the rear lug is the trigger spring, don't want epoxy on that!)
So, as the gun came, tightening the rear screw would flex the action, and still provide no support there. The hole was too deep, or the lug too short, however which way you might prefer to describe that situation... It took approximately 1/8 inch of epoxy to give the rear lug something solid to tighten down upon and give it a point of support without pulling down unnecessarily upon the action. - I believe this was the root of the problem, and I probably could have addressed it just as well with a stack of washers as I did with the epoxy.
Stock pillars would be a great idea for this stock and action. - It still may get this treatment someday.
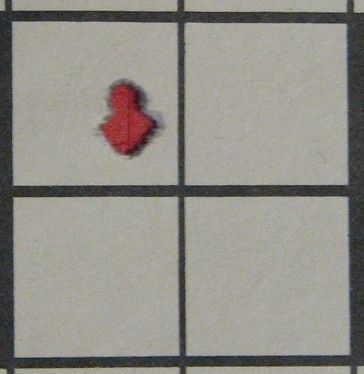
After bedding the action as described above, I bought new Leupold vertically split aluminum rings and a Nikon P-223 4-12x40 scope. This combination of actions fixed the problem and on the next outing, five shots went into .170" (center to center) at 50 yards.
I guess I ought to mention the load:
Hornady brass, Hornady 68 grain BTHP bullets, CCI BR-4 small rifle benchrest primers, 24.5 grains H4895 has the powder kissing the base of the bullet.
COAL 2.317" put the bullet .019" off of the lands. No crimp was used.
Note that I had to file a 'V" notch in the inside front of the magazine so that these bullets would feed properly at this length. - The noses were hanging up.
Anyway, it's behaving itself much better now. That's the main thing.
Last edited by Salvo; 11-21-2014 at 09:21 PM.
That is a fine looking 25 and mine looks just like it except I have the Vortex 30mm tube. These are amazing bolts and mine in .204 is making me rethink Remington and Winchester and Ruger 700, 70, 77.
To me, the weak link is the action of the extractor/ejector combo. It works well if you cycle the action normally, but if I try to cycle the bolt slowly so I can catch the empties, a lot of times they wind up sitting inside the gun instead of in my hand.
It may just be a push-feed thing, but in any case I find it to be irritating at times.
If somebody would make an honest five round magazine out of steel, I'd buy it. Same goes for a steel floorplate/trigger guard.
The action itself is pretty slick, and looks good. The safety is OK, but could be a little easier to disengage.
I like the stock... Comparing the model 25 to my similar-looking Savage in 17 HMR, I'm tempted to cut the barrel down to 20", knowing how much it would improve the gun's handling qualities. My 17HMR is the best handling bolt gun I've ever owned. - The 25 seems a bit ungainly and front-heavy in comparison. With the 25T cut down to 20", it would make a much better walking varminter than the regular model 25 walking varminter.
I am going to take a closer look at my 25-T stock. It shoots great on some days and good on others.
David
A way to test it is to "bed" it with modeling clay, putting a bit of clay in the stock and lightly oiling the metal parts before putting it together. Tighten the screws just snug, not too tight.
Then take it apart and see how deep the clay is in the bedding points, especially at the rear by cutting out a slice of the clay, gently removing it, and then measuring it.
 Members who have read this thread in the last 1 days: 0
Posting Permissions
Members who have read this thread in the last 1 days: 0
Posting Permissions
Bookmarks