


 Reply With Quote
All great choices! Glad to see it's coming together for you.

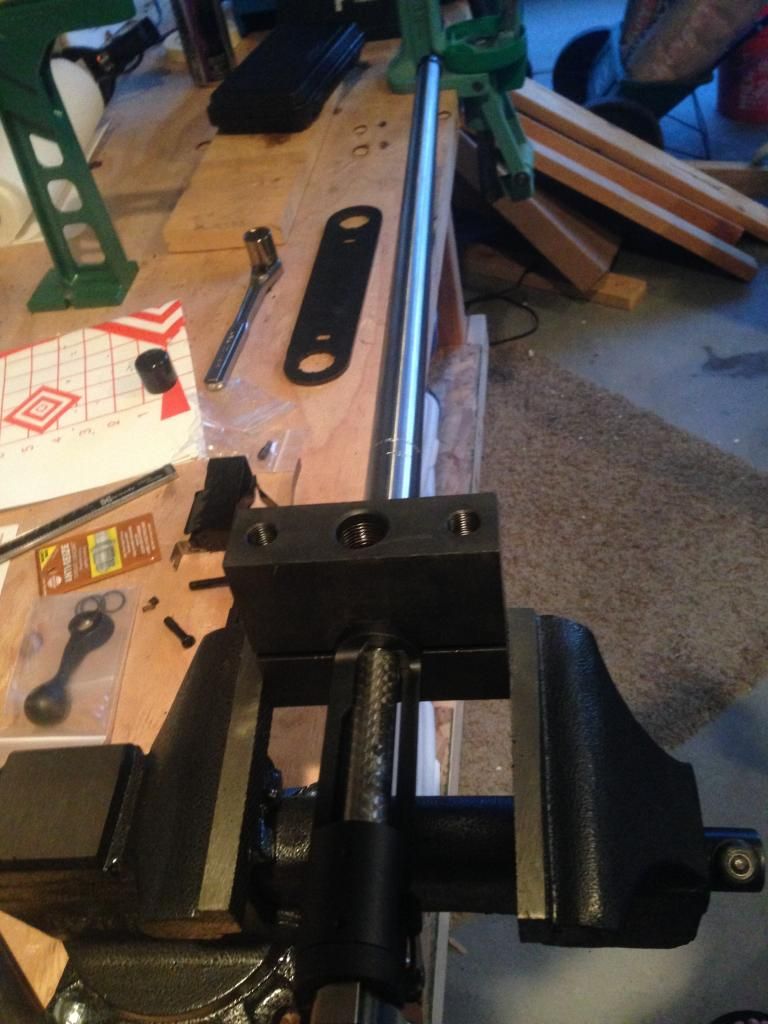
Why not! I guess I'll go ahead and post pictures as I build my first Savage. Purchased a Savage Model 11 short action, top bolt release, blind magazine as a donor rifle. I purchased a bench vise today and borrowed an action wrench and barrel nut wrench. Tonight's task was removing the barrel from the action and removing the blind magazine from the stock. The factory barrel nut was torqued tight! Way tighter than I would have imagined. On order I have the following parts, which are schedule to arrive over the next 7 days:
- Criterion 26" barrel chambered in .260 Remington
- NSS 1.5 # trigger spring for accu trigger
- NSS recoil lug
- NSS barrel nut
- Bell and Carlson Tactical Medalist Style 2 Stock - Black with Grey web
- Glades armory Savage tactical stainless steel 1.75" bolt handle
- Valdada IOR 1 Piece 20 MOA base
- I am planning on sending my bolt into Sharp Shooter Supply to have them flute it
The tape measure in the pics is so I can measure the proper head space when my new barrel comes in

Last edited by dpollard; 10-20-2014 at 07:39 PM.


All great choices! Glad to see it's coming together for you.

That sounds exactly like what I have in mind for my 260 build. I'm pretty sure I saw the exact gun you bought for the donor action in Cabelas. They had a great price on it. Keep up with the updates so I can have an idea what mine is going to look like.
Yep, at $150 off with a top bolt release it was too hard to pass up.Originally Posted by jw9424

yep, sounds like it's gonna be a great project. I have been thinking about using my tape measurer for setting headspace, but mine is yellow. Does that make a difference?
Lol. A tape measure works great for head spacing. Way better than a go/no go gauge! Nice pics.

Looks great , were do you buy a headspace tape?
I read on the internets somewhere that you have to use a red tape measure.
My Criterion barrel came in today along with the NSS recoil lug and NSS lock nut. I was able to get the barrel installed and head spaced. I am just waiting on a torque wrench to get the barrel nut torqued to the proper spec (posted in 110 gunsmith forum to find out what the proper torque is) and the proper action wrench, which should hold everything from rotating when I torque down hard on the nut. I also got the Sharp Shooter Supply bolt handle installed. Stock and action wrench are due to come in Wed. of this week. What I didn't realize, and what is not shown in any of the online tutorials I watched, is how much pressure the ejector is under with the ejector spring. I went to take it out tonight and both the ejector and spring went flying across the garage! Rookie mistake I guess.
Things are coming together. This is fun!
I never knew there was a torque spec. I just put it on tight then gave the barrel nut wrench a smack with a mallet!!
+1. Maybe 2 good smacks. 3 if I miss. :)
As for ejector... been there, done that.
Put the whole thing in a zip-lock bag first. Better chance of not losing any flying parts. :)
I just assumed there was. Sounds like there is not. I'll give it a good 2-3 smacks.
I set mine precisely halfway between "good-n-tight" and "farmer tight". Probably not necessary, but it makes me feel better.
Hope
Last edited by Ranger3; 10-25-2014 at 12:52 PM.
I was able to finish up my rifle build this afternoon. I ran into a couple snags with my Bell and Carlson Tactical Medalist stock. When I first put my barreled action in the stock the trigger would not operate. As it turned out, there was too much material in the stock pushing up on the trigger return spring thus causing the trigger to lock up. I removed "less than a credit card width worth" of material, per Bell and Carlson's instructions, and it seems to have fixed the trigger issue about 95%. Even after removing some of the material about every 10th cycle of the bolt the trigger will lock up. I just cycle the bolt again when this happens and it corrects the problem. Not ideal but B&C wanted me to pay to ship the stock to them to look at it, which I thought should be part of the warranty. I can't remove anymore material or they said I will void the warranty. I plan to call them again if the problem persists and hopefully they will step up and pay the shipping.
Surprisingly, the easiest part of the whole project is the barrel swap. The hardest part is taking the extractor off the bolt. All-in-all, pretty fun project. I hope to get out and shoot it fairly soon. Just waiting on my 2lbs of H4350 to arrive so I can load up some rounds. I purchased Lapua brass and some Hornady Match 140 gr bullets. The rifle is topped with a Vortex Viper HS LR 4-16x44 scope in Burris Signature Zee rings. In the pic is my Harris Swivel Bipod but I plan to purchase a lower bipod soon. Now, onto the cool part, pics:

Nice looking riffle....if those 140s wont shoot for you try a box of 142g smk...I bought 2 boxes of the 140g hornadys but havent had time to try them yet but the 142s shoot 1 hole groups at 200yds out of my 260.
Well, asfar as removing material and getting good results all but 5% of the time... I am 95% sure you just need to remove a tiny bit more material. I have had the same problem with several different stocks, usually get that after bedding them. It gets frustrating, I just keep hacking away till it works. Occasionally I remove too much material in the wrong area and so I then repair/reinforce it with Acraglass. No big deal. Of course, I have never hacked away at a nice stock before, just factory stocks from Numrich and various Boyds stocks.
I was just a little worried about voiding the warranty, although, not sure how they will know if I remove more than a "credit card width worth" of material. I didn't realize you could add material back in. I may take a little more off and see if that fixes my problem altogether.
Here are a couple of groups I shot over the weekend during load development for the rifle. These are all 5 shot groups at 100 yards. For now I will settle on the load used to shoot the first group posted below, 41.8 gr H4350. The average velocity was 2855 FPS with a 6 FPS spread.

 Members who have read this thread in the last 1 days: 0
Posting Permissions
Members who have read this thread in the last 1 days: 0
Posting Permissions


Bookmarks