Results 1 to 17 of 17

Thread: My attempt at pillar bedding and customizing stock - pic heavy

  1. #1
    Basic Member
    Join Date
    Jul 2008
    Location
    Houston, TX
    Age
    45
    Posts
    81

    My attempt at pillar bedding and customizing stock - pic heavy


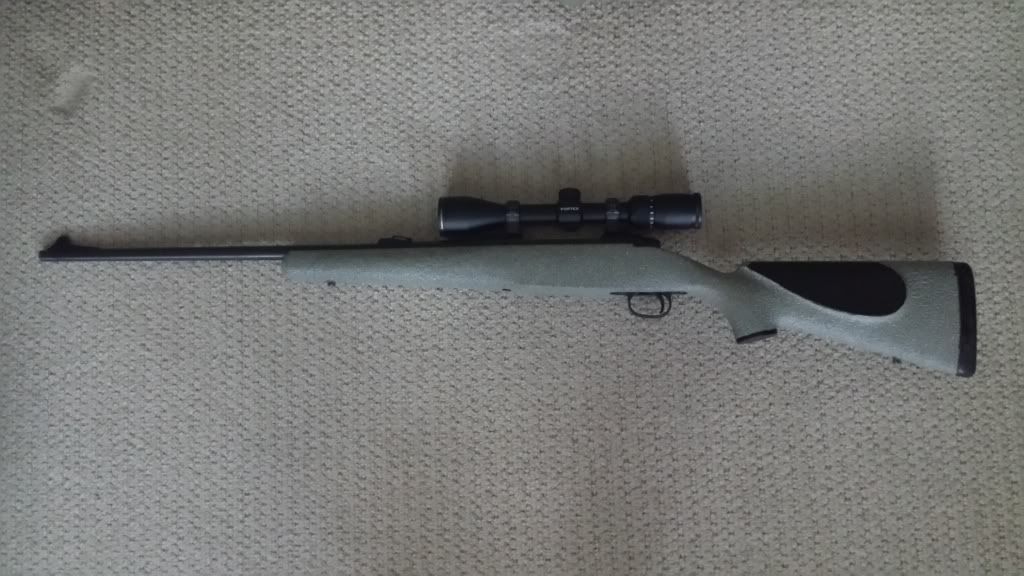
    Got a .243win in an old 110E action. It is fitted for the small magazine, but it basically is the same action as my 7mmRM. Stock is the plastic factory one.

    I was able to try it about a month ago with without making any changes to it and after zeroing in a Vortex Diamondback scope 4-12x40mm BDC I was able to put 3 bullets in about 1 inch at 100yds off sandbags. Then I rang some steel pigs at 200 and 250yds. This was all done with "Federal Deer Thugs" 100gr soft points. I have not really tried a box test with the gun or scope, but there was no noticeable change in POI with magnification changes and it tracked as expected when zeroing it.


    Knowing from reading here that factory stocks are somewhat flimsy, I planned to bed the stock and forearm. In the long a good aftermarket stock will be obtained, but decided to tinker, customize and play with this one. I do like the look of the spray on job they had done with it. Read most of what was available through google and here for forearm stiffening and decided that bedding some rods should work.


    I have also been thinking about shortening the forearm by about 2" removing the front "well" and moving the sling attachments point back to remove potential flex.


    I ordered some Grovtec flush cups and 1 1/4"swivels (http://www.grovtec.com/catalog/gt-sw...t-gtsw-295-78/, and decided to put on L side of stock for carrying flat, if it makes it to the woods. I also though about dremelling a little on the grip and adding a palm swell to it.

    It may become a sleeper gun if I can make reloads work... with my (gulp) Lee Dies and Sierra 100gr flat base seconds.

    So off I went...

  2. #2
    Basic Member
    Join Date
    Jul 2008
    Location
    Houston, TX
    Age
    45
    Posts
    81
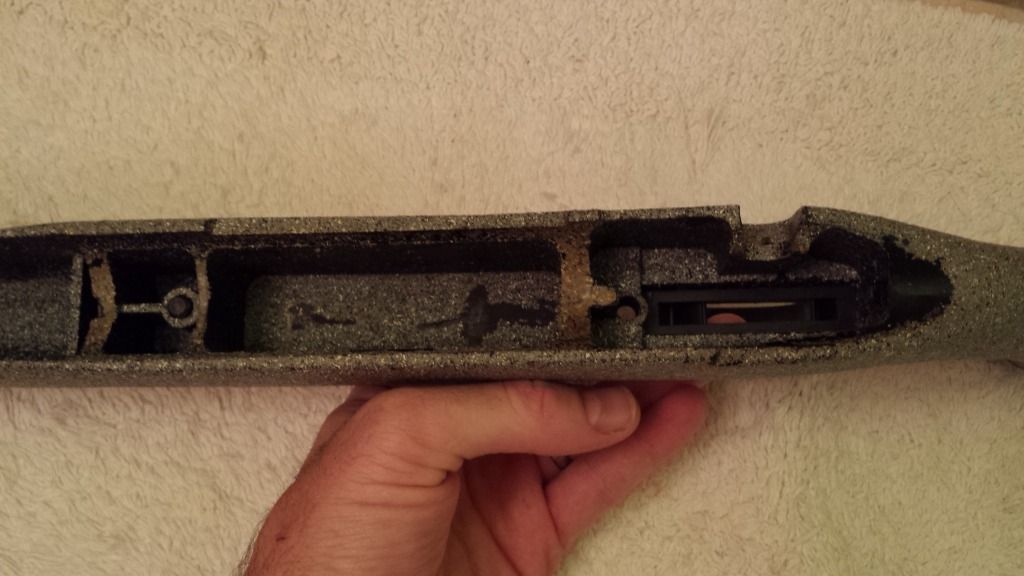
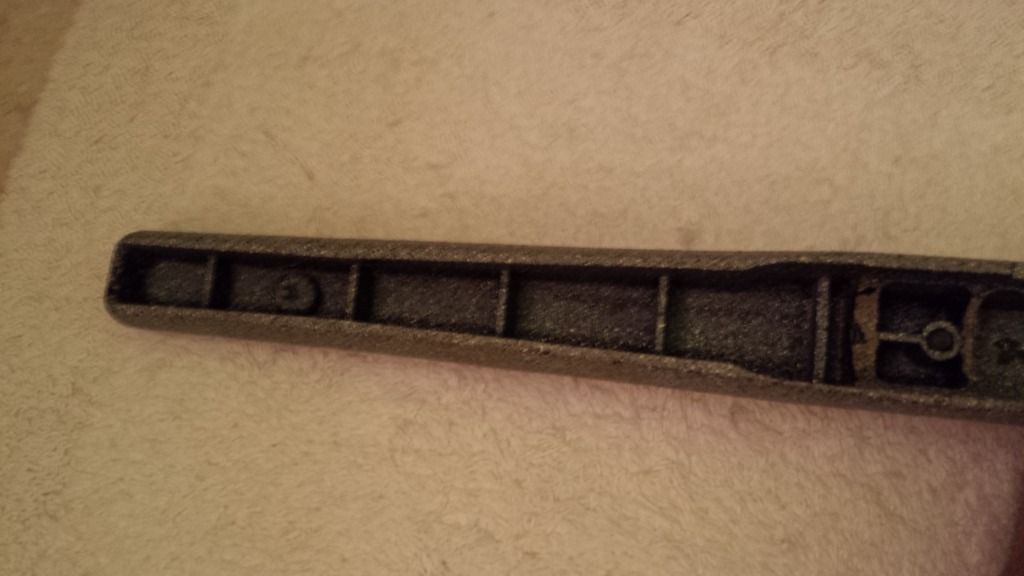
    I started working on the inside, removing paint and contouring a little the fluting on the grip, which is very pronounced and not comfortable. I have done a lot of wingshooting and clay shooting and know the feeling I like when shouldering a gun. Drilled some holes on the plastic and removed the plastic "bridges". The stock did not look like an ice tray anymore.
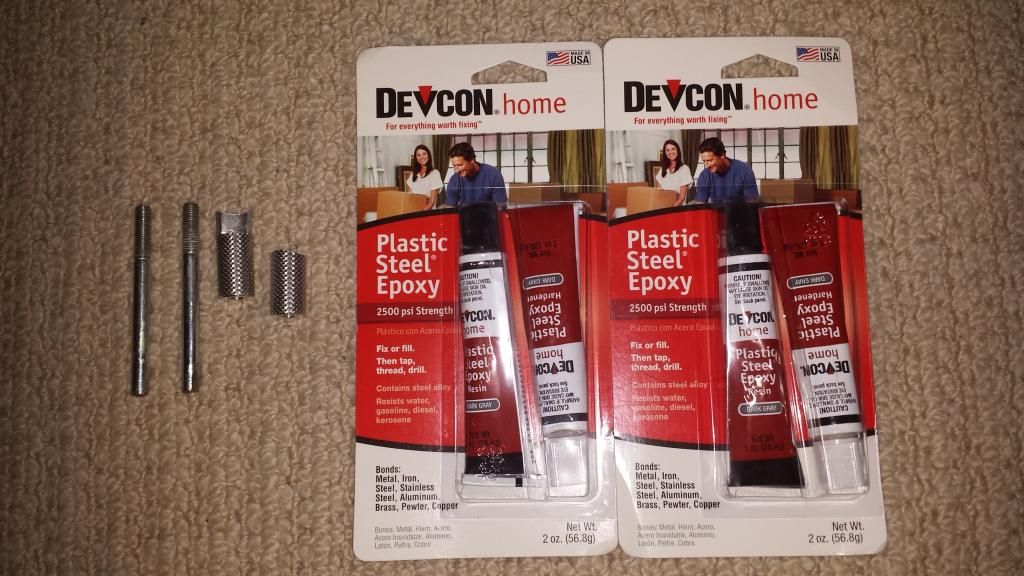
    Then I got to the fun stuff. I found an aluminum arrow shaft for $0.99.
    1/4x28 bolts that I cut the heads off, Devcon epoxy and Aluminum Pillars from ebay http://www.ebay.com/itm/Gunsmith-Acc...-/191127055391
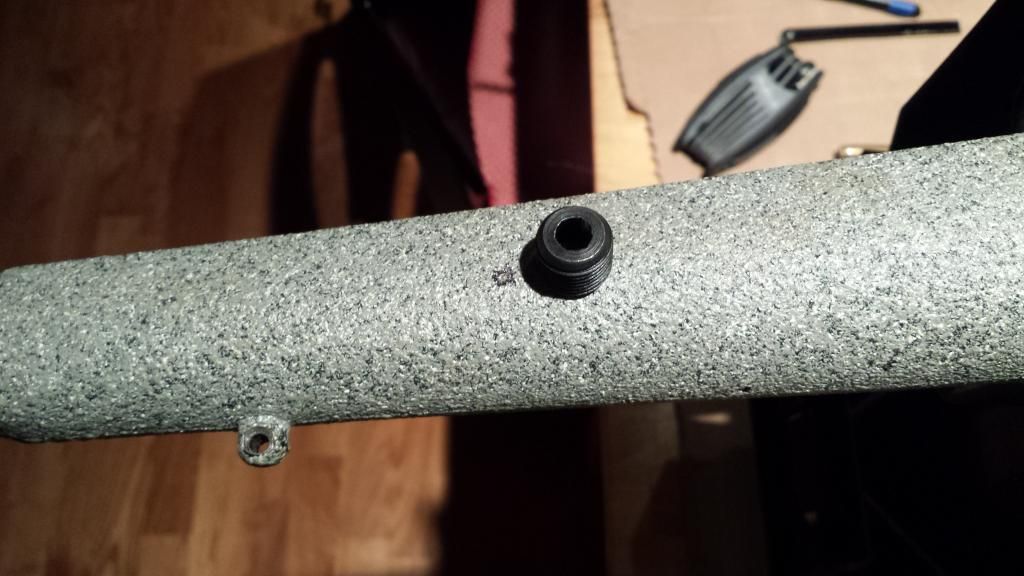
    It comes with "instructions" (not very good) and epoxy in the double syringe, the guy also sells pillars without the kit. They are lightweight and very textured exterior, which shows in the pic below. They are contoured, though I may dremel some of it off for a "mo'betta" fit, and still use bedding compound and skim bed after installation.


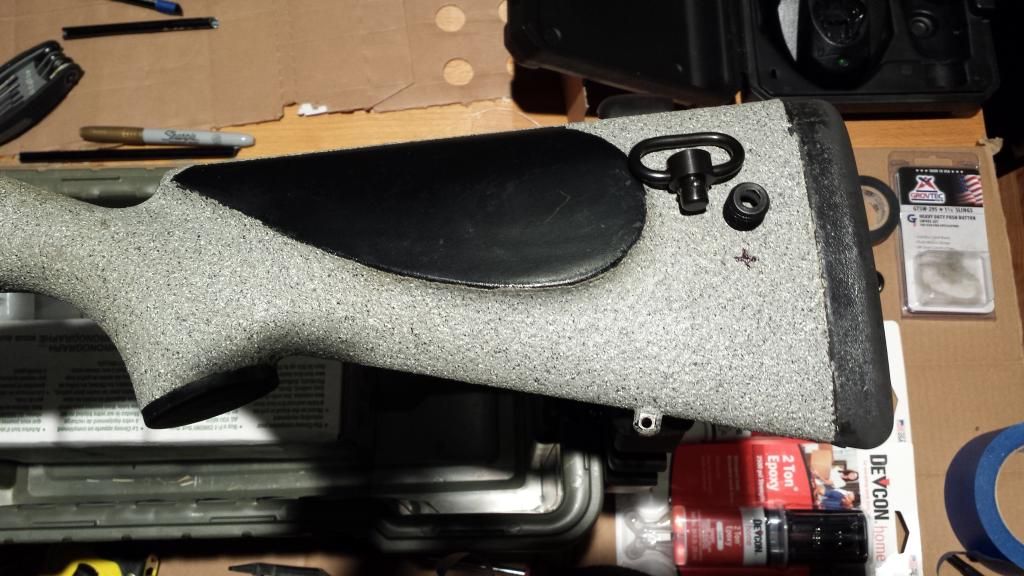
    This is where I have marked the stock for installing the Grovtec flushcups and swivels on the side (for carrying flat).


    I am not sure if I should do the swivels at the same time I complete the bedding and forearm, before, or afterwards.

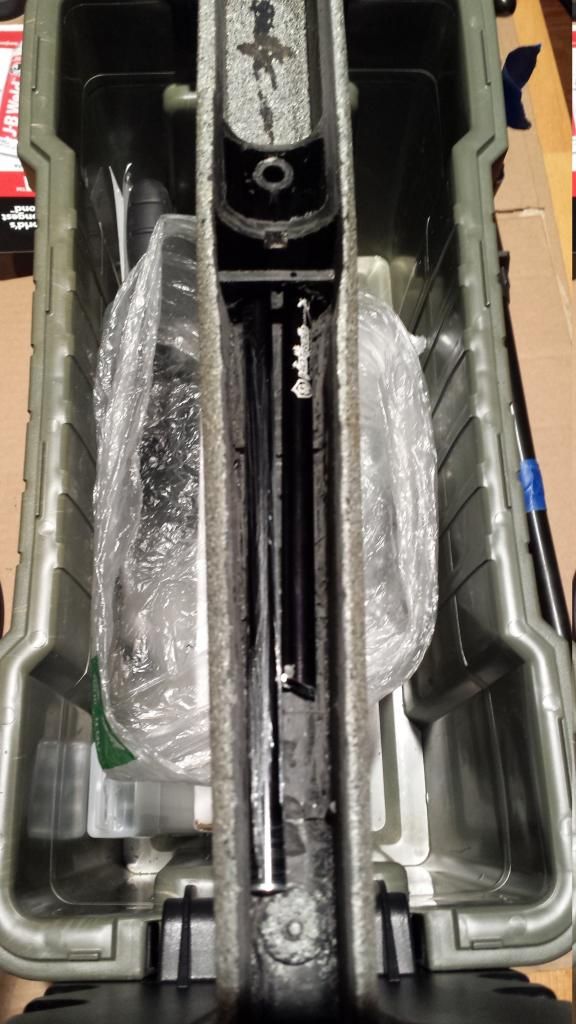
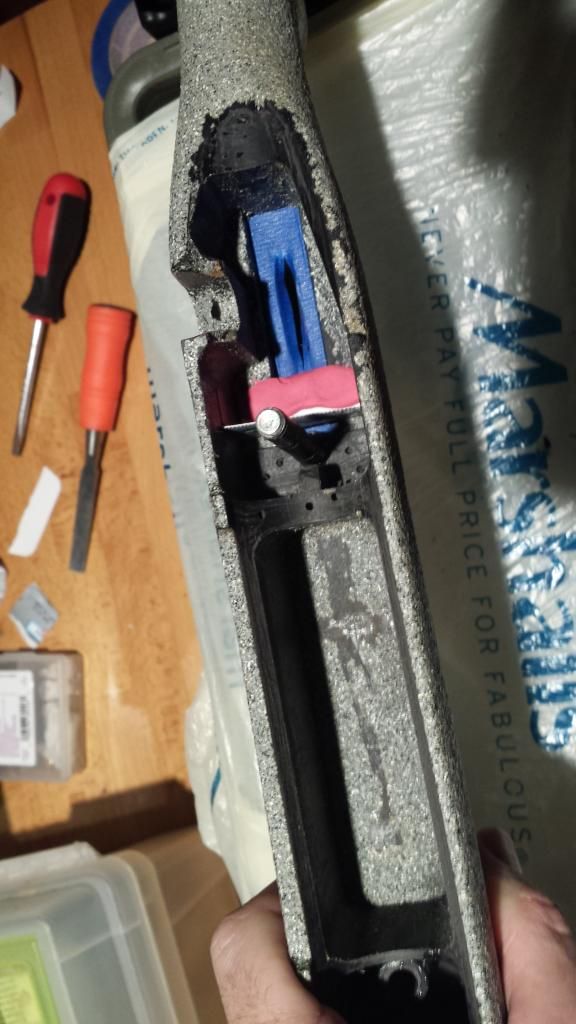
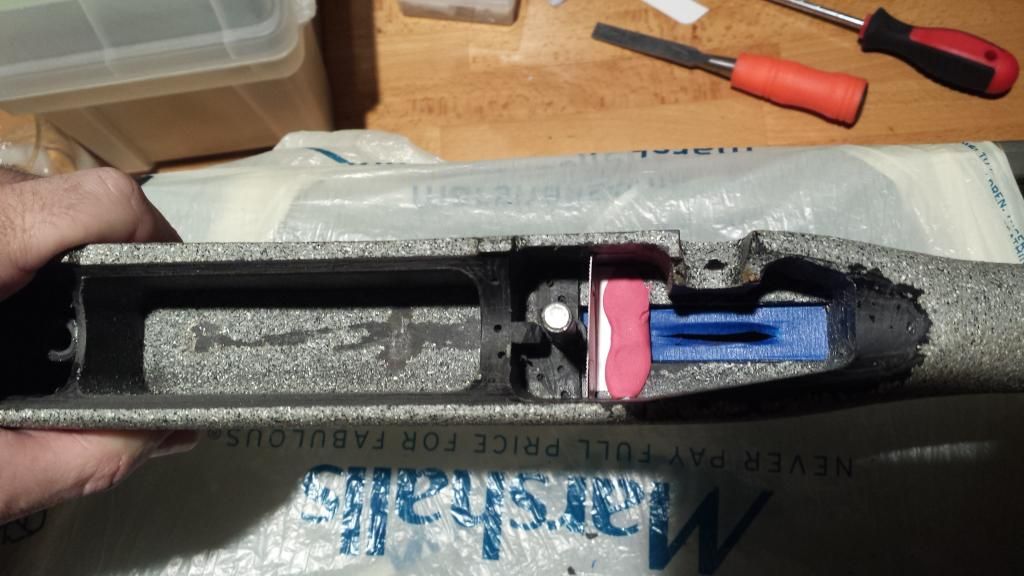
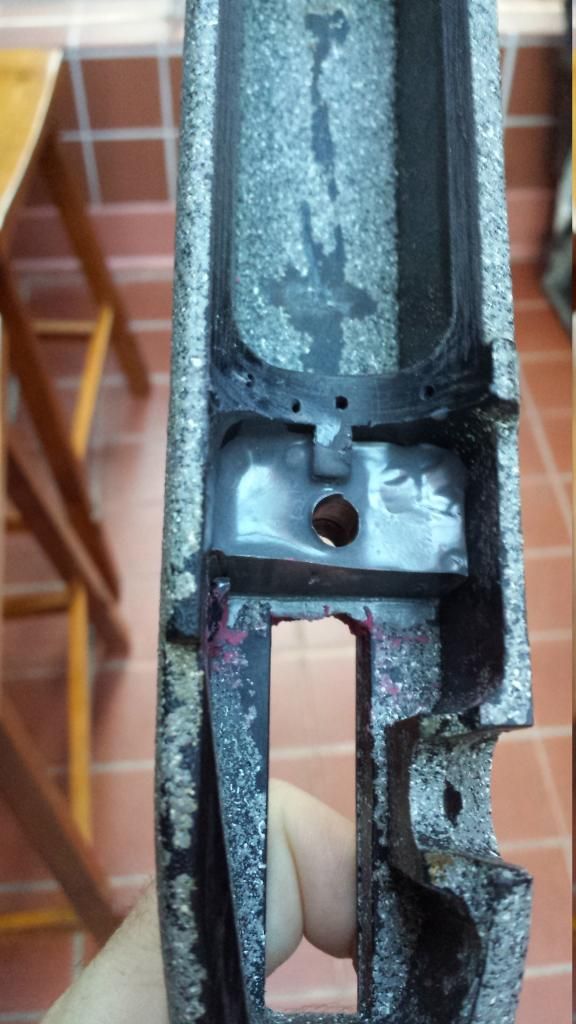
    This is the arrow (cut) being laid in the forearm. The rods go into the recoil lug area (don't affect lug fit). Thinking back I should have gone all the way back into screw area "well", but it was hard to drill and didn't think about it at the time. The shorter one is to allow room for the swivel cup.


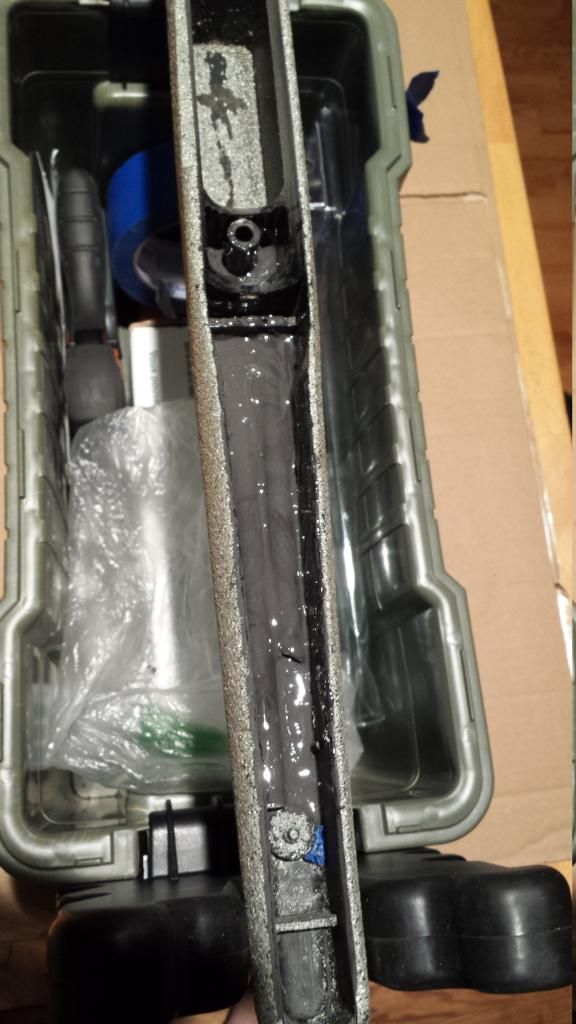
    Partially bedded arrow and front well.


    Looks rough because I will do skim bedding, free float barrel, but bed forearm appropriately.

  3. #3
    Basic Member
    Join Date
    Jul 2008
    Location
    Houston, TX
    Age
    45
    Posts
    81

    Another night of work on the gun

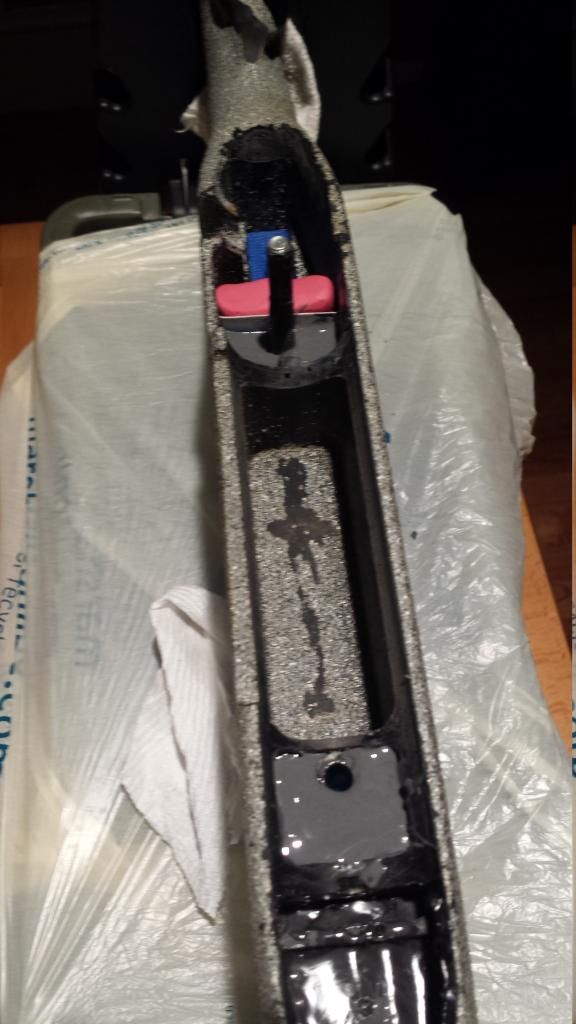
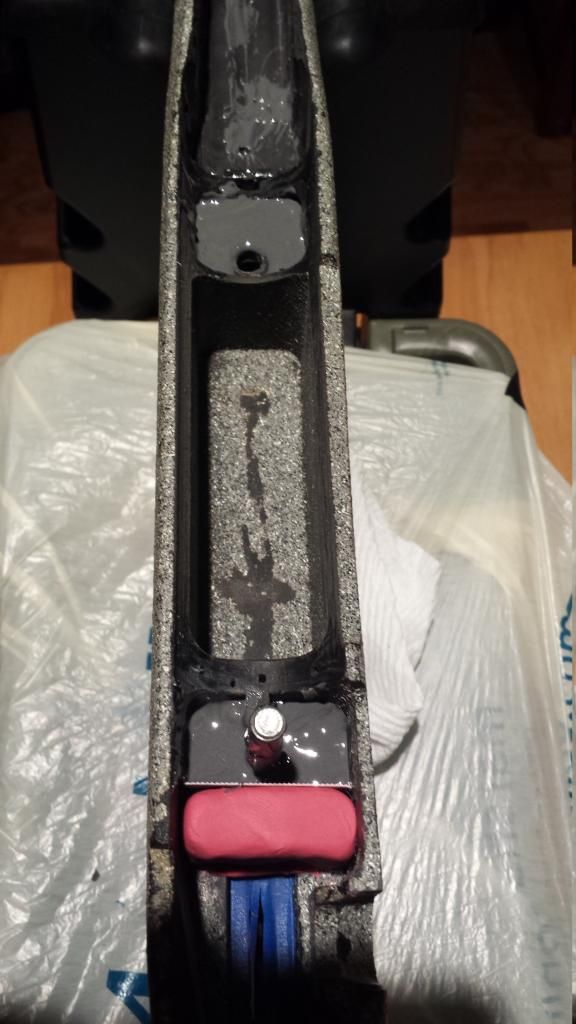
    The arrow shafts and part of the front well were done with some leftover Devcon that I had. It cured for 48h and I filled the rest of the well with JB Weld (which apparently has higher tensile strength and Temp resistance).
    I drilled some small holes in the area for the bedding to get some lockup and degreased with acetone in case there was any factory release agent left over. I made a backstop for the well with a piece of cardboard and plasticine. The well got filled with JB Weld.

    I got 2 layers of painters blue tape on screw guard, Kiwi shoe polish and wrapped the bolt with electrical tape and kiwi. Everything disassembled fine with very little run off of compound though the side of the cardboard wall.


    I am still planning in cutting off 2" off the forearm, my wife asked why and gave me a "are you crazy?" look, since she knows it really won't benefit anything. She is also concerned that I have weakened the gunstock with all the hacking.
    My sister in law is in town and staying with us and has seen me going to town on this stock with rasps, drills and dremel. First night she said "you know guns are a precision tool, right?" Last night she asked when I was going to try it - thinking she was intrigued I asked why - To be far away if it explodes...
    They both clearly don't understand looneism, but at least leave me alone to play

  4. #4
    Basic Member
    Join Date
    Jul 2008
    Location
    Houston, TX
    Age
    45
    Posts
    81
    The well was made so that I had a good solid channel to drill, and to give the pillar support upon installation. The front well was just filled with compound and no bolt in place as there was a plastic sleeve.

    I pulled the bolt and removed the cardboard barrier. Looks neat with very little JB weld that ran underneath. I should have a much more solid structure now to drill and install pillars.

    [/quote]


    So far, looking back I should have extended the arrows into the front pillar "well" and drilled larger holes in the plastic for better grab of the bedding (not saying it's not good currently). I could invest in a metal trigger guard, as that may fit any of aftermarket stock I acquire in the future.
    Barrel height and tang will be floated with layers of tape.
    Once pillar channels are drilled and pillars installed I will see how much is left proud, and if I have to remove more plastic for the stock to just rest on pillars.
    Palm swell will be made with Bondo, a latex glove and file/rasp as needed. Not sure about raising comb with wood/bondo for a monte carlo like feel, and how it would look with current rollover cheek rest.

  5. #5
    Basic Member
    Join Date
    Jul 2008
    Location
    Houston, TX
    Age
    45
    Posts
    81
    double post...

  6. #6
    Werewolf
    Guest
    I SO love the "never pay full price for fabulous" logo under a DIY savage build LOL. Interesting technique so far with pillar bedding a synthetic.

  7. #7
    Basic Member
    Join Date
    Jul 2008
    Location
    Houston, TX
    Age
    45
    Posts
    81
    Quote Originally Posted by Werewolf View Post
    I SO love the "never pay full price for fabulous" logo under a DIY savage build LOL. Interesting technique so far with pillar bedding a synthetic.

    Part of doing it was to learn how to do pillar bedding. I've never done it, if it doesn't work or I mess up, I have not lost much value in the stock. If it improves the gun a little, then it is a win-win situation. My dream stock would be a Manners Elite Hunter MCS-EH4, I'm just having to divert funds to other items, so I'm playing with the stock.
    Reason why I am posting so detailed info is to help other people wanting to do pillar bedding in a synthetic with poor support. I do agree that with Savage you do get quite fabulous performance for a nice price tag.

  8. #8
    cttb
    Guest
    How much difference did the arrow shafts make in stock flex? Did it make any difference at all in sideways flex (as opposed to upward flex)?

    I've got a factory tupperware stock, and I've kicked around the idea of bedding in a couple of arrow shafts to reduce flex. However, after looking at the stock, I can't see how bedding in arrow shafts would reduce upward flex much, if any at all. It doesn't seem like it would reduce sideways flex at all. I'm curious about somebody's real-world results.

    Here are my thoughts on it, if any one is interested. I can see how the arrow shafts would stop the stock from bending on a curve along the forward portion of the stock. However, I don't envision this kind of bending along a curve being implicated when shooting.

    The tupperware stock has a certain amount of flex that you can cause by by compressing the sides of the stock. I'm pretty sure the arrow shafts would do nothing here. I'm guessing this "compression" flex comes into play when firing the rifle, as long as anything (hand, bipod, bag, etc.) is in contact with the forward part of the stock.

    Next, the tupperware stock easily flexes in what I call a side to side or sideways motion. This is almost like the front part of the stock is pivoting side to side off the recoil lug or front action screw. The motion seems to originate closer to the lug. I don't see the bedded arrows doing much here either.

    Finally, the tupperware stock flexes upward. The fulcrum or pivot point for this motion also seems to originate in the recoil lug area. Since the stock appears to flex off a point near the lug or front action screw instead of bending along a curve, I wonder how much arrow shafts help. It seems to me like the stock would still have the same flex point even after bedding the shafts, and the bedded arrow shafts would just move up and down with the stock pretty much like it did before.

    I know with carpentry, reinforcing a horizontal surface along its length will help with sagging that occurs along the length of the horizontal surface in a curve. However, if the sagging is caused by force being applied to what amounts to a lever, the reinforcement has to be made at the fulcrum or the lever has to be eliminated. Reinforcing the horizontal surface won't do anything for this kind of sagging. Think of a shelf mounted to a wall sagging along the front edge as opposed to tilting downward from the rear edge. The flex problems with the tupperware shaft seem to be similar to the shelf tilting downward but the bedded arrow shafts seem like a solution for the equivalent of sagging along the front edge of the shelf.

    Anyway, I'm just wondering about real-world experience with the bedded arrow shafts and how much difference they seem to make.
    Last edited by cttb; 06-10-2014 at 11:19 AM.

  9. #9
    Basic Member barrel-nut's Avatar
    Join Date
    Dec 2010
    Age
    53
    Posts
    1,067
    I do not own an Axis, nor have I ever attempted to reinforce any stock in the manner outlined here. Nor do I intend any disrespect to the OP or his efforts to improve his stock, nor to any of the others who have discussed or displayed their work in this thread. All of this is all good and worthy of praise.
    With that being said, I find myself continually amused by the choice of carbon arrow shafts for the purpose of stiffening the forearm. To my logic this is akin to using a fishing rod to add rigidity, as the materials are basically the same. Carbon arrows, or arrows constructed of any material, are made to flex by design. Firing a modern compound bow imparts a tremendous amount of energy into the arrow in a few millisecond's time. The arrow shaft deals with this tremendous energy dump by moving forward, and by flexing, a LOT. If you don't believe me, watch a high speed video on YouTube. Also, the arrow shaft deals with the sudden deceleration on impact by, you guessed it, flexing A LOT. These things are not rigid, folks. They may be many things, such as light weight, easily available, cheap, easy to work with. But rigid? No. Most all of them are less rigid than the stock that you are trying to reinforce.
    I'm not trying to say that your stock is not more rigid after you're done with this project. But I believe that any improvements are due to the material used to bed the arrows, not so much the arrows themselves. I see them as basically lightweight filler material in this application. And they certainly function well in this aspect- you won't find anything lighter in weight. But I think if you really are after improvements in rigidity, that other materials would probably work better. Maybe allthread steel rods? Angle iron or even aluminum angle? Even just filing in the voids in the stock with solid Devcon would be probably stiffer, although all of these options would be heavier.
    I know I may have just kicked a sacred cow in the arse here and many of you will disagree, so fire away. But I just felt like sharing my thoughts on this issue, correct or otherwise.

  10. #10
    rob.dizz.89
    Guest
    I would agree with the post above about carbon arrows being very flexible, but I have another spin on it that may provide some extra insight. It is true that a full length carbon arrow shaft ~28" will flex massively upon letting go of a bowstring (as it's meant to, so it will absorb the limb recoil and not snap the bow in half) but as you begin to shorten that carbon arrow shaft, it begins to lose some of that flexing properly that archer's absolutely need. If you've ever shot a bow with an arrow that's too short it will begin to fly erratically because it starts to lose the flex that makes it so forgiving during flight. If these guys are using carbon arrows cut to around 10-12" in length they will perform much better in terms of rigidity than an archer's arrow would.

    BUT, having said that, carbon still flexes and I would also say it isn't the ideal material to increase very much rigidity in a rifle stock. If saving weight is a number one priority, you may gain marginal benefits from Carbon, but don't expect a whole lot.

  11. #11
    Administrator J.Baker's Avatar
    Join Date
    Dec 2006
    Location
    NW Ohio
    Age
    49
    Posts
    6,468
    The whole exercise of doing this to a factory tupperware stock is still and always will be completely pointless as all that reinforcement is forward of the actual flex point - the recoil lug pocket. Combine that with the fact that is still does nothing to address the inherent flex in the wrist and you're just spinning your wheels.

    How much time did you spend on this?
    How much money do you have in the arrow shafts and bedding compound?
    How much money do you have in other supplies? (applicators, clean-up, etc)

    Why waste all that time and money on a turd when it's still going to be a turd after you're done? And don't say "practice" or "to get experience" because the only experience you're gaining is how to modify a turd into a bigger turd. Wise up folks! We've been preaching this over and over and over again for a decade now and you guys still insist on wasting your time and money. If you want to tinker and "get experience" at least start with something worth working on - be it a $50 factory hardwood stock or a $100 Boyds laminate or Bell & Carlson synthetic stock. Stop being such tight-wads and do yourselves the darn favor so when you're done you actually have something worth having and that offers some benefit.

    "Life' is tough. It's even tougher if you're stupid." ~ John Wayne
    “Under certain circumstances, 
urgent circumstances, desperate circumstances, profanity provides a relief denied even to prayer.” —Mark Twain

  12. #12
    Basic Member
    Join Date
    Jul 2009
    Posts
    1,248
    +1 on that-"Just Sayin"! ;-))

  13. #13
    Team Savage
    Join Date
    Jul 2007
    Location
    Central Kentucky
    Age
    69
    Posts
    1,223
    +1, I was sitting here thinking the same thing as I read these threads. Why waist my time and money on this tupperware p.o.s. Check out Numrich Gun Parts and find a cheap discontinued Savage hardwood or walnut stock and customize away.

  14. #14
    Basic Member
    Join Date
    Jul 2008
    Location
    Houston, TX
    Age
    45
    Posts
    81
    have not finished working on this yet, so I can't comment on the flex being gone, but the aoorws are definitely stiffer when shortened.
    I know flexing points are the lug abutment and that is why I extended the arrows below there.

    J. Baker.
    I know the tupperware stock will never a Manners or a McMillan or a laminated from Boyd's, never ever.
    I am not trying to shoot MOA at 1500yds either, just have fun tinkering and seeing what can be done.

    Quote Originally Posted by J. Baker View Post
    How much time did you spend on this?
    How much money do you have in the arrow shafts and bedding compound?
    How much money do you have in other supplies? (applicators, clean-up, etc)

    Why waste all that time and money on a turd when it's still going to be a turd after you're done?
    About 3h so far
    $0.99 arrow. Bedding compound $11. --- $20 for the pillars, which would be needed for other stocks too
    Plastic knife for mixing/applicator - Free, 2 paper towels for cleanup - free, dustpan and broom - already in household.

    Quote Originally Posted by J. Baker View Post
    Why waste all that time and money on a turd when it's still going to be a turd after you're done?
    In reality, because I want to. When my turd experience is completed, I will have more experience in not making a turd out of a better stock. :)
    No offense taken by anything that has been said, so I expect no offense to be taken from my responses.

  15. #15
    obsessionx
    Guest
    I used aluminum shaft arrows because i had them laying around( sitting in the horns on a wall mount) I used them on a youth stock for my buddy i got some quick setting epoxy from JB weld and filled them full of it before i put them in the stock... Rock solid and there is no flex at all. you can always cover up a turd and make it look pretty! And for a youth gun it worked great for me and saved my buddy a few hundred bucks for a better stock that was going to get beat to oblivion anyway.

  16. #16
    Basic Member
    Join Date
    Jun 2008
    Location
    Colorado
    Age
    73
    Posts
    272
    Quote Originally Posted by Sponxx View Post
    have not finished working on this yet, so I can't comment on the flex being gone, but the aoorws are definitely stiffer when shortened.
    I know flexing points are the lug abutment and that is why I extended the arrows below there.

    J. Baker.
    I know the tupperware stock will never a Manners or a McMillan or a laminated from Boyd's, never ever.
    I am not trying to shoot MOA at 1500yds either, just have fun tinkering and seeing what can be done.


    About 3h so far
    $0.99 arrow. Bedding compound $11. --- $20 for the pillars, which would be needed for other stocks too
    Plastic knife for mixing/applicator - Free, 2 paper towels for cleanup - free, dustpan and broom - already in household.


    In reality, because I want to. When my turd experience is completed, I will have more experience in not making a turd out of a better stock. :)
    No offense taken by anything that has been said, so I expect no offense to be taken from my responses.

    Check your pm's. I just finished something similar and picked up a couple of little tips you might find interesting.
    There are 3 kinds of people in this world. Those who can do math and those who can't

  17. #17
    Administrator J.Baker's Avatar
    Join Date
    Dec 2006
    Location
    NW Ohio
    Age
    49
    Posts
    6,468
    No worries Sponxx - I wasn't trying to berate you or your work, just pointing out something that's been known for years now so those new to Savage's and this site won't see this and think it's the 'Final Solution' for their wet noodle tupperware stock issues. The only way you're ever going to eliminate the flex the forend of the tupperware stocks is to bolt on a piece of aluminum angle to the outside of the stock that extends rearward of the recoil lug pocket which wouldn't be practical or aesthetically pleasing.

    With GOOD factory wood stocks typically being available for $50-60 in the classifieds, Boyds selling brand new laminates for a little over $100, and Bell & Carlson offering reasonably priced synthetic stocks there's no excuse - none - to waste your time, energy and money trying to "fix" the factory tupperware stocks. If someone's that cheap or they don't have the patience to save up a few bucks for a month or two to get one of the above then they probably just need to go back to an air rifle or BB gun because they're surely not going to be able to stomach the price of centerfire ammo and reloading components these days. Sorry if that comes across as harsh or rude to anybody, but some folks just need to hear it that way to get the message to finally sink in. lol

    I'm all for doing it yourself IF and WHEN it makes sense and the effort actually yields a measurable improvement, but this one has been proven time and time again to be a lost and hopeless cause.
    "Life' is tough. It's even tougher if you're stupid." ~ John Wayne
    “Under certain circumstances, 
urgent circumstances, desperate circumstances, profanity provides a relief denied even to prayer.” —Mark Twain

Similar Threads

  1. bedding/pillar bedding a boyds stock
    By blink in forum 110-Series Rifles
    Replies: 12
    Last Post: 10-01-2015, 12:17 PM
  2. Replies: 15
    Last Post: 05-27-2015, 12:04 AM
  3. Replies: 0
    Last Post: 09-15-2014, 11:28 AM
  4. pillar bedding a boyds stock.
    By obsessionx in forum 110-Series Rifles
    Replies: 0
    Last Post: 06-13-2014, 02:47 AM
  5. My second attempt at bedding
    By jglover_81 in forum 110-Series Rifles
    Replies: 11
    Last Post: 01-26-2012, 03:50 PM

Tags for this Thread

Bookmarks

Posting Permissions

  • You may not post new threads
  • You may not post replies
  • You may not post attachments
  • You may not edit your posts
  •