Page 1 of 2 12 LastLast
Results 1 to 25 of 30

Thread: Scope Leveling datum plane

  1. #1
    Sundodger
    Guest

    Scope Leveling datum plane


    I have a savage 11 223 that I am trying to use the scope leveling system included in the Wheeler Engineering scope mounting kit and I have a question.

    The bubble level you place on the rifle itself, do you put it on the rails that the bolt lugs ride on or the machined Surface above (in-between the receiver ring and receiver bridge)?

    I only ask because they are not in the same plane (off by 1/8-1/16 of a bubble width).

    My gut is to go with where the bolt lugs ride, but I figured someone else would know this for sure.


    Here is the level I am using:

    http://www.cabelas.com/product/Wheel...D0&Ntt=wheeler

    Thanks!
    Last edited by Sundodger; 06-06-2013 at 12:02 AM.

  2. #2
    stangfish
    Guest
    This kit assumes the bolt raceway is perpendicular to the vertical lines of the stock/action screws. With savage that could be an issue. I tried some of that stuff and have a bunch of little spirit levels to show for it. Now I use a square with a spirit level in it line up on the butt pad screws and a 3' foot carpenter square set level at a distance. Secure the buttstock level to the earth and the crosshair even with the carpenters level. Im sure people might think that is odd but I never had anyone tell me my scope was off.
    Last edited by stangfish; 06-05-2013 at 10:13 PM.

  3. #3
    Sundodger
    Guest
    Thank you stangfish, I had to read that a few times to get the picture clear in my head. I might have to give that a shot. To bad about these sorts of devices don't work very well, they are so nice and simple.

  4. #4
    mnhntr
    Guest
    I have the same thing and its a pain in the you know what. If your have a way to hold your rifle in a level fashion (bipod or rest) and hang a string from the ceiling you can use the string to make your verticle crosshair plum.

  5. #5
    Basic Member cheezie's Avatar
    Join Date
    Aug 2011
    Location
    Daytona Beach
    Posts
    32
    Not to be too anal, mnhntr, but since I just complimented you on another thread, I feel justified to criticize you on this one: the word is PLUMB. Have a good day!!

  6. #6
    mnhntr
    Guest
    Thanks

  7. #7
    Sundodger
    Guest
    Quote Originally Posted by mnhntr View Post
    I have the same thing and its a pain in the you know what. If your have a way to hold your rifle in a level fashion (bipod or rest) and hang a string from the ceiling you can use the string to make your verticle crosshair plum.
    I have a rest and two bipods I could use, but my question comes back full circle now. When I level the rifle on the rest so i can check the string, what plane on the gun do I use to call it level?

  8. #8
    mnhntr
    Guest
    Use the scope base

  9. #9
    sab1
    Guest
    Here is my method for mounting scopes, but in order to do it, you have to have a means of holding the rifle motionless, while allowing you to make minor position adjustments. I use a gun vise made for this purpose. This method requires the ability to sight down the barrel, from breech to muzzle, so it may not work for all rifle designs. I have used this method many times over the years, and done correctly, it will easily get you on paper at 100 yds with the first shot, with scope reticle aligned perfectly with the bore for long distance accuracy.

    1. Start by mounting your base/rings. I use an alignment pin set in order to get the rings as concentric as possible. Once aligned, I lap the rings.
    2. Place your rifle, with scope loosely mounted, into the vise.
    3. Find a clearly visible, perfectly vertical reference line in the distance. This can be a weighted rope, the edge of a plumb 2x4, or any other clearly visible vertical reference line that you can come up with. A black weighted rope hung in front of a white background is ideal.
    4. Remove your bolt so that you can sight down the barrel.
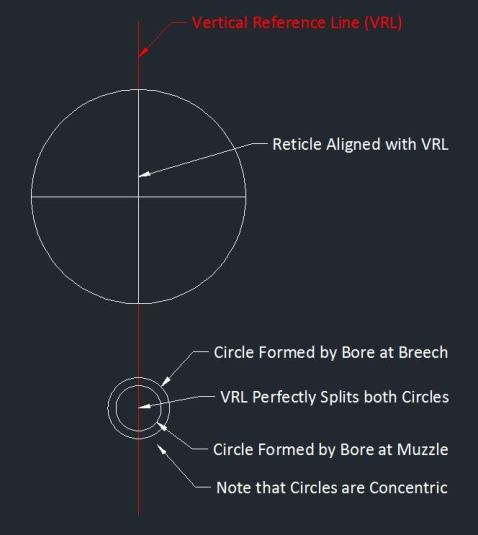
    5. This next step is complicated, and is the key to accurately mounting a scope. The idea is to adjust the rifle until the scope and the bore are centered on the vertical reference line. It's easy to get the scope lined up because you have a reticle indicating the center. The hard part is lining the bore up since there is no center indicator. The key is to have a "good eye" and remember that you need to align both the breech end and the muzzle end. Aligning just the muzzle end will not suffice. To align both, you use the concept of concentric circles. Looking into the breech, you can see a circle formed by the bore at the throat and a circle formed by the bore at the muzzle. Although these two circles are the same diameter (bore diameter), from the perspective of looking down the breech end of the barrel, the throat bore is significantly larger. You simply use your "good eye" to align these two circles concentrically, with the vertical reference line perfectly cutting the circle in half. This step takes boatloads of patience because you'll have to move back and forth between looking down the bore and looking down the scope repeatedly until everything is adjusted just right. Finally, you rotate the scope until the vertical cross hair is aligned with your vertical reference line.
    6. Carefully torque your scope ring screws, and make a final check to ensure everything is still in alignment.

    Since a picture is worth a thousand words, here you go:


    I hope y'all find this helpful!

    Best Regards,
    Scott

  10. #10
    Sundodger
    Guest
    Thank you sab1,

    1) I like your use of an alignment pin to set the bases to the action. I was really struggling with this, there was much more slop that I liked which made me frustrated the base manufacture didn’t do a tight hole/tight slot dimensional tolerance scheme. What diameter is your alignment pin(s)? Do you use them on each of the base screws or only one on back and one on the front? My only concern is the manufacturing tolerance between the datum axis’s of the front mount screw holes and the datum axis of the rear mount screw holes.

    What I did was use a touch of rubber cement between the base and rifle action, drop on my rings/bases, start the base screws in both the front and rear mounts, threaded them to snug, backed them out a bit, shook the mounts, then laid my lapping bar across the rings. Then some more shaking and pressure I got them to where it felt like the front and rear rings should be concentric, slowly and carefully removed the lapping bar but trying to make sure the rings/bases do not move. Then torqued them down and went on to lapping them.

    NOTE: I am using Talley one piece ring/base mounts.

    2) This is the gun “vice” I have, I am not sure if it will work how your procedure requires. There is no provision to lock it down. I might play with it and see what I can do though

    http://www.cabelas.com/product/MTM-S...&WTz_l=Unknown

    3) What distance do you typically use?

    4 and 5) That does make sense, thank you. Mine might struggle with it being a smaller dia bore and a stock with a comb that’s raised about ½”. When the gun is still locked down and the scope reticle is lined up with the weighted line do you move the elevation adjustment through its range of motion to make sure it the vertical reticle line stays lined up with your weighted line? It seems that would verify that plane made between the bore axis and scope axis is vertical.

  11. #11
    sab1
    Guest
    Quote Originally Posted by Sundodger View Post
    Thank you sab1,

    1) I like your use of an alignment pin to set the bases to the action. I was really struggling with this, there was much more slop that I liked which made me frustrated the base manufacture didn’t do a tight hole/tight slot dimensional tolerance scheme. What diameter is your alignment pin(s)? Do you use them on each of the base screws or only one on back and one on the front? My only concern is the manufacturing tolerance between the datum axis’s of the front mount screw holes and the datum axis of the rear mount screw holes.
    The alignment pins line up the rings to each other, not the rings or bases to the action. See the photo on this page:

    Scope Alignment Pins

    I have not found a way to ensure that the scope axis and the bore axis are coplanar, but those pins will at least ensure that your scope isn't twisted.

    Quote Originally Posted by Sundodger View Post
    2) This is the gun “vice” I have, I am not sure if it will work how your procedure requires. There is no provision to lock it down. I might play with it and see what I can do though

    http://www.cabelas.com/product/MTM-S...&WTz_l=Unknown
    I use this one:

    HySkore Sighting System and Cleaning Vise

    Quote Originally Posted by Sundodger View Post
    3) What distance do you typically use?
    I've had success with as little as 30' (in the house) to as much as 50 yds (outdoors). I don't think it matters, much, as long as the distance gives you a good "sight picture" down the bore.

    Quote Originally Posted by Sundodger View Post
    4 and 5) That does make sense, thank you. Mine might struggle with it being a smaller dia bore and a stock with a comb that’s raised about ½”.
    The smaller diameter bores aren't really an issue. You just have to experiment with your VRL's sight picture down the bore.

    Quote Originally Posted by Sundodger View Post
    When the gun is still locked down and the scope reticle is lined up with the weighted line do you move the elevation adjustment through its range of motion to make sure it the vertical reticle line stays lined up with your weighted line? It seems that would verify that plane made between the bore axis and scope axis is vertical.
    No, I don't. All that would do is verify that the scope's elevation adjustment tracks on the same plane as the retical's vertical post. It wouldn't verify that the bore axis and scope axis are vertical to each other.

    Regards,
    Scott

  12. #12
    Sundodger
    Guest
    Scott,

    Thank you I think I am tracking now. I used alignment pins like you showed to verify the scope rings were concentric, next time I will try them before.

  13. #13
    Basic Member
    Join Date
    Sep 2012
    Location
    Elizabethtown,Pa
    Age
    75
    Posts
    1,313
    Quote Originally Posted by Sundodger View Post
    Scott,

    I used alignment pins like you showed to verify the scope rings were concentric, next time I will try them before.
    Try this type. Without additional measuring the pointy thingies only show the points align.

    .

    If you look closely you'll a gap where the bars meet at the bottom . It was a result of the rear ring having a burr, about .002" on it's base tipping the rear of it up and forward.

    After correction the rings were bedded to the scope.

    That set is about 25 years old, they're one of those long forgotten old gunwreaker tools. You can read about the "re-invented" ones here....
    http://www.accurateshooter.com/gear-...lignment-tool/

    Bill
    Each morning eat a live green toad, it will be the worst thing you'll have face all day.

  14. #14
    sab1
    Guest
    Bill:

    Thanks for the link to the Kokopelli bars. Those are WAY better than the pointed ones! It's funny that you have a set from 25 years ago, and Kokopelli patented them in the mid-90s. Kinda makes Kokopelli's patent invalid!

    Regards,
    Scott

  15. #15
    Basic Member
    Join Date
    Sep 2012
    Location
    Elizabethtown,Pa
    Age
    75
    Posts
    1,313
    Quote Originally Posted by sab1 View Post
    Bill:

    Thanks for the link to the Kokopelli bars. Those are WAY better than the pointed ones! It's funny that you have a set from 25 years ago, and Kokopelli patented them in the mid-90s. Kinda makes Kokopelli's patent invalid!

    Regards,
    Scott

    Actually, that set my late uncle made probably in the late 70s, early 80's time frame. I got them when he was winding things down and closing up shop. I have no idea where he came up with the idea other than maybe a simple way to check ring alignment. I never really asked, I just used them.

    Bill
    Each morning eat a live green toad, it will be the worst thing you'll have face all day.

  16. #16
    thomae
    Guest
    Why not simply use a one piece lapping rod? Align and lap with the same tool. Or am I missing something?

  17. #17
    Basic Member glassbeaver's Avatar
    Join Date
    Jan 2012
    Posts
    45
    Lap your rings, plumb for alignment reference, and box it to make sure all is kosher... A lot of fancy stuff used here but if the scope doesn't box it's all for not.

  18. #18
    sab1
    Guest
    Quote Originally Posted by thomae View Post
    Why not simply use a one piece lapping rod? Align and lap with the same tool. Or am I missing something?
    A one piece rod is very stiff and will twist the rings without you realizing that they are being twisted. It will force the rings to be straight, but they are elastic and will be "sprung" into that position (as soon as you remove the rod, they will spring back out of alignment). That twist can be overcome by a thorough lapping, which will essentially line-bore the rings, but there are two problems with that situation. First, the amount of material you have to remove during lapping when there is a twist in the rings could be relatively massive. Second, if you ever decide to reuse those rings, and you've lapped the heck out of them, you may have rendered them unusable on another rifle.

    Quote Originally Posted by glassbeaver View Post
    Lap your rings, plumb for alignment reference, and box it to make sure all is kosher... A lot of fancy stuff used here but if the scope doesn't box it's all for not.
    glassbeaver - boxing a scope won't reveal a vertical misalignment problem very well, since vertical misalignment only comes into play at long distances, and boxing at long distances is difficult to do accurately, due to too many other influences besides vertical alignment (like wind). If you never shoot at long distances (over 500 yds), vertical misalignment is not a big deal. The only tools I use to mount a scope are a bit and torque wrench, alignment pins, and a lapping rod. Oh, and a vertical reference line. What's so fancy about that? I suspect you use everything I do except the alignment pins. Are those considered "a lot of fancy stuff?"

    Regards,
    Scott

  19. #19
    Basic Member
    Join Date
    Jul 2009
    Posts
    1,248
    This is all great information. But for my level of shooting, I mount my scopes using my "good eye" from start to finish. I set the rifle on an MTM rifle rest & "eyeball" it plumb. I set the scope on the action, step back & "eyeball" the vertical crosshair plumb with the bore. When the scope is mounted, I shoot the rifle using my "good eye" & make sure the vertical crosshair is plumb. If my "good eye" fails me, and the vertical crosshair is not plumb, the POI will be off target. Using the methods described, how does one apply the same mechanical logic to insure the vertical crosshair is plumb "when the shot is broken"? I know some people mount a "scope bubble" to attempt to plumb the rifle, but a 1/2" bubble is next to useless. When the "good eye" is used in the two most critical functions of the process, why not use it throughout the process? I don't begrudge anyone putting in whatever time & effort they wish on their hobby or passion, but at what point do I abandon my shoulder rifle and move on to a "rail gun"/ "shooting machine"? JMAO :) Good Luck-Good Shooting Jim

  20. #20
    sab1
    Guest
    Jim:

    Using your method will give you adequate accuracy for most shooting activities. I, too, did it that way for hunting and recreational shooting rifles. However, if you shoot long distances for accuracy, you'll find it inadequate. Serious long distance shooters take the time to mount a scope more accurately. Yes, a bubble level on the rifle is used, and no, it is not "next to useless." In fact, I was just doing something this morning that reinforced the fact that a bubble level can be very effective in the right hands. I'm building a shed for my 2500 gallon well water tank at the homestead, so I'm using a 4' level. It has both a digital level that reads in degrees and a bubble level. I've learned that I can detect 0.1° in the bubble, if I take my time to read it. That's hardly "next to useless."

    By the way, if a bubble level is used, it gets installed and adjusted while the scope is being adjusted (when the scope reticle and bore are both aligned with the vertical reference line). That way, everything is well-aligned.

    I offer my methods up for those who want to use them. If you don't like them, don't use them. It's as simple as that.

    Regards,
    Scott

  21. #21
    Basic Member
    Join Date
    Jul 2009
    Posts
    1,248
    Scott:
    Your use of the VRL makes more sense to me than most any other method I see out there. I appreciate knowing your system and will use various aspects of it when I can put the extra time into mounting a scope. My shooting is limited to 300yds so, as you mentioned, my
    scope installation methods only need to suite me within that limit.
    I have built houses using a good 4' level & a string line level, & "the marbles never ran to one corner of the room". The string line level
    is checked by the 4' level on a long piece of 2by framing lumber which is "eye ball" straight. This can produce good results, & we are in agreement on that. But scope bases have about a 1/2" mounting surface which really isn't even flat. And a level 1" or 2" long sitting on a surface that is not true in the first place is why scope levels are "next to useless to me". I would not attempt to build a house using a 6" level.
    For long range shooters who have a level on their scope/rifle, if you look up at your bubble and judge it to be plumb, look down at the cross hairs and your nose itches and you scratch it, look back up at the bubble .... at what point do you feel good about breaking the shot?
    I am surprised that I haven't seen a scope yet with a "level in the sight picture"?
    I have dreamed of someday owning an action that was "trued", with a machined in scope rail on it, with a barrel matched to it with perfect matching threads, and on and on with all the other stuff that goes with it. But I don't see that happening soon.
    But I have learned from this discussion and very much appreciate what has been shared :) !
    Thanks Very Much..... Good Luck & Good Shooting :) .....Jim

  22. #22
    stangfish
    Guest
    In the end is if you are able to keep the horizontal crosshairs level with the gravity of the earth and the vertical perpendicular, you have the battle won.

  23. #23
    sab1
    Guest
    Quote Originally Posted by FW Conch View Post
    Your use of the VRL makes more sense to me than most any other method I see out there.
    Thank you, Jim, but I can't take full credit. My method is a conglomeration of many that I have come across over the years. I don't think there's much "new content" in my method - it's simply taking the best parts of various methods and putting them together into a system that I've found works.

    Quote Originally Posted by FW Conch View Post
    I have built houses using a good 4' level & a string line level, & "the marbles never ran to one corner of the room". The string line level is checked by the 4' level on a long piece of 2by framing lumber which is "eye ball" straight. This can produce good results, & we are in agreement on that. But scope bases have about a 1/2" mounting surface which really isn't even flat. And a level 1" or 2" long sitting on a surface that is not true in the first place is why scope levels are "next to useless to me". I would not attempt to build a house using a 6" level.
    If you are talking about the "whiz-bang" scope leveling "kits" out there, I agree. I have purchased several over the years, and none of them work well, for the reasons you point out. On the other hand, if you are talking about a rifle-mounted scope level, mounted and trued to the VRL, I disagree. They do work, but as we agree, you have to be shooting over 500yds to see the results.

    Quote Originally Posted by FW Conch View Post
    For long range shooters who have a level on their scope/rifle, if you look up at your bubble and judge it to be plumb, look down at the cross hairs and your nose itches and you scratch it, look back up at the bubble .... at what point do you feel good about breaking the shot?
    Remember, most long range shooters are using some type of rest (one has to, in order to be accurate). The rifle is not moving around enough that a quick glance with the weak eye (without moving one's head) will cause problems. Again, this is a tried-and-true, proven-on-the-range practice. It really does work!

    Quote Originally Posted by FW Conch View Post
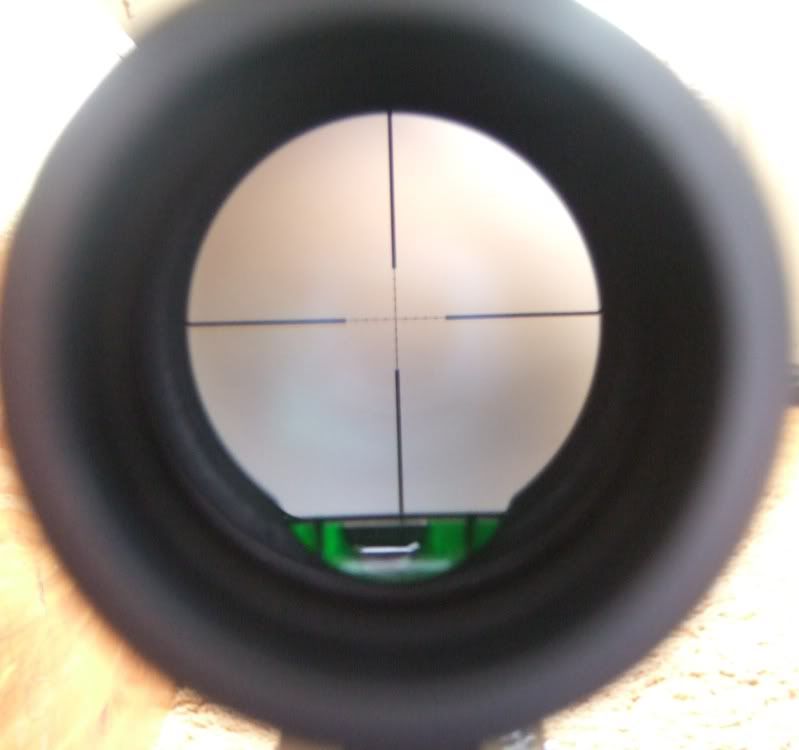
    I am surprised that I haven't seen a scope yet with a "level in the sight picture"?
    Jim, ask, and ye shall receive:


    I "borrowed" that photo from another web site, but it shows the factory-option internal bubble that U.S. Optics offers to their customers. Unfortunately, U.S. Optics products are priced very high. It would be nice to see other manufacturers offer it.

    I've enjoyed this discussion, Jim!

    Keep 'em in the X-ring,
    Scott

  24. #24
    Basic Member
    Join Date
    Jul 2009
    Posts
    1,248
    Wow ! I shouda known ? Thanks Scott :)

  25. #25
    stangfish
    Guest
    Konus has them in their M30 scopes.

Page 1 of 2 12 LastLast

Similar Threads

  1. Leveling A Scope, and How To Verify question
    By Texas10 in forum 110-Series Rifles
    Replies: 19
    Last Post: 05-29-2018, 05:18 AM
  2. Replies: 37
    Last Post: 10-07-2015, 09:35 AM
  3. New Forster Datum Dial
    By n4ue in forum Ammunition & Reloading
    Replies: 9
    Last Post: 12-08-2013, 09:13 PM
  4. Replies: 4
    Last Post: 05-25-2012, 06:21 AM
  5. Leveling Savage rifles to get scope levels correct...
    By DutchH in forum 110-Series Rifles
    Replies: 5
    Last Post: 10-21-2011, 12:55 AM

Members who have read this thread in the last 1 days: 0

There are no members to list at the moment.

Bookmarks

Posting Permissions

  • You may not post new threads
  • You may not post replies
  • You may not post attachments
  • You may not edit your posts
  •