

 Reply With Quote
Seen this yet? Might answer a few of your questions
http://savageshooters.com/index.php?...0Bedding%20101

so I decided to bed my long action 110 in 308. I got the pillar kit from the guy on ebay, and I have a bedrock bedding kit I got awhile back.
The pillars are really thick. Before I remembered I had rasps, I used drillbits, and the only ones I had larger than the pillar was pretty large, I think I made it too big. I am thinking of also putting a washer on the end of the screw so it doesn't look like a gaping hole.
The front takedown screw is pretty close to the trigger group. The front pillar had to be ground because there is a trigger group part (the lever you push forward to remove the bold) and it didn't have clearance until I ground it. I am planning to claim some bedding area in the back part of that pillar, away from the trigger group. I'll try to take a pic tommorrow and post it a pic of the screwed in pillar.
I think my savage is a differant model than the 110's I have seen bedded on the web. My trigger seems to be pressed in. There is a pin but the end you would push out is expanded, I don't think I can just push the pin out like my rugers or ar's. So I was going to leave it in, which I think I need to do anyway to make sure I have enough clearance for everything. I am planning on covering it with plenty of tape, clay, and releasing agent.
I am also planning on bedding around the barrel lug. There is some over the magazine well (I have the internal magazine) which doesn't leave much for bedding, so I was going to bed a little in front of it, about an inch all together.
The pillars are contoured so I am going to use the takedown screws to attach them to the rifle and insert it like that. I actually have to snug the front one up pretty good because an shifting of that pillar will interfere with the above mentioned part. Most of the bedding instructions say to use a 3inch bold and cut the head off. I don't understand the reasoning in cutting the head off, and from what I am seeing I need to leave mine on so the pillar will stay properly aligned to the barrel.
Is there anything in my plans I should be aware of? Anybody have any hints or tips pertaining to the 110? Or a pillar hold that could have been a tad smaller? I am familier with bedding, only from bedding my ruger 10/22's. Is leaving the trigger in going to present a problem?


Seen this yet? Might answer a few of your questions
http://savageshooters.com/index.php?...0Bedding%20101
Yes. I have it printed out. It doesn't show how close the sear is to the rear pillar. Those pics are not a 110, only that little diagram. It would be nice if I had one of the models where you can just squish the bedding material out and clean it off but it looks like i have to be more careful.
AAARRRGGGG!!!!
I decided to take the trigger out, just to see. I finally got it back together but it wasn't easy!!! The parts were easy enough and I have some punches (my glock tool worked best) but teh PIN WOULD NOT GO BACK THROUGH!! I couldn't even get it through the parts by themselves, one at a time!!
I enlarged the holes a little and it was still hard! I didnt' open them up much though. I finally got it back together and it works fine. I don't know if I want to undertake that again.
If your rifle is indeed a 110 long action and its a .308 then you have Savages first attempt at a short action cartridge rifle. There are problems with trying to do barrel swaps to long action cartridges if you plan on that, plus the mounting screw spacing is different, closer together than the standard 110. Taking apart the trigger group isnt a good idea and your safety may not work properly once you have it back together as the safety is part of the trigger group. There is an FAQ on adjusting the trigger.
El lobo
The safty worked. I notice it is picky though. I kept testing the function when I was grinding the pillar and fitting the action into the stock and noticed that sometimes the safty would only go to have safety and not full safty. It would also do it when the bolt was very snug against the rear pillar, I think it may touch the bolt a little. This will be a non-issue when it's together because there will be a washer on the end of the pillar next to the bolt head. Still a concern of mine.
I could see how it was supposed to go together, but the pin seemed to be flattened on the end (which is why I was hesitant to remove it) and would not just go back together nicely.
I am concerned about whether that front pillar is going to cause issues, esp if the bedding isn't perfect. I may just keep the trigger group in to bed, but seal it all up with tape and clay, and include the part of the pillar next to the sear in all that. There is plenty of surface on that pillar that well have epoxy on it so it shouldn't be a problem.
I'm not planning on swapping barrels, I love my .308. It's strictly a hunting rifle though, so it doesn't get that much range time. I do shoot it more than just hunting. I'm not made of ammo money, that's why I fuss with my .22's when I get that urge to fuss.
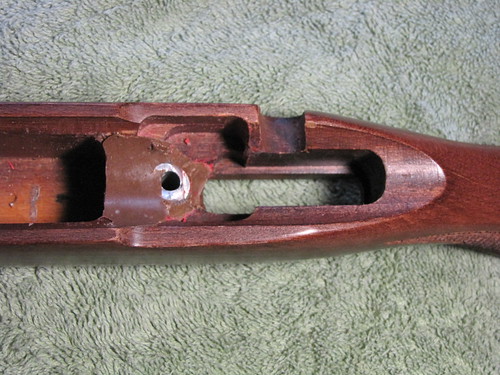
Here you can see how close the takedown bolt is to the sear. The tape is to keep the mag spring in. I am considering bedding a little in front of the pillar, it should give it good support without affecting the trigger group. I am concerned about not being diligant enough in my tape in dough. Just because a mechanical lock isn't obvious doesn't mean it's not there. I managed with my 10/22's
Here you can see the pillar next to the sear. It was a stepped pillar but I had to "step" it down some more. I actually ground it even more since I took that pic. There is plenty of clearance, provided the lug doesn't shift when I put it in the stock.
Here it is from another angle.

A notch like this will probably work a bit better, or at least give more room for error.
[img width=600 height=450]http://img.photobucket.com/albums/v284/trappst/pillarbed002.jpg[/img]
sorry for the bad angle but that notch starts at about in the middle of the pillar.....this is a set I got off fleebay. The notch isn't exactly centered though...if you look close, you can see where the hole is for the action screw. Guess middle isn't the best word....just aft (towards the trigger) of the screw hole prolly explains it better. The front was contoured but I filed it off so the bedding material would match the action instead of trying to fit the pillar to it.
Here it is ready to go into the stock
[img width=600 height=450]http://img.photobucket.com/albums/v284/trappst/pillarbed008.jpg[/img]
I have no help for you. I will say this sounds like every project I do. There always seems to be an issue. Good luck.
Originally Posted by gitarmac
LOL...its a piece of cake!
Follow my instruction. Pay close attention to the second paragraph on the reassembly. http://members.cox.net/kelley_brown/...erAssembly.htm
Bill
Wow! I wish I had that last night! I might not have gotten it together anyquicker but I would have felt ok stopping. I didn't want to forget what I was doing so I stuck through to the bitter end!!
The part that gave me the most problem was getting the pin back in. I used my glock tool as the slave pin. After a long time of failed attempts to get past the spring I decided to see how the pin fit through the individual pieces. It didn't. I had to tap it through each piece with a small hammer until it would go through better. I also polished it with my dremel. The pin looked flattened on the end even before I started, that's why I wasn't even going to bother.
It still wouldn't work with it all together. That's when I got out the drill!It sounds bad but the drillbit was the sames size as the pin. It was still a battle after that.
I would do it again if I had to but I am afraid of having to chip away too much bedding stuff, that's why I am thinking of leaving it in and blocking it. I have this stuff called "parafilm" at work, which is like stretchy waxy plastic, used to seal test tubes and stuff. I can wrap the whole shebang in that, then put releasing agent on it. The worst that would happen is it would stick to plastic. The pillar already had a step in it, it just wasn't enough. I will probably do a little more. Of course that's something that could be relieved later on if need be.
Like the other poster said, it's always something.
Well I did it. I got impatient only a few hours into the setting and popped it apart!! Actually I gently lifted it. I know that's stupid and bad but patience isn't my virtue.
But it all worked out. It's unsightly as hell on the bottom because the pillars are so thick, but nothing is binding. I could have used more under the lug but I don't think it's worth building up, it (the bedding) just doesn't go all the way up the sides. The rear of the recoil lug is bedded nicely, with room on bottom and sides. I will double check that with clay later on to be certain but I had a goodly amount of tape on the bottom. I checked it with clay before I started to get an idea of clearance.
I have to do the trigger gaurd, which I am doing right now. It wasn't flat enough under the takedown screw, it was only a matter of time until the plastic broke. I wonder if anyone makes a better trigger guard?
The safty seems to stick sometimes, but it did that before I started bedding, in or out of the action. At first I thought it was stuck but now I think it is just stiff. I'm going to keep an eye on that.
you can buy a metal trigger guard from savage for about $20-$25.00, i just replaced mine last week
I'll have to check into that. I skim bedded some of the bedded parts when I did the trigger guard, there were wrinkles from the tape and some gaps I thought shouldn't be there. It's as good as it's going to get I think, so I can stop "fixing" it now. ;D I'll post pics tommorrow.
Have you got a part number for that?
Thank!
metal trigger guard matte finish (at) 105417 $20.00 savage arms (413)568-7001
Thanks! I was trying to search for that part as well!
Here are the almost finished pics. I still have some cleaning to do, I just picked the clay off with a pic.
Here is the front part bedded. I didn't mean to include the barrel but that's where the stuff went.
Here is the part by the trigger. There was very little material there to being with. I really had to grind to make sure there was clearance. I had to grind part of the pillar next to the screw, that's why the project turned into so much bedding support.
Here is a differant angle of this area. You can understand my concern. The pillar is in there nice and tight, but the support in this area does not center the pillar. I thought about not putting the pillar in there but that's the area that needs it most.

It snugs up nice and snug and everything works. I wont' be able to see if it's worked or not till I get a new scope, so it will be a few weeks. If I had it to do over again I don't know if I would bother, I'm concerned about the rear takedown area. I am wondering though if it might not matter. There is plenty of support up front, the rear takedown screw snugs it in place.
Anyway, whats done is done. If it turns out it doesn't work, I will get a new stock. Any suggestions welcome. :) I am also wondering what to put on the bottom to protect it against the elements. I am concerned that oil will cause the resin to loosen over time. I thought maybe some spar varnish, or polyurethane.
 Members who have read this thread in the last 1 days: 0
Posting Permissions
Members who have read this thread in the last 1 days: 0
Posting Permissions


Bookmarks